Mini edible tiaras, seriously what's not to love, and with the right cutter you can whip up a stack of them and have them ready to pop onto pretty much anything to give it a bit of royal treatment.
They are really quite tiny, pretty much they just fit around my thumb. The cutter set I used (link here: Crowns Patchwork Cutters ) has a larger size tiara as well which is perfect for the top of a cake so you could make a whole princess (or prince/king) party.
Now I have made a video on how to make the tiara but as I was silly enough to start upgrading my other computer with the video on it and I think it will be another few days before I have access to it. In the meantime I have written out the instructions below.
How to make an edible tiara
You can use any cutter or hand cut the shape yourself, however I have included links to the cutter I used. If you scroll to the bottom of the post I have also included a recipe for small batch mexican paste which should make up a few dozen of these mini tiaras.
Ingredients
Mexican paste colored light orange or ivory (buy premix or see small batch recipe below)
tiara cutter (available here: Crowns Patchwork Cutters
)
crisco or similar solid but soft white fat
2 X small white rolling pin - one for rolling the other (2cm or 3/4" for setting the tiaras onto to dry)
toothpick
edible gold dust*, rose spirits and paint brush
or edible gold paint/spray
*make sure the dust or paint is edible, saying non toxic does not necessarily mean edible and many glitters and dusts sold in cake decorating stores are for decorative purposes only. The links below are edible.
Rub a little crisco onto the small tiara/crown cutter.
Using a small rolling pin roll out the mexican paste very thin (like really really thin) and press the tiara/crown cutter into the paste to cut out the shape. I like to do this on a piece of plastic wrap which is a little fiddly but I know the paste can not stick to the counter.
If necessary use the toothpick to gently remove the mexican paste shape from the cutter. Use the toothpick to remove any excess paste from the shape and the small heart at the front if desired (see the you tube tutorial for more detail).
Place onto a small rolling pin to shape the tiaras. The one I used is around 2cm or 3/4" wide or around the same size as a permanent marker tube. You can use anything that is clean and food safe you have sitting around for this.
Paint the tiaras with the edible gold paint, either by using a premixed paint or mixing edible gold luster dust with rose spirits. Don't worry they may not look very sparkly while wet.
Allow to dry. Once dry you may wish to give them an extra coat or brush a little extra gold luster dust onto the tiaras to add extra shine.
Store in an airtight container until required. You can make these weeks in advance.
Adhere to tops of macarons, marshmallows or cookies with a little royal icing.
Small batch Mexican Paste
75g pure icing sugar (2 5/8 powdered sugar)
1 tsp gum tragacanth or tylose powder
Knead together well. Store wrapped in plastic in an airtight container at room temperature. Knead again well before use. Can be colored as required.
Linda Vandermeer is a blogger, baker, maker and author of the cookbook '
Sweets on a Stick': More than 150 kid friendly recipes for cakes,
candies, cookies and pies on the go!. Published in the US the book is
available at most online book stores.
Affiliate links may earn me money and contribute to supporting this blog.
Original Ideas, photography and recipes by Linda Vandermeer do not reuse without permission.
I love linzer cookies, The delicate buttery cookie sandwiched together with preserves is such a dainty treat and as you can see they are pretty as a picture.
Love is all you need Bowl and Mug from Mollegaarden(Krasilnikoff)
Although it is usual to decorate simply with the cut out shape showing the filling and maybe a dusting of sugar, I have decided to embellish each cookie with simple dots of royal icing adding an ornate touch without overwhelming the treat.
I have also modified my recipe to use hazelnut instead of the original almond lending a warmer, nuttier taste to the cookie which perfectly pairs with the raspberry filling.
The idea for the Deer Heart cookies has been in my head since last Valentines Day, as in truth the Deer Aimee cutter from Cakes by Bien is one of my favorite cutter ever. But I did find cutting the buttery soft linzer cookie dough a little tougher than when I use my regular vanilla sugar cookie or gingerbread cookie recipe and in the end I made half a simple circle cookie with a heart cut out. I'm not saying it can't be done, but it is a little bit of work removing the dough around the neck section and I can be a little bit lazy sometimes.
As it turns out the simple heart ones were the perfect little bite size, adorable and so much fun to decorate with the little dots of royal icing.
Hazelnut Linzer Cookie Recipe makes around 24 double filled deer cookies or 40 small circle.
Deer Aimee cookie cutter from Cakes by Bien. Circle cutter approx 4cm (1 1/2")
225 g (8oz) unsalted butter room temperature
100g (3 1/2oz) or 1/2 cup sugar * I used caster (superfine) sugar
1 large egg yolk
300g (10 1/2 oz) or 2 cups plain (all purpose) flour
1/2 tsp ground cinnamon
pinch of salt
80g (2 3/4oz) hazelnut meal (ground hazelnut)
Deer Cookie cutter and small plastic heart plunger or circle cookie cutter and medium heart cutter.
Filling - 1/2 cup raspberry jam (jelly)
Decoration - Royal Icing
In the bowl of a stand mixer cream together the sugar and butter at high speed for a couple of minutes until light and creamy. Reduce the speed to medium low and mix in the egg yolk, scraping down the sides as required. Add the flour, hazelnut meal, cinnamon and salt and mix at low speed until combined.
Wrap the dough in plastic wrap and chill in the fridge for 1 to 2 hours until the mixture is firm.
Dust the workbench with flour and generously flour a rolling pin, then roll# out the dough and cut out shapes as desired.
# If you have difficulty rolling out this dough you can roll it out between sheets of baking paper.
To make the Deer Heart cookies, cut out the deer shape and then use a small heart plunger cutter to cut out a heart shape on the back of half the cookies.
To make Linzer Love cookies cut out circle shapes and use a heart fondant cutter to cut out hearts in the middle of half the cookies.
Place the cut cookie dough on baking trays covered in baking paper and chill for 1 hour.
Preheat the oven to 180 C (350 F) and bake the cookies until golden (around 12 - 15 minutes).
Allow the cookies to cool on tray.
Place the raspberry jam (jelly) in a microwave safe bowl and heat at high for 20 - 30 seconds until it starts to bubble. Stir until smooth.
To fill deer cookies place jam (jelly) in a disposable piping bag and pipe onto half of the cookies (the ones without the heart cut outs). Gently press the remaining cookies onto the top using the jam (jelly) to stick the cookie into place.
To fill the heart cookies you can just spoon the jam (jelly) onto the top of half the cookies (without the heart cut outs) and press the other cookies gently onto the top.
To pipe decoration mix up pre-mix royal icing to piping consistency and fill a piping bag with a small round tip (I used 1.5 PME).
Pipe an eye and ear onto the deer cookies and a few small dots around the back/tail area.
With the heart cookies, pipe decorative dots around the heart cut out and edge of cookies.
Optional - To pipe decorative drop swags around the edge of the cookie, press the tip to the edge of the cookie and gently apply pressure to allow a length of icing to fall/drop down, carefully pull the tip around to the point on the cookie you wish the swag to reach whilst still applying the light pressure and press the tip to the cookie so the royal icing attaches to the edge of the cookie. Continue around the cookie until you have completed a full circle. Fill in dots between the swags around the edge of the cookie and then pipe a second smaller circle of dots on the top of the cookie.
Linda Vandermeer is a blogger, baker, maker and author of the cookbook '
Sweets on a Stick': More than 150 kid friendly recipes for cakes,
candies, cookies and pies on the go!. Published in the US the book is
available at most online book stores.
Affiliate links may earn me money and contribute to supporting this blog.
Original Ideas, photography and recipes by Linda Vandermeer do not reuse without permission.
Mini Greengate bowls available Simply Sweet Home CLICK HERE
Ooops due to some technical difficulties (or maybe more accurately a spectacular baking fail) I do not have my planned recipe post this week.
Instead I'm going to share these pictures I took quite a while back using up leftover frosting, candy, sugar flowers and sprinkles to decorate some cupcakes I baked in mini bowls.
They turned out soooo pretty.
The kids had these for afternoon tea and it made the everyday into a bit of a fancy occasion.
Plus I love using those little mini bowls to bake stuff in, I use them when ever I can (um maybe to justify to Mr Sweet how many of them I have sitting around the house).
If you would like to decorate your cupcakes in a similar way, fill mini bowls (or teacups or cupcake cases) around 3/4 full then when baked and cooled top with frosting or icing (I used raspberry Italian Meringue Buttercream piped using a star tip to make lots of small stars).
Linda Vandermeer is a blogger, baker, maker and author of the cookbook ' Sweets on a Stick': More than 150 kid friendly recipes for cakes, candies, cookies and pies on the go!. Published in the US the book is available at most online book stores.
This is not a sponsored post however I am related to the owner of Simply Sweet Homes.
Original Ideas, photography and recipes by Linda Vandermeer do not reuse without permission.
Sweet's 8th birthday party this year was a pretty grey and pink dessert table with a garden theme to tie in with the main party activity which was.......gardening.
We purchased some packets of easy grow flower seed and pots that eventually break down and the kids got to fill the pots with soil and plant the seeds. The pots were just the right size to fit into cupcake boxes which made packing up and taking home both pretty and easy.
I was lucky enough to find some little trowels the week before the party for $1 each at the local supermarket which the kids took home along with their little garden boxes.
If your not trying to be as economical as me this would work as well with a few punnets of plants instead of the seeds, but I managed to get enough for 12 kids along with a few of those sunflower and tomato ready to grow pots (that I used as party prizes for other games) for under $20.
All the rest of the stuff I used to decorate the gardening table with I already had (see that pink polka dot fabric it was from Bubble's 5th birthday party I blogged about 5 years ago).
Apron and string in tin - Greengate
Garden pots, seeds - Big W discount department store
Trowels - Coles supermarket
White plant stand with blackboard - Bunnings hardware
Pink polkadot cupcake boxes and pinwheels - Choice discount variety store
Party Table
The
party table colour theme was based on the lovely grey with pink rose
and white dot fabric I used as a table covering. I picked it up because
it was so pretty intending to have dresses made for the girls, it was
from Lincraft at around $8 a meter.
I had a fake
window/mirror shutter I had from a while back I got in a closing down
sale and was part way through restoring an old wooden plate rack I
picked up on Ebay, so I added them to the table. The pink riser that the
candy jars are on is a bathroom caddy I picked up at a discount dollar
store last year and painted pink for another party.
Then
when I was out one day I spied those big moss balls and I don't know
why but I got them. For some reason I really like them, anyhoo they
added some colour to the table and a bit of texture the big one was $10
and the 2 smaller ones $5 each from Vast Interiors.
The
day before the party I picked up a stack of flowers to pop in little
pitchers and vases scattered around the table. It was a pretty relaxed
table.
Overhead are some pink hanging lanterns which don't quite make it into the photo's.
Birthday cake - Ombre butter cream decorated cake in shades of storm and pink sunset - Italian meringue butter cream with strawberry cake. The butter cream was applied with an offset spatula to evoke the feeling of an artist's pallet.
Candy - Chocolate sixlets, marshmallows and bon bons. There were also pink pig sours on top of the white plate rack and I bought out a selection of other lollies for the kids to fill up their own take home loot bags.
Homemade raspberry macarons (Click here for recipe) served in a Greengate Sophie Vintage bowl.
Cinnamon scrolls with pink cream cheese frosting- we are loving cinnamon scrolls at the moment so we prettied them up with sugar flowers, butter cream piped leaves and sugar sprinkles. What more can I say - yum (click here for a cinnamon scroll recipe)
Linda Vandermeer is a blogger, baker, maker and author of the cookbook '
Sweets on a Stick': More than 150 kid friendly recipes for cakes,
candies, cookies and pies on the go!. Published in the US the book is
available at most online book stores. Original Ideas, photography and recipes by Linda Vandermeer do not reuse without permission.
Linda Vandermeer is a blogger, baker, maker and author of the cookbook '
Sweets on a Stick': More than 150 kid friendly recipes for cakes,
candies, cookies and pies on the go!. Published in the US the book is
available at most online book stores.
Original Ideas, photography and recipes by Linda Vandermeer do not reuse without permission.
I might not have mentioned this in the past but I like butter. I like the taste, I love how it whips up to make a delicious buttercream, how it makes my pancakes turn crisp and golden when I use it in my fry pan and the way it melts into my cheesy garlic bread.
So now we've established I really (really) like butter, I have to admit I don't always use it, sometimes oil works out better. It depends on the recipe. Oil can result in a moister cake, it makes better salad dressing and works best in marinades.
Anyhoo, I noticed on the back of the new Betty Crocker cake mixes that there is an option to make them with oil and water, instead of the butter and milk. I thought it was interesting so I did a comparison using Betty Crocker Vanilla Butter Cake Mix.
I followed the easy directions on the packet exactly the same for both cakes - just replacing the butter with canola oil and the milk with water, popped the mix into 2 identical pans, greased and lined the same way and baked in the same oven.
So what happened?
Yup, definite difference right from go. The batter with butter and milk was light, thick and creamy. Instead of pouring into the pan, I dolloped it out with a spatula.
The water and oil was a more fluid mixture that poured straight into the prepared pan. It was thinner and seemed a bit bubbly, so I gave the pan a few taps on the bench to try and loosen any air bubbles. The top was completely level.
Then I popped both pans into the oven using the fan forced option at the temperature recommended on the box and baked until a skewer inserted came out dry.
Visual Test
Bit of a surprise during baking. Although the top of the butter and milk cake was not level before baking the cake rose evenly. In fact I think if I had of lined the sides it would have been even more even. I decorate a lot of my cakes and a cake with an even top is a huge plus for me, I would barely need to trim the top of this one at all. The finished cake was a pretty uniform golden colour and sprang back nicely when touched with a dry feel. Once cut the texture inside the cake was pretty even without large air bubbles.
The water and oil cake cooked in exactly the same pan and same temperature peaked in the center when baking, it would be fine for serving the the kids looking like that but I would need to trim a heap off the middle to get an even finish if I wanted to decorate it. It required a little more cooking and was a darker colour when baked all the way through (tested with a skewer). The top of the cake felt a little sticky to touch. Once cut the cakes texture looked ok but there were a few air bubbles.
* Note I used a 22cm round spring form tin instead of the recommended loaf tin as I did not have 2 loaf tins exactly the same size.
Taste Test
I cut up samples of the cake unfrosted and we commenced a blind taste test.
Ok most of my testers were not completely reliable. My 9 year old, 7 year old and 5 year old asked how they were different, said they both tasted good and asked for more. I guess that is an answer in itself.
As for me, I could not tell a huge difference on the initial tasting, but there was a mild aftertaste of oil for the cake baked with canola oil and water. I think using a different type of oil could remedy this problem.
Verdict
I preferred the cake made with butter and milk, it definitely won the visual test hands down and for me the taste was better, although I clearly stated my fondness towards butter at the start of this post which might make me a little bit biased towards the taste.
But the kids say any cake is a good cake, so if you prefer to use oil for taste, economy or whatever reason, who am I to tell you different.
Decorating the cake in shades of pink
I couldn't let all that yummy cake go to waste so I decided to decorate the cake, by trimming the tops and sides and frosting all over with vanilla ready to use frosting. I used an extra tub of Betty Crocker Creamy Deluxe Vanilla ready to spread frosting, divided it up and added a few drops of pink food colour to make 3 different shades. Then I spread the frosting on using a butter knife in stripes graduating darker towards the bottom.
A few sugar roses* on the top and in no time I had an easy sweet shabby chic cake made with 2 packets of Betty Crocker Vanilla Cake Mix, a tub of Creamy Deluxe Vanilla Frosting some pink food colour and a knife.
* Feel free to use fresh pesticide free roses in place of sugar roses.
Linda Vandermeer is a blogger, baker, maker and author of the cookbook '
Sweets on a Stick': More than 150 kid friendly recipes for cakes,
candies, cookies and pies on the go!. Published in the US the book is
available at most online book stores.
Disclosure: the ideas, words and opinions in this post are my own however
this post was sponsored by General
Mills.
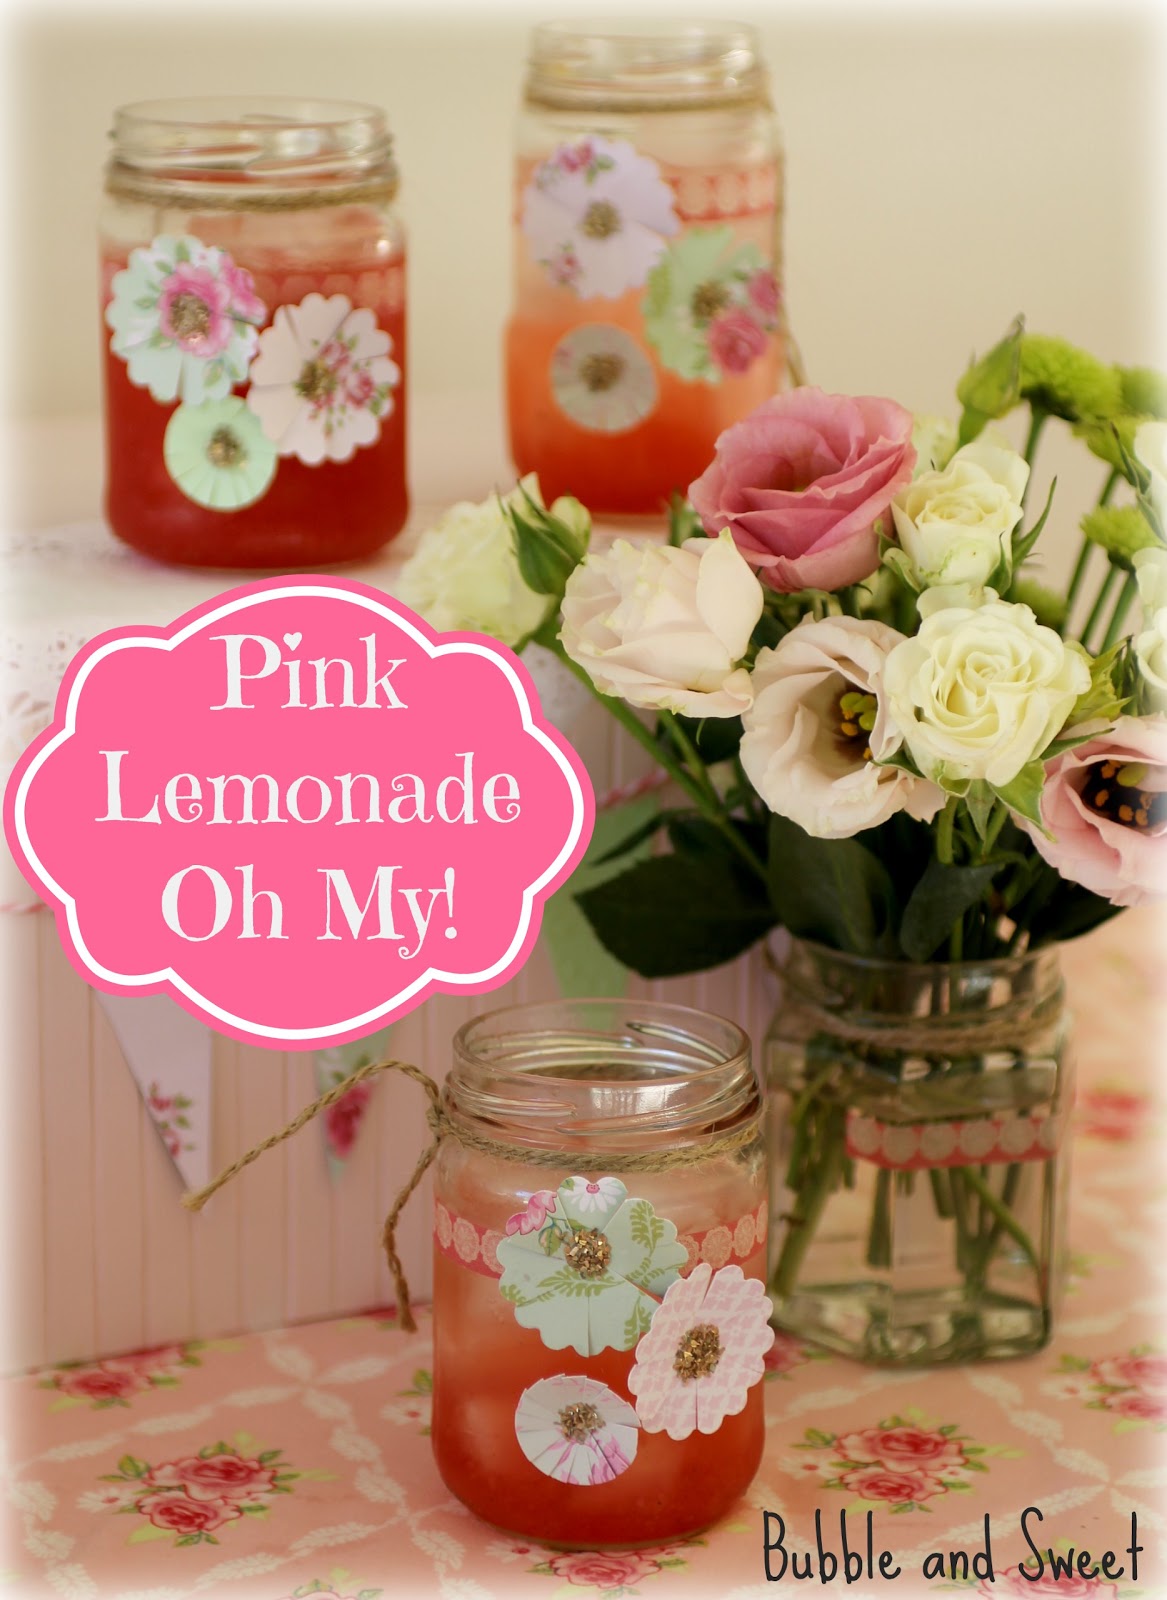
Looking for a delicious drink that will not have the kids running around like crazy because of food colours and additives.
Ok well I can't promise the sugar won't have them running around ;) But this drink is naturally coloured and flavoured plus it's super fun to make.
For YouTube instructions on how I made the paper rosette's to decorate the cupsCLICK HERE
Plus my kids made it themselves (mostly). Yup we didn't just make lemonade we made memories and had a great time doing it.
We whipped up a big batch for Lilli's birthday party and it was a bit of
a huge hit. I'm not sure if the fact we popped it into a drink
dispenser had anything to do with the fun factor but I do know there was
a constant line up of kids patiently waiting their turn until it pretty
much ran out.
The drink dispenser fun at Lilli's 9th birthday - CLICK HERE for pictures of the full party and candy table
Memories are made of Pink Lemonade recipe For US conversion use your regular cups and substitute quarts for litres for a similar result. This makes up a huge batch of over 5 litres (about 5.5 quarts). If you like you can substitute around half the water for store bought lemonade (US - that means clear soda like sprite). If you add store bought product it is probable that the drink will then have additives.
2 cups sugar
2 cups water
2 cups lemon juice
1 1/2 cups strained rasbperries (we strained frozen as it's way more economical that way here)
4 Litres (4 quarts) cold water (or to taste)
Optional - Ice, sliced lemon and raspberry to serve
Heat the sugar and water over low heat until the sugar is dissolved and cool to room temperature.
Mix in the lemon juice and raspberry juice and pop in the fridge until cold. Can be stored in the fridge for 2 days in an airtight container.
When ready to serve add the cold water (or lemonade/ clear soda).
* Recipe can be halved. The juice/ sugar syrup mixture can be frozen prior
to adding the water in ice cube trays and stored in airtight ziplock
bags in the freezer and then defrosted in fridge when ready to use.
Lilli's 9th birthday party was a pretty pink and green party. For more pictures and details on how I stuck to a budget and still managed to make it look good check out my post CLICK HERE:
We also had cupcake decorating as the party activity CLICK HERE for how to host a cupcake decorating paryt details:
Linda Vandermeer is a blogger, baker, maker and author of the cookbook '
Sweets on a Stick': More than 150 kid friendly recipes for cakes,
candies, cookies and pies on the go!. Published in the US the book is
available at most online book stores:
Lilli's pretty pink and mint green ruffle rosette party table.
Sometimes I see awesome catchy titles like 'best budgeting tips ever, see how this person paid off their house in 3 years' and I have to click over. I'm always disappointed. One of the top tips is inevitably to stop buying coffee. I'm not sure they fully understand my goal is to magically save money so I can constantly do the types of frivolous things the post is advising against.
Which brings me to today's post, this year instead of trying to top all the previous year's party and be even more over the top I went the other way and did the party on a budget (disclaimer I acknowledge in advance sometimes my understanding of budget may not be the same as yours, or more relevantly Mr Sweet's, but there are some real and sensible cost saving tips scattered in the post).
And it still looked good. I pretty much decorated this party with 5 pieces of scrapbook paper, a few pieces of ribbon and twine and a piece of material I had left over from something else.
Ok I admit - there is lots of other stuff on the table but I already had those things and this is my magical budgeting fantasy. It's the story I told Mr Sweet and I'm sticking to it.
Of course I made all the cakes and treats myself as well, plus I was also the entertainment as the party was a cupcake decorating party. Oh my goodness it sounds like I'm a super mum, but we all know that is far from true, y'all have seen my most embarrassing ever messy creative space before shots.
Anyhoo as well as doing all the stuff for the party I managed to whip up a couple of you tube video's to show how I made the decorations. Most of it is pretty easy stuff, but feel free to click through and check me out crafting to save money because it's too much fun not to ;) umm craft that is not watch me on youtube....
See me make DIY Easy cheap Paper Bunting you tube video:
Super cute rag ribbon bunting cake topper tutorial:
Make your own Paper rosette's:
Decorating the party table on a Budget
My brief to myself for this party was to use what I already had, thus the pink and green colour scheme, as I seems to already have a lot of stuff in those colours sitting around.
Drinking Jars - I used recycled jars that my friend gave me after one of her parties, which makes them re-recycled. Cute huh! They are decorated with some washi tape I had sitting around and the paper rosette's (see the you tube tutorial link) that I pretty much stuck on everything.
Straw flags - I already had these pink and white polkadot straws left over from a previous party, I added a little bit of green and pink shabby chic floral washi tape from Greengate to the tops and popped them in another tall re-recycled jar decorated the same as the drinking jars.
Bunting - I had been thinking of doing a pretty rag ribbon bunting behind the table but then I would have had to buy fabric - and I was budgeting remember. So I made this paper bunting myself from Tilda and Martha Stewart scrapbook paper I already had sitting around, it was easy, it was cheap, it was really fast to make and it gave the effect I was looking for. It used 3 pieces of scrapbook paper and I saved the offcuts for mini bunting and rosette's. I stuck it to the wall over a piece of ribbon using double sided tape.I did a quick video tutorial on how I made it/
Risers - (these are to give height to the table mostly for visual purposes) this is a bathroom storage box from the dollar store, it was about $9. I painted it pink (with paint I already had sitting around), and then added Tilda scrapbooking paper offcuts saved from the wall bunting above. I used double sided tape to stick on some pink and white twine, added the mini bunting using more double sided tape and finished off with a couple of those paper rosette's. Then in a complete turn around from the famous style tip to finish something and take one thing away - I added a paper doily, adhering it with a little double sided tape. When your decorating with me - 'More is more'.
Tablecloth - this was a piece of Tilda fabric off cut left over from other decorating in my house, it has big chunks cut out the back - but you can't see behind the table so I didn't care - remember I'm on a budget. I cut another strip off (behind the table) to use on the cake bunting. If your fancy you could no doubt finish off the edges with some pretty trim, I'm not that fancy and I always try to avoid sewing. Seriously there was a drink dispenser and candy/ lollies, like the kids were checking out if my tablecloth was finished.
Rag fabric bunting cake topper - Using more of the pink and white twine I tied strips of the tablecloth fabric and a little bit of excess lace trimmed from the bottom of the lace I used on the cake. Note - ok you guys are thinking at this stage I am going overboard using little scraps of left over lace, but there is a method to this madness. By using the little offcuts I am ensuring consistency, it simply matches better. (Link to you tube tutorial)
Hanging lamp frames - Hmmm what can I say, I saw a picture of a naked lamp HERE that I loved and PINNED it inspired these lamps. But remember I was on a budget, I tried checking out some of the second hand stores to find lamps to use but when I had no luck I took my old bedside lamp that I hadn't used for years and made what you see in the picture above. I loved the look but needed another......and I stole Mr Sweet's which unfortunately he still uses. I've been wanting to get overhead wall lamps for a while now so I guess it will be happening soon, and he wasn't upset at all, well not too upset ;)
Pink floral 2 tiered stands - I already had one of these that I had picked up a while back at the dollar store for around $14. When I went back there was only 1 left and it was wonky, they sold it to me for $11 and I bent it back into shape. I was using the other one to hand sugar flowers off each layer to dry so it is totally multi functional and worth it - *double bargin *.
Drink dispenser - I already had the drink dispenser, although it did take me many hours to find it, you may wonder how something that large can get lost, and I would agree with you. Anyhoo I decorated it with paper rosette's to continue my theme. See reverse styling note above, when in doubt add an extra paper doily - it works for me.
Cake Plates and Jars - I already had all of these sitting around. Beg, borrow or failing that hire some. Discount stores also have these types of things available for quite reasonable prices at the moment, but remember you will have to store them afterwards.
Party Food
Pink Lemonade - The kids made up the pink lemonade the day before the party, they thought it was awesome fun of course, were super proud of themselves and I only had to help out a little. It was win win. Plus there is no artificial colour in this baby - it's hand strained (frozen) raspberry :) Note according to the kids - drink dispensers rock. It was the biggest hit of the party after the cupcake decorating.
Ruffle Rosette Cake - The cake was pink and green layers with piped buttercream. Raspberry layer cake and a new pineapple flavour I was trying out - verdict. We won't be trying out that pineapple cake again, but the raspberry layer was delicious. The buttercream was Italian Meringue Buttercream flavoured with real raspberry so once again no food colour. I'm hoping to share how I made this one on the blog soon. Continuing on with my rosette theme I popped a few fondant rosette's all over the cake. The bottom layer was fake styrofoam covered in fondant - we really didn't need that much cake but I liked the extra height.
Macarons - green french almond macaron shells with raspberry white chocolate ganache to tie in with the colour theme.
Cake Pops - White candy chocolate dipped decorated with fondant rosettes in pink and green.
Decorated Cookies - Ruffled buttercream with fondant rosette, still carrying through that rosette theme. And fondant and royal icing decorated sugar cookies.
Candy / Lolly Green apple bon bons, white milk bottle and 'teeth' mix and pink/white swirl marshmallow.
We also had pass the parcel as that is the party girl's favorite party game. The prizes were mostly baking related ie. fondant plungers and cookie cutter sets.
Party favor's consisted of a pink and white bag from the discount store ($2 pack of 10) filled with some cupcake decorating treats like pretty cupcake cases, sugar pearls and a fondant flower or butterfly plunger plus a box of Betty Crocker vanilla cupcake mix.
Where to get stuff or make your own
How to make a paper bunting How to make rag ribbon cake topper How to make paper rosette's
Apple Bon Bon's - The Professor'
Other candy - Big W discount department store
Photography by Terri Vandermeer any especially blurry shot's might be by me :)
Fabric for Tablecloth and rag ribbon bunting - Tilda Rosalie Pink
Scrap paper - Tilda I picked mine up at Sewco in Brisbane
All cakes, cookies and macarons - Bubble and Sweet How to Host a Cupcake Party Blog
Cupcakes at cupcake party and packet mix used for party favours - Betty Crocker
Cake stand's, plates and drink dispenser's bought minimum of one year ago so stockist details are probably out of date sorry. The Cake Stand is Clara French, the Drink dispenser was from Sharnel Dollar Designs (no longer sells to public now party styling services and commercial styling), the white flat plates from Freedom Furniture, the
Linda Vandermeer is a blogger, baker, maker and author of the cookbook ' Sweets on a Stick': More than 150 kid friendly recipes for cakes, candies, cookies and pies on the go!. Published in the US the book is available at most online book stores:
This post is not sponsored. Affiliate links may result in earnings, however will not cost you any more :)