My cute as can be nephew has just turned one and when his mother asked if I could help out by making a cake I took the opportunity to put together this fun little inexpensive birthday party.
DJ's mum sent me a picture of a red robot that a friend had created for his birth as inspiration and the cookies, cake and cake pops are all based on that design.
Instead of a regular bright primary background I decided to theme the cake and cookies with a nod towards steampunk. The cake is a shimmery battered looking copper with steel and copper cog accents made from fondant.
Anyhoo you might have noticed that the table is a bit low key and that's because I put it together on a budget. 'Cause it's lots of fun to have a big party with all the trimmings, but sometimes fast and inexpensive is the way to go.
Of course as I made all the treats myself I have a little head start on everyone, but I think you could make this party look just as good with a buttercream frosted cake with a couple of plastic robots on top (plus you can play with them afterwards), your favorite store bought cookies or biscuits and just regular round cake pops.
Red Robot Party Suppliers and Sources
The table cloth is actually a roll of red polka dot wrapping paper from the local discount/ dollar store.
The candy jars are MOGDEN Jar from Ikea - they are $6.99 (AUD) from the bathroom section. One of the things I like about them (apart from the price) is that they are not overly large so you don't need to go overboard on the sweets. I only needed to use 1 regular bag per jar, normally I need to open around 3 bags to fill a candy jar.
The red and white 'stands' are once again from Ikea - they are candle holders and I just placed the jar on top. You could adhere the jar securely to the stand, however I find for the younger kids it's a good idea to be able to take them off and put the jar at the front of the table so they can easily reach in.
I picked up the robot stickers that are decorating the stands and pail from the local discount/ dollar store for $2 a packet. You could also pop the stickers onto loot bags to tie in your theme if you like.
The red pail the pops are in is from the local discount/ dollar store for a couple of dollars - this one was actually recycled from my daughter's Wizard of Oz party.
For the background decoration you can find similar hanging paper fans from The Little Big Company I had mine sitting around from another party that I recycled. These fans are good for recycling as they fold down flat easily for storage.
The blue round mini 'plates' are actually some coasters.....once again from Ikea.
and the little stand up robot's are very inexpensive DIY ones that come in box of 20 from a toy shop.
and remember my book sweets on a stick has lots of fun inexpensive and easy to make ideas for birthday parties for boys and girls. You can pick it up online here:
Did you know it's National Pear Month in Australia. Yup it's happening all around you right now and I bet quite a few of you might have even been participating and supporting local growers by eating a delicious juicy pear. There are also all kinds of exciting pear relating goings on around, including your chance to win for dinner for 2 HERE and lots of other foodie events around the country. You can find out more at rediscover the pear HERE.
We don't actually need to rediscover the pear in this household, despite all the cake and cookies I bake we are big fruit eaters here, and yummy Australian pears are always in the fruit bowl during their season.
OK - these green dot ones look good but that is way too much frosting -
trust me don't do that, make your swirl smaller like the other pics.
In celebration of the pear, I came up with this light and delicious spiced pear cupcake topped with a swirl of creamy caramel cream cheese icing.
The light and fragrant cupcake was reminiscent of a tea cake and matched the decadent icing well.
But if your looking for something less creamy they were also lovely without any icing, or dipped in butter and cinnamon sugar.
Those cinnamon sugar ones were really good warm so these are the only photo's I got :)
Spiced Pear Cupcake (makes 20 - 24 cupcakes) store in an airtight container for up to 3 days
Note that this recipe calls for Extra Large eggs in place of large eggs, just because that is what I mostly have in my fridge. I use organic eggs when possible and always free range.
1 large pear cut into very small pieces (yield around 1 3/4 cup) I used Sweet William variety
1 tsp cinnamon
1 tsp all spice
1 1/2 cups self raising flour
1/2 cup caster sugar
4 Extra Large Eggs
250 (8 3/4 oz)grams unsalted butter softened.
Preheat the oven to 180 C (350 F). Line 2 muffin trays with paper cases.
In a medium bowl mix together the pear, cinnamon and all spice.
Sift the flour and sugar into a large bowl and make a well in the center, add the Eggs and softened butter and mix well at low speed using an electric mixer until just combined. Scrap down the sides. Increase the mixer speed to medium high and mix for 2 minutes.
Using a spatula fold the spiced pear mixture into the cupcake batter. Spoon batter into prepared tins filling the paper cases 3/4 full.
Bake for 15 minutes or until a toothpick inserted in the center comes out clean. Remove from oven and allow to cool for 5 minutes before turning out on a wire rack to cool.
Caramel Cream Cheese Frosting
200g (7oz) Cream Cheese at room temperature
100g (3 1/2 oz) Unsalted Butter at room temperature
3 cups sifted icing sugar
1/4 cup caramel (like top and fill) or make your own dulce de leche following the instructions HERE
Place the cream cheese and unsalted butter in a large bowl and mix until combined. Add the icing sugar one cup at a time and mix at medium low speed until incorporated, increase speed to high and mix for 2 minutes until light and fluffy. Add the caramel and mix until well combined. If you are spreading the cream cheese onto the cakes you can use straight away if you would like to pipe place in fridge until the mixture becomes firm.
Alternate Cinnamon Sugar Topping
Melt 125g (3.5 oz) unsalted butter in a bowl. In a separate shallow bowl mix together 3/4 cup sugar, 1/4 cup brown sugar and 2 Tbsp (2 Tbsp 2 tsp US)ground cinnamon. Dip the tops of the cupcakes in the melted butter and then into the sugar mixture.
I also made up some simple chick cookies in rainbow colors. The cookies are all about the cute cutter which I picked up at Ecrandal.
I found a pretty Easter printable range at The TomKat Studio which was in soft pastel colors that worked in well.
The Candy are actually Yogurt Gummy type lolli's. I know it sounds totally weird but they actually taste nice. They are 99% fat free, 50% fruit juice with yogurt powder and milk solids - Oh my goodness it's nearly like a health food (saying that mockingly). But I was really pleased I found them as they are a super pretty pastel color and they were so reasonably priced. They came in a huge packet which also had orange and white and I just popped on some gloves and separated them. They are made by vitabite and also come in frog and snake versions. In the US I found some on a site called Yogurt Gums that looked the same.
I filled pretty mini baskets I picked up last year from Sharnel Dollar Designs with jelly bean eggs and chocolate eggs and decorated the baskets with The TomKat Studio printables and a ribbon as thank you gifts.
and I popped some on hand made card rosettes and some on hand dyed pink paper doilies.
To hand dye doilies pop on some gloves, mix up some food color in water in a shallow bowl. Hold on to the edge of the doily on the right side, dip the left half and then hold on the other side and dip the right side. Place on Viva or paper towels until dry and then iron inbetween a couple of paper towels.
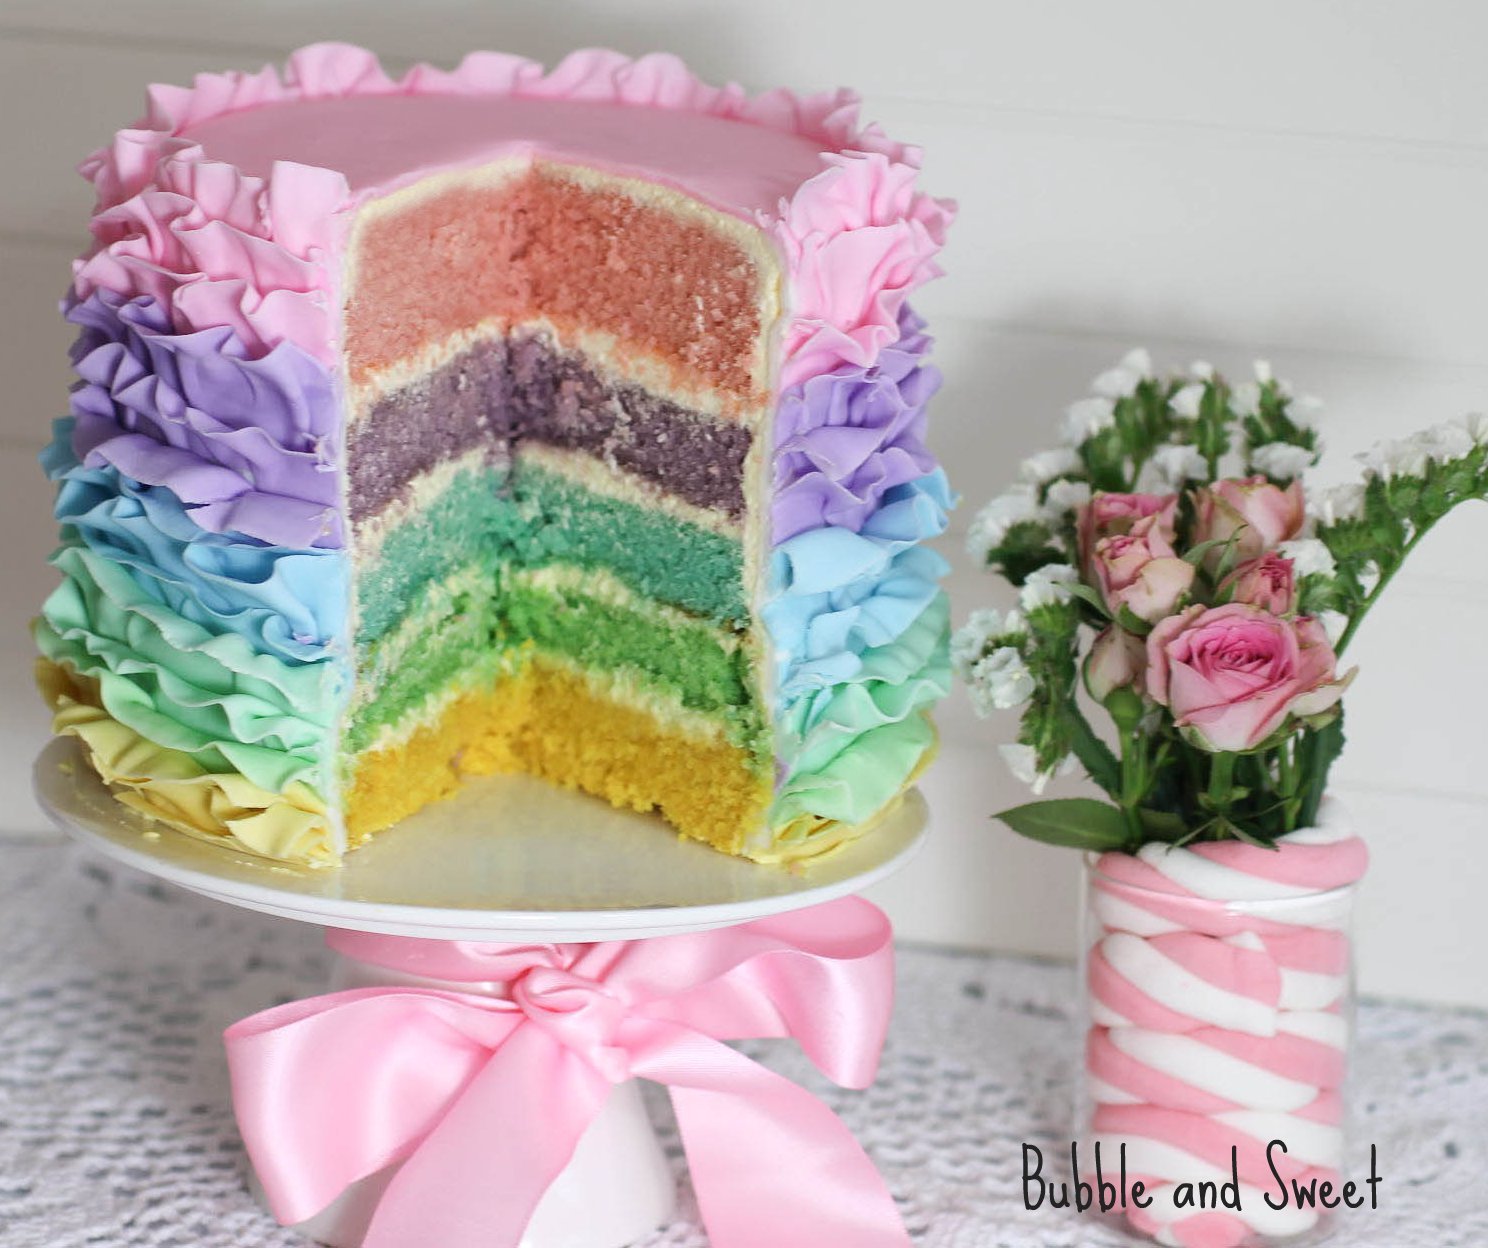
Wow, the pictures of that Pastel Rainbow Ruffle Cake that I posted last week were pretty popular. I had something else planned for today's post but I have pushed it back to show how I made the cake seeings as y'all asked so nicely.
Now some of you are going to be disappointed as although the cake was frosted and filled with delicious Buttercream frosting, the actual ruffles are fondant.
I know some of you do not like fondant at all.
Me - I don't mind a bit of it and I kinda like it on cookies, I use Bakels brand which tastes quite nice, before I started using Bakels I was with the not a fondant fan club as well, so I get where some of you are coming from. Some of the fondant brands taste really awful.
If you really hate fondant and you are not so great with piping, check out my post on this pink rainbow ombre cake for Real People HERE. You could cover your rainbow cake in this way following the instructions for the buttercream layers and using pretty pastel colors instead of all pink for a totally achievable rainbow cake. It is way easier to make and you don't need a lot of equipment.
For the rest of you the steps I followed to make the cake follow and as always ....this is just the way I did it, if you are a decorator and you have a different way of doing any of the steps that is fine, you can follow your regular steps.
Pastel Rainbow Ruffle Cake instructions
To make this cake you will need 5 cakes in rainbow colors
Buttercream (or ganache)
Fondant*
Pink, purple, blue, green and yellow gel food color (I used Wilton, although for the purple fondant I used Americolor)
Large rolling pin
cornflour (corn starch)
Small Rolling Pin
Large knife for trimming the cake
Small sharp knife
Cake smoothers X 2
Frilling tool - if you do not have a frilling tool a toothpick can be used for a similar result
Not stick flower molding mat
Small brush and water
*Fondant dries out really quickly - keep it in an airtight container or ziplock bag in between use and work really quickly.
Make the cakes.....The recipe I used to make the cakes is the Quick and Easy Vanilla Cake from page 9 of my book Sweets on a Stick. I mixed up a couple of batches, divided it into 5 and colored each batch using Wilton gel food colors. You only need a small amount of these gel colors for the cake to be a pretty vibrant pastel color. Start with 1/4 tsp and add more if your cake batter batch is large until you have your desired color.
Make sure you grease, flour and line the tins to make removing the cake easier. I only had 2 tins the size I wanted so I cooked a couple of cakes wiped the baking pans clean, regreased and floured, lined and popped the new batch of cake batter in.
Pop the baked cakes onto a wire rack to cool.
I trimmed the top and bottom off each layer to make the cake flat and remove the thin brownish crust. If your not taking photo's I would only worry about trimming the top to make each layer even. I started with yellow as the base. I took a cake board and popped a little of the buttercream in the center to secure the cake and then I stacked the cakes up with Italian Meringue Butter cream in between each layer.
In between each layer I popped the cake into the fridge to chill to make sure the whole thing didn't slide off the plate.
The Italian Meringue Buttercream recipe I used was from the Whimsical Bakehouse cookbook.
Once the final layer was in place and chilled I spread buttercream around the edges and made the cake as smooth as possible. Well as smooth as possible without going overboard remember there will be lots of ruffles covering this cake. Chill the cake again until the buttercream is firm.
At this stage I got a piece of paper and marked on it where each layer ended/started.
Now you need to cover the cake with the fondant underlayer for the ruffles to stick on - I just used plain white for around the side. Measure around the cake with a piece of string to work out how long your fondant will need to be and then measure the height.
You will need to roll out a piece of fondant that you can cut into a rectangle the size that you have measured.
Roll out the fondant on a workbench dusted with a little cornflour, turn and lift the fondant often to make sure it does not stick and try and roll out in a rectangular (ish) shape.
Once the fondant is big enough trim along the top to get a straight line. Take the cake out of the fridge and lay it sideways onto the fondant so that you can wrap the fondant around the cake. Where the fondant joins at the back you can wrap one layer over the other and then using a sharp knife cut down in a straight line. Lift up the fondant and remove any excess underneath and smooth the cut line together with your finger. Don't get too uptight about it, it's all going to be covered with ruffles.
Pop the cake upright and use the sharp knife to trim off the fondant from around the bottom of the cake, and use fondant smoothers to make sure that the cake is smooth.
Color some of the fondant pink and roll out until very thin and using the cake tin that you used to bake the cakes in press down to cut out a round the approximate size of the cake. Place it on top of the cake and use the fondant smoothers to make the top as smooth as you can. I used the smoothers in a kinda T shape around the top edges to make a moderately sharpe edge.
Take that piece of paper from before where you marked the colors and using a knife make a little indent so you will know where each color ends/starts.
Now time to start making the ruffles.
Color your fondant by kneading a small amount of the gel food color into the fondant. You should not need a large amount of colored fondant for each color, about the size of your fist should do if you are making a smallish cake, obviously more if you are making a large cake.**Remember fondant dries our really quickly so keep it in an airtight container or zip lock bag while you are not using it.
To Make the fondant ruffles dust the workbench with cornflour (cornstarch), take a piece of fondant about 1 1/2 tsp and shape it into a rectangle, using the small rolling pink roll in out into a long strip. As you roll you may need to press the sides in carefully with the sides/heels of you hands to stop it from getting too wide. (or if you find that is not working you can always use a sharp knife to trim it back to size) Keep rolling until the strip is quite thin. I like to pick the strip up after each roll to ensure it is not sticking to the bench and when necessary dust underneath again.
When you have rolled out as thing as you can on the workbench, pick up the strip of fondant and place onto a nonstick foam (the type you use for making fondant flowers) and using the middle section of the frilling tool roll back and forth (like using a rolling pin) to make the strip even thinner, you will probably get it to double in length.
Then use the pointed edge of the frilling tool rolling back and forth along one edge of the strip a little more to make it a little ruffly.
Attach this strip of fondant to your cake starting at the top. Brush on a very small amount of water to the cake along the top and press the fondant strip onto the cake. I tried to gather the strip to make it appear more ruffly (see picture). When you have finished attaching one strip make another and attach it to the cake starting where the last strip finished. Go back and press the lumpy bottoms of the ruffles down as you finish attaching each strip.
Continue making pink strips of fondant and attaching them to the cake cone working your way down the cake until you reach the indent that indicated you should start with the next color and follow the instructions this time making violet ruffles. Follow this process for all the remaining colors until the cake is completely covered with ruffles.
As you work your way down, some of the ruffles may fall down and look floppy, I usually brush a tiny amount of water around the middle section and press the ruffle up so it is upright, but this look is not about perfection so some floppy areas will work just fine.
At the very bottom I rolled out a strip of yellow around 1/3 the width of the regular strips and without ruffling it adhered it around the bottom to cover any of the uneven ruffle bottoms.
Phew all done, now you can relax and have a piece of cake: )
Linda Vandermeer is a blogger, baker, maker and author of the cookbook ' Sweets on a Stick': More than 150 kid friendly recipes for cakes, candies, cookies and pies on the go! Published in the US the book is available at most online book stores:
Just a quick sneak peek of the pastel rainbow ruffle cake I made up for an Easter Dessert Party table.
I'll do up a tutorial for it in the next week or so, but I couldn't wait to share a couple of photo's with you.
.
Rainbow ruffles :)
The actual cake is the easy one bowl Vanilla recipe from my book Sweets on a Stick. It's really super dooper easy, you just pop all the ingredients into the bowl at once and mix it for a couple of minutes. It's in the cake pop section, but as you can see it's just as good not crumbled up on a stick ;)
UPDATE - I have now popped up instructions on how I made the cakeHERE
Sweets on a Stick is available at most online stores including.....
Ok I'll admit it, I have been making a lot of bird themed stuff lately.
I'm blaming the bird baby shower I made stuff for late last year. 'Cause while I was thinking up stuff to make I came up with lots of other ideas. Like when I made up the speckled 'bird egg' macarons I thought, hmmmm......they sure would make pretty cake pops.
And then once I've thought that it's not like I could stop thinking it. It's like a done deal.
Also I blame the birds, or rather the graphic designers who make birds look so cute. In real life birds aren't really that cute. Well around here anyway, they are pretty swoopy in the spring time. specially when they are nesting, more kinda the Alfred Hitchcock type deal.
But in my mind they are protecting cute little chicks that will grow up to be whimsically pretty with rosy cheeks so I can forgive them all the swooping and still pretend they are adorable.
And this is what their eggs will look like :)
I used blue Wilton Candy melts to make these delicate looking speckled eggs, but you could use any color you like including plain white chocolate, which would give a lovely creamy colored egg.
I mixed Blue and White candy melts together to get a more subtle light blue color for my eggs, and y'all might think, well why didn't you just color your own chocolate.
So I thought I might share my reasoning with you:
Regular food color can not be used on chocolate - Water is chocolate's nemesis and most regular food color is water based, even those gel colors. You need to buy special oil based food colors or get a special product (like AmeriColor™ Flo-Coat™) which somehow magically allows you to mix in the regular color.
I prefer to use the candy coating for cake pops for a couple of reasons - it sets way quicker than regular chocolate. Also once set it doesn't leave fingerprints as easily as regular chocolate.
I actually like the taste of the Candy melts/ coating when paired with the cake truffle. It's not really chocolate and from the name you can tell it's not pretending to be. It has a kind of vanilla flavor which is really sweet and I feel lends the finished treat a bit of a lighter taste.
Plus that's what I had in my pantry (probably for the reasons listed above).
and in case you missed my earlier post. I noticed Fishpond having a 24 pre-order sale on Peggy Porschen's new book boutique bakery, for $21.97 including free postage in Australia - nice!
1 batch Oreo Cookie Truffle or Cake pop mixture#
Blue candy melts
White candy melts
Chocolate
Copha or Paramount crystals
Toothpicks
Clean brush/ toothbrush
# cake pop mixture is cake crumbled up with buttercream or other frosting mixed in until it is moist enough to hold it's shape.
Line a tray with parchment paper. Take around 3 teaspoons of the cake pop mixture and roll it between your palms to make a smooth ball, then using your fingers and palms turn the ball into an egg/oval shape. I find that shaping the mixture into the ball first makes it easier to get a smooth finish.
Place the egg shaped truffles on the tray in fridge to chill until firm
Melt the chocolate. To get the color I desired I mixed the Wilton Blue Candy Melts and Wilton White Candy Melts at a ratio of 2 parts white chocolate to each 1 part chocolate (eg 400g Blue to 200g White or 14 oz Blue to 7 oz white). Mix in quite a bit of copha or paramount crystals during the melting process until the mixture is very fluid (but not so much that it is watery). The mixture should be like condensed milk.
This is NOT how the finished melted blue/white candy melt mixture should look - this is just showing how I mixed a couple of colors together. It should be a consistent color and much more fluid than this bowl.
I melt my chocolate in the microwave on medium low, medium is too hot and high is way too hot. If you heat your chocolate at too high a temperature it will burn and not be salvageable for dipping .Remember medium/low for short bursts of 60 to 90 seconds.
Grab a bunch of toothpicks. Holding one end of the stick dip the other end into the melted chocolate/candy coating and insert it into a egg shape so the stick is sitting in the larger rounded bottom side of the egg (see picture) and the stick is parallel to the tray. Repeat for remaining eggs.
Place the tray back into the fridge to chill for 10 minutes or until the sticks are secure.
Make sure the chocolate/candy coating is still melted, if needed remelt in the microwave at medium low. Holding the end of the stick dip the whole egg truffle into the melted chocolate/candy coating. Lift it up and allow as much of the candy/chocolate mixture to fall off as possible. Place upright in a stryofoam block to set.
Once set you can lay the cloud pops back down on a tray to work on. Holding the toothpick securely twist and pull the toothpick out and repeat for all the eggs.
Make sure you still have some of the melted chocolate. For this step I like the chocolate to be nearly set, but not quite.Make sure your hands are really clean (I know you would be doing that anyway) or pop on gloves and stick your finger into the melted chocolate. Then press the chocolate into the hole left by the toothpick and smooth it around with the tip of you finger.
Next melt up very small amount of the dark chocolate you can add a little copha or paramount crystal if you like.
Place one of the eggs away from the others on a clean workbench (like your kitchen bench). Dip your brush in the chocolate and then holding the brush by one hand, run your fingers through the bristles sot that the chocolate splatters onto the egg.
Yup just like you used to do when you were a kid.
I like to hold the brush down just under the larger rounded bottom side so that the flicks of chocolate are larger down there and graduate up to less at the top of the egg, but that's just my preference.
Repeat for remaining eggs.
Eggs can be stored in an airtight container in the fridge for 3 days.
If you enjoy cake pops, my book Sweets on a Stick has lots of recipes for making cake pops from scratch and more fun ideas is a US Release however there is a conversion chart in the back of the book for metric.It's available from bookstores in the US and here online at:


