

Happy Mother's day to all the mothers out there today.
I've had a great day and I'll be finishing it off with a piece of this ruffley creamy cake tonight.
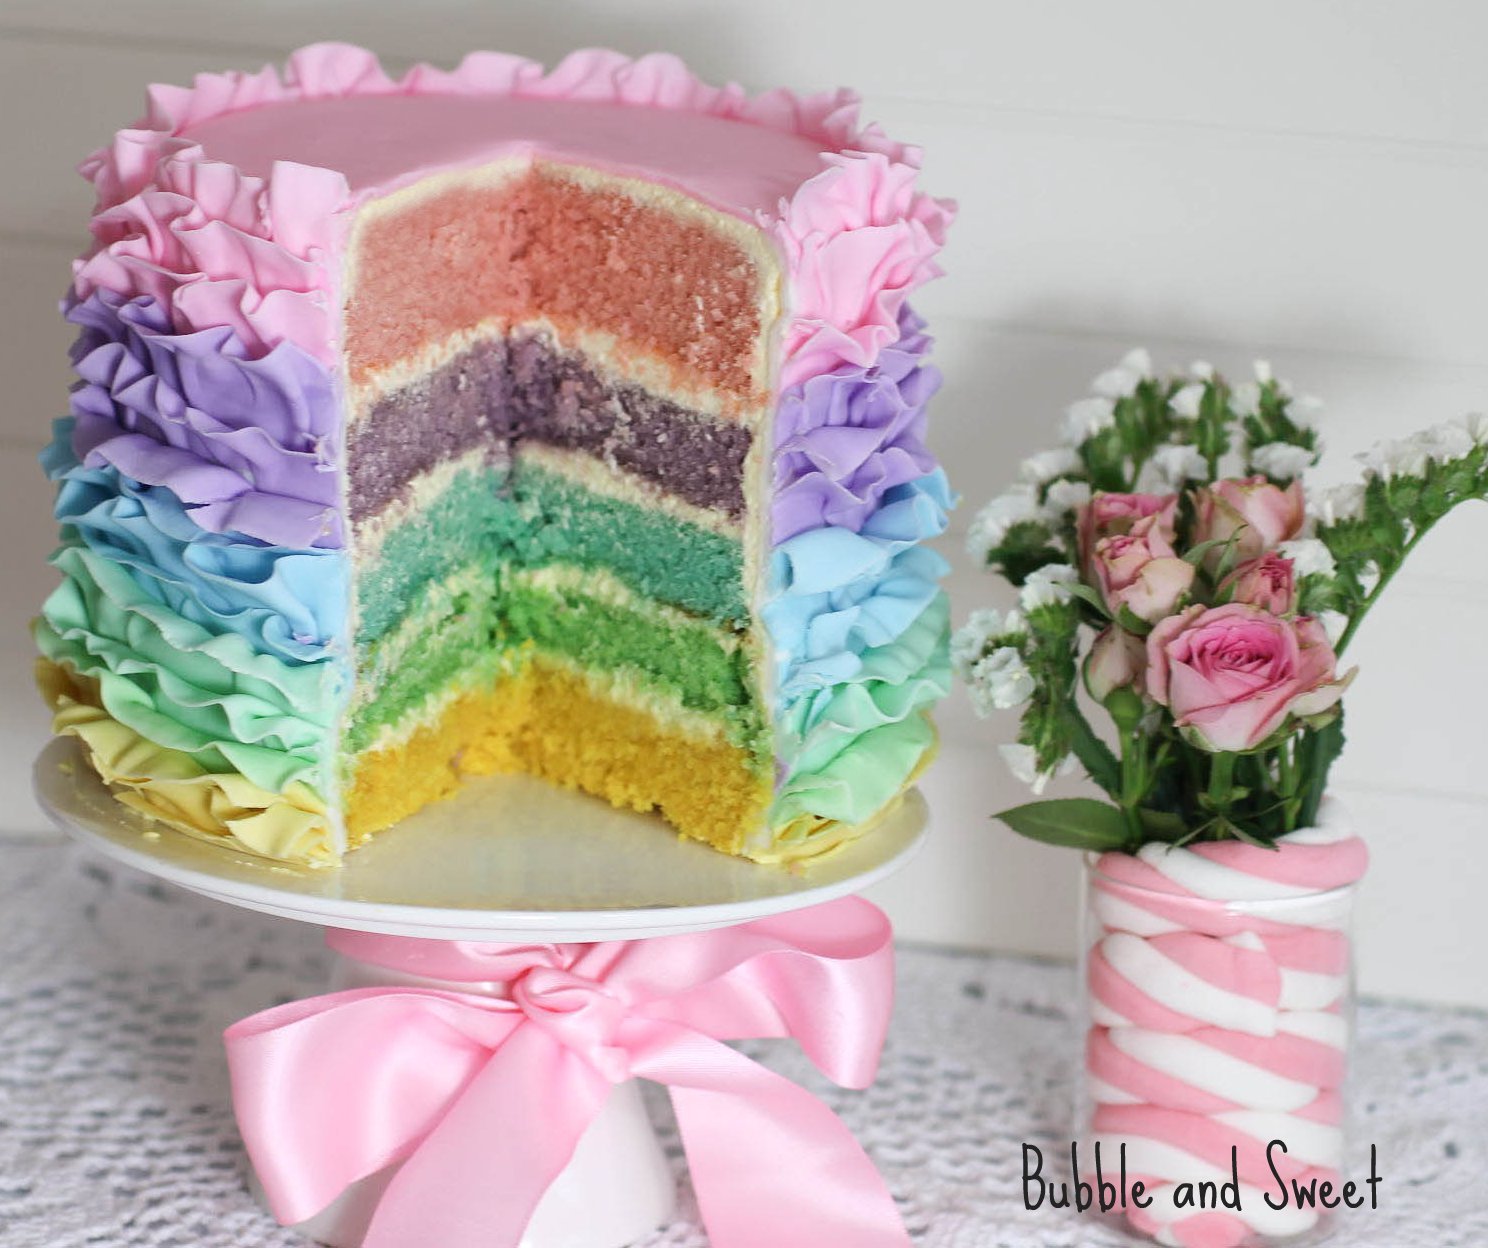
YUP creamy 'cause it's butter cream not fondant.
A while back I baked up a pretty pastel ruffle cake. It was kinda popular, but some of y'all were sad that it was fondant :(
So to make all those sad folk a bit happier I have made up some instructions on how you can make the same style ruffled cake with butter cream.

This one isn't a full rainbow. As it was for our mother's day celebrations it includes green and purple and I've popped a layer of pink in as well, just because it's my cake and I like pink.
Also the butter cream ruffles are never going to be as thin as the fondant ruffles, but the upside of the butter cream is that it takes around a quarter of the time.
and just so you know I'm using the term butter cream pretty loosely here. There is no butter or cream in the frosting I made up, I used a white vegetable shortening like crisco. I really like butter, REALLY LIKE it, so there has to be a good reason for me not to use it. Using the shortening results in a whiter frosting that is easier to color, it also stands up to the heat better than butter and it just plain stands up during piping better than a real butter frosting. If you prefer you can try a different type of frosting and depending on how firm it is it might work. It does work with Italian Meringue butter cream in cool weather.

Now I have to get back to the very important task of picking which Epiphanie camera bag I'll be getting as my late mother's day gift..........
Ruffled Butter Cream Rainbow Cake
Baked cake layers in pink, lilac and green *
sturdy cake board in the size of your cakes
White Frosting (recipe below)
various gel food colors (I used dusty pink, vintage blue and moss green)
off set spatula
#406 Wilton tip
3 disposable piping bags
a cake turntable or a cake stand
# the #406 Wilton piping tip is one of the large sizes that do not fit into regular couplers. It looks like a 104 petal tip but is twice the size.
* My cakes were made using the vanilla cake recipe from my book Sweets on a Stick, you can just use any cake mix you like or even packet mix colored with a little food gel, I also added some strawberry and lavender flavor to the cake mix before baking.
The night before you decorate the cake color color 1 cup each of the frosting pink, lilac and green, if you like you can add some flavor during this step. I made the pink strawberry and the lilac lavender flavor.

Cut the brown crusty edges off the cake layers.

Place the green cake layer onto the cake board and place a good dollop of frosting on top. Use the offset spatula to spread evenly around the top of the cake and place the lilac layer of cake on top of the first green layer pressing down lightly.

Repeat the process adding more frosting and then the final pink layer of cake.

Using as little frosting as possible give the cake a coating of the white frosting using the offset spatula and smoothing the top as much as possible. Pop the frosted cake into the fridge until the frosting is firm to touch.
** I was working on a cake turntable up to this step. So that I did not have a cake board in the finished cake I used a large cake lifter, inserted it between the bottom cake layer and the cake board and lifted the cake onto my serving cake stand. You don't need to do this step I'm just explaining as some people think it's weird when I don't have a board in the instructions and then not in the pictures.**
One the frosting is firm to touch frost the top with a thin layer of pink frosting. Smooth as much as possible using the bottom of the offset spatula. If you have a special tool for smoothing you can use that instead.
Cut off the end of a disposable piping bag and place the tip in the end. Fill the bag with about 1 cup of the pink frosting.

** You might like to get a feel for the bag and tip and do a few practice squeezes onto a clean plate or parchment paper to work out how you like the ruffles. I like to attach the bottom thicker edge of the tip to the surface and then pull sideways slowly moving my hand back and forth, parallel to the surface being frosted.**
Starting at the top of the cake frost a layer of pink ruffles. Hold the larger/bottom opening of the tip to the top edge of the cake and move around the cake slowly with small up and down movements.If you are right handed it will be easier to move around the cake anti-clockwise (reverse for left handed).

I held the piping bag with my right hand and the cake stand with my left hand spinning the cake and keeping the piping bag in the same general spot just moving up and down slightly. Doing it this way a row of piping took about 15 seconds. However if you do not have a stand or turntable you can do the ruffle in sections lifting and restarting as you turn your plate around.
Pipe another 2 or 3 ruffle layers around the whole cake trying to keep the ruffles as close to the one above as possible until you can see that you have covered the top cake layer. If you have only used a thin layer of white frosting to cover the cake layers you should be able to see when you reach the end of the pink cake.
I only had one tip so I had to remove it and wash in warm soapy water with a tip cleaner.

This here is where I was fixing up the mistake, but it kinda shows how to hold the piping tip to the cake. It's really hard to take a photo of yourself piping :)
Cut the end of another disposable piping bag, place the tip in the end and fill the bag with the lilac frosting and pipe 3 or 4 layers of ruffles around the cake until you reach the end of the lilac cake layer.
Repeat the process with the green frosting around the bottom green cake layer.
If during the piping process you make a mistake, you can simply remove the messy section with a clean small offset spatula or knife and recipe just the removed section, but this should be done before the next layer is piped underneath.

The cake is best served within a day. It can be stored in the fridge, just remove an hour or so before serving to allow to come to room temperature.
White Frosting
500g icing sugar sifted (1 lb and 1 5/8oz powdered sugar)
350g white vegetable shortening * or crisco (around 2 cups) (12 3/8 oz)
1/4 cup warm water
1 tsp vanilla extract (I normally use real vanilla extract but I used clear vanilla flavor in this recipe)
In the bowl of a large stand mixer using the whisk attachment, mix the icing sugar and warm water until combined.
Add the vegetable shortening and whisk at high for around 10 to 15 minutes or until the mixture is very light and fluffy.
Add the vanilla extract and mix until combined.
You may add any color or flavor at this stage to achieve your desired frosting.
*In Australia white vegetable shortening can be found at cake decorating and kitchen stores like HERE
or you can buy Crisco in Australia at some good deli's, chocolate stores (the type that sell US candy sometimes sell Crisco) or here at US FOODS.

Linda Vandermeer is a blogger, baker, maker and author of the cookbook ' Sweets on a Stick': More than 150 kid friendly recipes for cakes, candies, cookies and pies on the go!. Published in the US the book is available at most online book stores:
I'm sure this cake is as delicious as it is pretty! I wanted a slice just reading your tutorial!
ReplyDeleteThank you so much for the tutorial! I was wondering how this was done :) It looks absolutely beautiful.
ReplyDeletejane
this is gorgeous!
ReplyDeleteI love your ruffle cake!! Adorable!! Happy Mother's Day!
ReplyDeleteWOW! Those are so pretty!
ReplyDeletedid you dowel rods in the cake?
ReplyDeleteNo I did not find this particular cake was large enough to require dowels. If you check out my previous cake from last week (the ruffle dress cake) I did suggest popping a dowel into the center as it had quite a number of layers. Thanks Linda V
DeleteI love the three colours that you have chosen! So elegant! :D
ReplyDeleteI love this cake! What a beautiful dessert. I can't wait to give it a try myself.
ReplyDeleteGorgeous once again! Fondant or buttercream I'd be very happy with a slice either way. Thanks for the tutorial :)
ReplyDeleteI just showed this to my twin girls after searching for a rainbow cake they have requested GeForce their fourth b- day! And this ruffled rainbow cake is ezoxactly what the want! Thanks for the inspiration. Wish you were here in Southern California. Just want to share the excitement!!
ReplyDeleteWhat style and size tip is that?
ReplyDeleteHi it's a Wilton 406 which is a kinda petal type - like a really big 103 or 104 :)
ReplyDeleteI just did my version of your ruffle cake. It is not as pretty as my cake was shorter than I had hoped. It's still pretty but I can't wait to try it again!!!
ReplyDeleteIm a first time baker and think this may be a little ambitious for my limited skills, but is it easier to pipe the frills upwards or downwards?
ReplyDeleteBeautiful cake!
I've made similar ruffle cakes using buttercream before, and personally find swiss meringue buttercream to be easy to pipe and holds the shape really well. Considering I live on the equator and therefore am subjected to ridiculously hot and humid weather ALL the time, the SMB hasn't failed me yet, so I'm good on calling it my go-to.
ReplyDeleteI love this! I wanted to do a two tiered birthday cake for my daughter, and was wondering if this could work. I'm using a 12" round for the bottom, and a 9" for the second layer. Any suggestions?
ReplyDeleteHi Sweetjam, sure it will work. Just make them as normal and stack them up with wooden dowels in between to hold the top layer up. You might like to add in a few extra shade/color to make 3 layers per tier. I made a 3 tier ombre one for my daughters birthday here which might give you an idea, even though the tiered one is fondant it is the same principle: http://bubbleandsweet.blogspot.com.au/2011/08/lillis-7th-birthday-party-mermaid-party.html
DeleteThis comment has been removed by the author.
ReplyDeleteHi Linda...
ReplyDeleteThank you very much for the comprehensive explanation on how to do this cake and also the recipe for the buttercream...
I did it... and proud of it....
Thank you very much... xoxoxoxoxo
awesome! nice tutorial, too! thanks for sharing, linda! ^__^
ReplyDeleteI haven't enough words to explain how much i love it!! It's so pretty and brilliant!! A lot of congratulations!
ReplyDeleteHello, Linda :) , Thanks for your cake making tips specially How to make a ruffled buttercream rainbow cake! I found it very easy to make will give to my cook to prepare it. Regards from Online Shipping Adviser
ReplyDeleteThanks so much, glad there are talented folks who are kind enough to mentor us!
ReplyDelete