I was so excited by the technique I used to make the cottage rose macarons in my last post I decided to keep on going and make something even more whimsical and magical and that's how these woodland toadstool macarons came to be.
How adorably cute are they, and look at the perfect shiny shells! I am smitten with this technique. It's the opposite of textured macarons and I love it to bits.
I made a YouTube video <click here> that's only a few minutes long so you can watch the piping technique. Honestly I am mesmerised by the way the piped mixture falls back into the shells and can watch it endlessly. Once they are piped they look like beautiful necklace pendants sitting on a tray.
The secret to shiny macron shells that withstand the wet on wet piping technique is a recipe with the right consistency, not all recipes will work. My recipe is an Italian Meringue base that I have personally tried, tested and tweaked for 15 years. It was used commercially in my cafe and was no fail time after time for thousands of macarons. You can get it for free <HERE>
and if you know me you know I haven't stopped here. I have a few more designs floating around in my head that I have to try before I move on. If you make your own batch up make sure to tag me on instagram so I can see how they work out 👀
I filled these macarons with a whipped pistachio ganache that is so yummy you can eat it with a spoon, I've included quick instructions at the end of the post below.
Happy Baking
xx Linda
Shopping links
(may have affiliate links which may earn me commissions and contribute to the running of this blog):
Red Food Powder like <AMERICOLOR RED CLICK HERE FOR LINK> I prefer a powder for red as you need to use so much gel food colour it impacts the batter consistency.
Green food colour - any gel type can be used as only a drop is needed I used moss green. You only need a drop or 2 for the soft hue I achieved.
Pistachio Cream - I picked mine up at Costco her is an online link <PISTACHIO CREAM AMAZON> You can make your own or buy any brand you like. Or you can use just white chocolate ganache without adding the pistachio cream to save money.
PISTACHIO GANACHE -I filled the woodland toadstool macarons with a decadently delicious whipped pistachio white chocolate ganache. Mix 3 parts white chocolate to 1 part cream (ie 300g (10+5/8oz) white chocolate to 100g (3+5/8oz cream)) heat in microwave for 2 minutes on high, cool/set, whip in a mixer and then and mix in 1 part pistachio cream (ie 100g (3 5/8 oz))
Linda Mccubbin is a blogger, baker, maker and author of the cookbook ' Sweets on a Stick': More than 150 kid friendly recipes for cakes, candies, cookies and pies on the go!. Published in the US in 2011 (under my previous name Linda Vandermeer).
Honestly these Cottagecore rose macarons might be the prettiest macarons I've ever made. Are they cottage core? I'm not sure we used to call it shabby chic. Anyhoo those sweet roses are piped into the still wet macaron batter with different coloured macaron batter. I was so happy when it worked and I ended up with super shiny deliciously gorgeous patterned shells.
They are definitely the macarons of my dreams. It is so satisfying when the piped mixture falls back down into the shells.
I was so excited I even made a 5 minute Youtube videoshowing how I made them which includes mixing up the macaron batter so you can easily follow along andmake your own here. Like I said it's a pretty short video and you can see the consistency required for the batter so I recommend watching it if you're going to try make your own macarons (patterned or not).
I filled these ones with a white chocolate rose ganache to match in with the rose decorated shells. I also did a version with a whipped white chocolate buttercream and raspberry puree centre for Mother's Day which was reminiscent of Devonshire tea and totally delicious..
They do require a little bit of work and I'm not sure every macaron recipe will work. Some of the recipes out there are different batter consistency to mine and as a result the piped roses will not fall back into the shells as well, so I've included the exact recipe I used which is the same recipe I've used for 15 years, modified slightly over the years. While I had a cafe I made thousands of these gorgeously delicious treats and fine tuned the recipe until it was no-fail for me.
I've already made up a few more batches of these wet on wet designs to share with you so check back to see all the macaron gorgeousness over the coming weeks.
XX
Linda
Cottagecore Macarons (wet on wet instructions - see also my YouTube video)
Mix up macaron batter. I've included my recipe for Italian meringue macarons below. Just before the batter is ready spoon out a small amount into 2 small bowls around 1/3 cup in one and 1/2 cup in the other.
Colour the large portion sky blue, and then colour the 1/3 bowl green (I used one drop mint green), then colour the 1/2 cup pink (I used one drop) then split a small amount of the pink into another bowl and put another drop of pink to make it a darker hue of pink. Put all the batter into seperate piping bags.
Batter waiting to be piped. I made my own parchment bags for the small amounts
Pipe the main batter onto trays lined with parchment paper. I did one tray at a time so the macarons did not start to form skins.
Once you have the blue macaron shells piped, tap the tray on the counter to remove any air bubbles and then pipe 3 light pink dots (see picture 1 in the collage below).
Using the darker pink pipe a curve or c on top of each light pink dot. (see picture 2 in collage below)
Using a toothpick, skewer or scribing tool swirl in little circles back and forth to look like little rose swirls (see picture 3 in collage).
Pipe little leaves on the sides of each rose by piping a dot then letting go of the pressure on the piping bag and pulling the bag out sideways (see picture 4 in collage below) My leaves fell into the batter, however you might need to pipe a dot and use the scribing tool to pull the 'leaves' outward.
Repeat for remaining batter and then allow to rest on the trays until set (see picture 5 in collage below).
Linda's Macaron Shells makes around 40-50 shells or 20-25 filled macarons. See below macaron recipe for simple instructions for ganache filling.
150 gram (5 +1/4 oz)almond meal (almond flour) 150 gram pure icing sugar (5 +1/4 oz powdered sugar) 150 gram granulated sugar (5 +1/4 oz) 37 grams water (1 +1/4 oz) 110 gram (3 + 7/8oz) egg whites aged split into 2 lots of 55grams each (2 lots of 1 + 7/8 oz each) food color of choice (I used sky blue, pink and mint green gel type food colour)
*ageing egg whites refers to separating the yolks from whites and then leaving the whites to age for a few days. This can be done on the counter if your countries climate permits or in the fridge, wrap the bowl with plastic wrap and then pop a few holes in the top. Alternately you can pop fresh egg whites in the microwave on high for 10 seconds or so - I used the aging on counter method in this batch pictured.
1. Mix the ground almonds and icing sugar together and pulse a few times in food processor to make almond meal finer. Do not over process as the meal can become oily. Sieve into a large bowl. Add colour and 55g (1 + 7/8 ounce) of the egg whites to the sugar/almond mixture but don’t mix in.
2. Place remaining 55g (1 + 7/8 ounce) of egg whites in bowl of mixer fitted with the whisk.
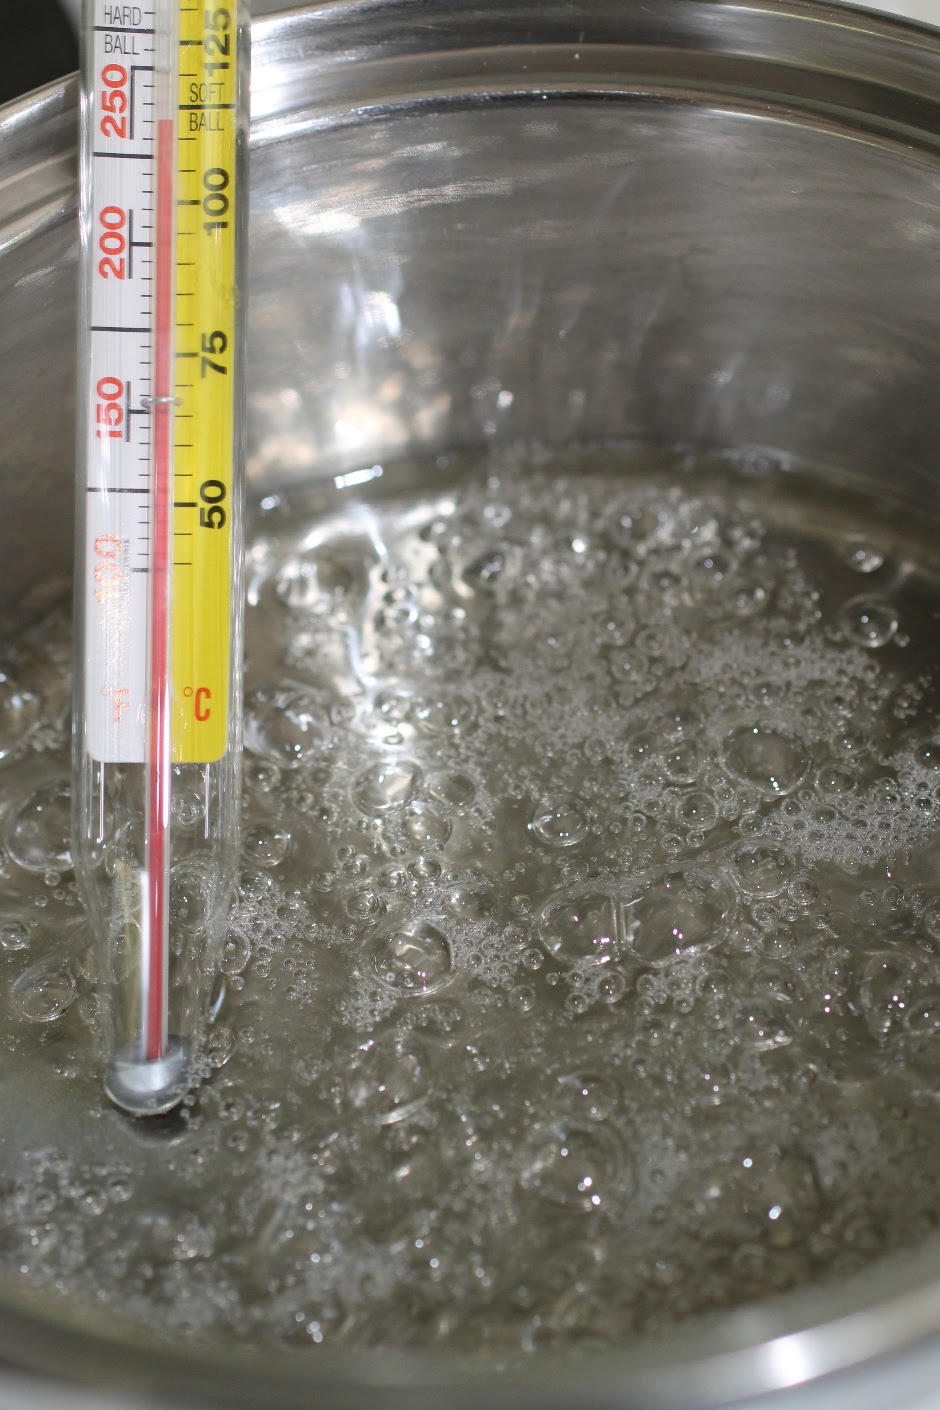
3. Pop granulated sugar and water into saucepan, stir to combine and cook without stirring to 118 C (245F). Brush down the sides of the saucepan with a pastry brush dipped in water as required to avoid sugar crystallising. Make sure you have a pouring shield on your mixer, once the syrup has reached 118C pour in a thin stream down the side of the mixer bowl continuing to whisk on medium low.
4. Continue to whisk the meringue on high until the side of the bowl is only a little warm to touch, around 50C (120 F).
5. Add meringue mixture to almond mixture and using a large spatula fold the mixture together until it starts to shine and forms. If you run the spatula through the mixture it should form a ribbon that disappears back into the mixture after about 20 seconds.
6. Add the mixture to a piping bag fitted with a plain tip (or just cut the end of a disposable piping bag, that's what I do) and pipe in lines onto parchment lined baking sheets. To make the macarons as even as possible I apply a constant slow pressure to the piping bag and count a few numbers like up to 3 for each one.
7. Set aside for about 30 minutes or until the macarons have formed a skin so that the macaron mixture does not stick to your finger when gently touched. If the weather is humid this step may take longer up to 2 hours. I pop on the aircon if it's humid at my house.
8. Meanwhile preheat oven to 130-135C (275 F) fan forced. Once ready bake the macaroons for around 19-23 minutes depending on size, it may take less of longer, all ovens are different. If they are baked and you gently push on the side the tops will not move, if the tops do move bake for another minute or 2. Also they should not be browned if they are reduce the heat for the next batch or bake for less time.
9. Once baked remove the baking trays and immediately slide off the macarons and the parchment onto the work surface and let cool completely before removing the shells.
10. Once cooled match disks into like sizes and sandwich together using the ganache.
Ganache Recipe
To make ganache melt white chocolate with cream in the microwave for 2 minutes on high and mix gently until combined, use a ration of 3:1, so for example 240 grams (8+1/2 oz) white chocolate to 80 grams (2 + 7/8 oz) cream. Add some gel color and rose oil/flavor to taste.
I'm a bit excited because I've recorded a new Youtube video. Oh my goodness, WOW! How much has technology changed in the last 10 years and by the way how fast does time go. Today was a learning curve, and some of the sound is a bit stilted, but new things are always fun and I'm looking forward to making more.
I thought I would jump back into it with some textured ombre Christmas Tree macarons, which is pretty much making up macaron mixture and not properly following through with the macaronage.
Which actually makes the whole process easier because no stopping and starting and counting out to see if the mixture is sinking back so it will make perfect shiny shells that won't collapse.
If you haven't made macarons before it might be a good place to start. I've used my regular macaron batter and piped the Christmas trees using Wilton petal tips 103 and 104 and then decorating with some royal icing.
I made the macarons in pink and green ombre which just means that they graduated from light to dark in the same shade. It would take a few steps out if you made them all the same colour and didn't decorate them and they look just as impressive.
The green macarons were filled with a delicious whipped pistachio ganache which I recommend, even if you decide not to make textured macarons (recipe below).
Happy Baking XX
Linda M
Macaron Recipe- Macarons should be filled a day prior to consuming and can be stored in fridge for a week. Filled and undecorated macarons can be wrapped in lots of 3-5 in plastic wrap, placed in an airtight container and frozen for a month.
190 gram (6 5/8 oz)almond meal (almond flour) blanched
190 gram pure icing sugar (6 5/8 oz powdered sugar)
190 gram granulated sugar (6 5/8 oz)
1 tsp powdered egg white (optional)
48 grams water (1 5/8 oz)
140 gram egg whites aged split into 2 lots of 70grams each (5 oz split into 2 lots of 2 1/2oz each)
food color of choice
1. Mix the ground almonds and icing sugar together and pulse a few times in food processor to make almond meal finer. Do not over process as the meal can become oily. Sieve into a large bowl. Put 70g (2 1/2 ounce) of the egg whites in a bowl but don’t mix in yet.
2. Place remaining 70g (2 1/2 ounce) of egg whites in bowl of mixer fitted with the whisk.
3. Pop granulated sugar and water into saucepan stir to combine and cook without stirring to 118C (245 F). Brush down the sides with a pastry brush dipped in water as required to avoid the sugar crystallizing. Once the mixture reaches 115C (240 F) start mixing the egg whites on high. Make sure you have a pouring shield on your mixer, when the sugar syrup reaches 118C (245 F)remove from heat and immediately pour in a thin stream down the side of the mixer bowl continuing to whisk on high.
4. Continue to whisk the meringue on high until the side of the bowl is only a little warm to touch, around 50C (120 F).
5. Add meringue mixture to almond mixture and add in extra egg whites and using a large spatula fold the mixture together until it is just combined.
6. Split into 3 bowls with about 1/2 cup batter in one bowl, 1 cup in another and leave the remainder in the mixing bowl, then add colour to each bowl as desired making sure to not overmix.
7. Put each seperate colour into a piping bag fitted with a 103 or 104 petal tip. Line a tray with non stick baking paper or a silicone mat and using the darkest colour pipe a row with about 5 ruffles then another row with 4 ruffles, switch to the next lightest colour and pipe 3 ruffles and finally pipe a top swirl with the lightest colour.
8. Allow to rest for 20 mins until the surface of macaron is just dry to touch and then bake at 135C (275 F) for 20 mins or until the tops of the macron is firm and does not jiggle when lightly pushed from the side.
9. Allow to cool and fill, I filled the green trees with Whipped White Chocolate Pistachio Ganache with a wilton open star tip, try tips 18 or 21.
- heat the pistachio paste for 20-30 seconds to warm it, set aside until needed.
- mix together the white chocolate and cream in a microwave safe bowl and heat at hight for 1 minute, allow to sit for 1 minute and mix until smooth, if there are still lumps that have melted, heat for another minute and mix until smooth.
- add the pistachio paste to the white chocolate ganache mixture and mix until smooth, add food colour if required,
- allow to cool then whip to make a lighter airier consistency once it has set.
Original photos and recipe from the Bubble and Sweet blog by Linda Mccubbin. I love when people share my blog ideas and give credit. Please feel free to link back to my blog for non commercial purposes. Affiliated links and adds may earn me money, however all ideas and opinions are my own,
So it's here......the 4th chocolate Ruby Chocolate or RB1 Callebaut has been released in Australia and it's pink.
PINK I tell you.
Yup all it took to bring me back from blogging hiatus is pink chocolate.
Now I know there has been a little bit of instahype surrounding RB1 in Australia and who can really blame anyone. Pink chocolate is always instaworthy.
But does it live up to the hype?
Hiya ruby chocolate. Teacup, cutlery and tea strainer all Cristina Rae
To try it out I had a little bit of a taste test with my friend and her daughter a few nights ago. I did up a plate with some Callebaut white, dark, RB1 and some Lindt milk.
Truth is no one picked the Ruby as their favourite on the night but to be fair I had just had Indian food delivered before hand and I don't think we started off with the clearest palate.
So I've just tried it again and it's not bad and I think maybe it's even pretty good. Kinda not what I expected at first but it is growing on me. As described it is fruity and it has the lovely Callebaut texture that makes that brand my go to for white and dark chocolate.
To celebrate this new chocolate I've been in my kitchen creating and decided to start of with macarons 'cause they are kinda my thing.
The shells are are a plain french almond macaron and the filling is a whipped ruby chocolate ganache buttercream with a touch of rose. Due to whipping the ganache and the addition of butter and sugar the RB1 chocolate flavour which is not overly robust does not really shine through as much as it could. If you want the full ruby chocolate flavour experience I recommend making a regular ganache (ratio 3 parts chocolate 1 part cream).
I've decorated mine with a little bit of piped ganache, a strawberry crisp (which is like a strawberry whopper) and a gold soft pearl.
If you don't have any ruby chocolate handy you can substitute white chocolate and they would still be just as lovely.
Ruby Rosewater Macarons (makes approx 30 filled macarons) Fill the shells with the filling (included after recipe for shells) at least 1 day before you serve to get the correct consistency. Store in an airtight container in fridge and then bring to room temperature about 30 minutes prior to serving. 190 gram (6 5/8 oz)almond meal (almond flour) 190 gram pure icing sugar (6 5/8 oz powdered sugar) 190 gram granulated sugar (6 5/8 oz) 48 grams water (1 5/8 oz) 140 gram egg whites aged split into 2 lots of 70grams each (5 oz split into 2 lots of 2 1/2oz each)* pink food colour ice (I use gel type food color like Wilton)
*ageing egg whites refers to separating the yolks from whites and then leaving the whites to age for a few days. This can be done on the counter if your countries climate permits or in the fridge, wrap the bowl with plastic wrap and then pop a few holes in the top. Alternately you can pop fresh egg whites in the microwave on high for 10 seconds or so - I used the microwave method in this batch pictured.
1. Mix the ground almonds and icing sugar together and pulse a few times in food processor to make almond meal finer. Do not over process as the meal can become oily. Sieve into a large bowl. Add colour and 70g (2 1/2 ounce) of the egg whites to the sugar/almond mixture but don’t mix in.
2. Place remaining 70g (2 1/2 ounce) of egg whites in bowl of mixer fitted with the whisk.
3. Pop granulated sugar and water into saucepan stir to combine and cook without stirring to 118C (245 F). Brush down the sides with a pastry brush dipped in water as required to avoid the sugar crystallizing. Once the mixture reaches 115C (240 F) start mixing the egg whites on high. Make sure you have a pouring shield on your mixer, when the sugar syrup reaches 118C (245 F)remove from heat and immediately pour in a thin stream down the side of the mixer bowl continuing to whisk on high.
4. Continue to whisk the meringue on high until the side of the bowl is only a little warm to touch, around 50C (120 F).
5. Add meringue mixture to almond mixture and using a large spatula fold the mixture together until it starts to shine and forms a ribbon that disappears back into the mixture after about 20 seconds. 6. Add the mixture to a piping bag fitted with a plain tip (or just cut the end of a disposable piping bag, that's what I do) and pipe in lines onto parchment lined baking sheets. To make the macarons as even as possible I apply a constant slow pressure to the piping bag and count a few numbers like up to 3 for each one. 7. Set aside for about 30 minutes or until the macarons have formed a skin so that the macaron mixture does not stick to your finger when gently touched. If the weather is humid this step may take longer up to 2 hours. I pop on the aircon if it's humid at my house. 8. Meanwhile preheat oven to 140C (285 F)#. Once ready bake the macaroons for around 13 to 15 minutes depending on size, it may take longer, all ovens are different. If they are baked and you gently push on the side the tops will not move, if the tops do move do bake for another minute or 2. Also they should not be browned if they are reduce the heat for the next batch or bake for less time.
9. Once baked remove the baking trays and immediately slide off the macarons and the parchment onto the work surface and let cool completely before removing the shells.
10. Once cooled match disks into like sizes and sandwich together using the ganache. # The recipe stipulates 140 C however my new house and kitchen I used the fan forced option at 130C (265 F) and it worked out lovely.
Ruby rose whipped ganache buttercream
I used a Wilton closed star tip 31 to pipe and decorate
240g (8 1/2 oz) RB1 chocolate (Callebaut Ruby Chocolate)
80g (2 3/4 oz)cream
50g (1 3/4 oz which is just under 1/2 stick) unsalted butter
1/2 cup icing sugar (powdered sugar)
1 Tbsp rose water (or to taste)
generous pinch salt flakes
Heat cream and add to chocolate, allow to sit a few minutes and then gently whisk until smooth. Cool until nearly set.
Add ganache and remaining ingredients to the bowl of a stand mixer and whisk until light and fluffy.
I love when people share my blog ideas and give credit. All posts contain original ideas, photography and recipes by Linda Vandermeer-McCubbin unless otherwise credited. Please feel free to link back to my blog for non commercial purposes. Affiliate links may earn me money and contribute to supporting this blog.
I've started to bake macarons again and it's taking a little bit of getting used to. In my old kitchen I could whip out a batch of perfect macs with next to no thought or effort, but at the moment sharing a kitchen and with a different oven than I am used to I find that the little distractions impact my final result.
This batch I forgot to add in my egg whites with the almond and icing sugar, I was mixing away and after a few seconds I realised it was quite thick and I was not going to achieve the correct consistency. Just a touch too late I remembered my extra egg whites, and although I added them in I found the mixture was a little bit too bubbly.
Although they were ok, I just wasn't completely happy with them. The crisp outside was a little bit too thin for my tastes and the feet collapsed a little.
But to tell the truth I did find them more like a well known french patisserie so perhaps I am onto something ;)
You can use Nestle Bakers Choice chocolate chunks to add into your ganache to fill the macarons and you can dust the macarons with a little bit of cocoa like mine to get the same rustic look. Click HERE for my macaron recipe if you would like to make your own.
Also remember there is still one more day let for the #BakeItYours #NestleBakersChoice giveaway. You can enter for free in my rafflecopter giveaway below. Entry for Australian residents only over 18 years of age.
Affiliate links may earn me money and contribute to supporting this blog
I love when people share my blog ideas and give credit. All posts contain original ideas, photography and recipes by Linda Vandermeer-McCubbin unless otherwise credited. Please feel free to link back to my blog for non commercial purposes.
I was sent a box of nestle product to assist in the development of recipes for this blog post. No sponsorship or financial incentive was received.
Because my gold was not on transfer sheets it is a bit textured, which looks great with the added layers of buttercream applied with an offset spatula.
This cake is perfect for hiding any little imperfections on the cake while still managing to look perfectly put together.
Anyhoo I best go pack some more boxes and take some stuff down to charity.
Affiliate links may earn me money and contribute to supporting this blog.
Original ideas, photography and recipes Linda Vandermeer please do not reuse without permission except for non commercial purposes where you may use 1 image, give credit and link back to original post.
It's party time again around here and Bubble celebrated with a swan princess party with a pretty mint, gold, white and black theme.
It was a low key event with just a few friends so I decided to have it indoors and turned my creative craft space into the dessert table which worked well and ended up being a great decision as the weather threatened rain as the party was starting.
Party Decorations
OK I know you all want to know it, where did I get that amazing green feather garland 'cause it's pretty gorgeous, and let me tell you even more so in real life. I picked it up at Lark to decorate Bubble's bedroom with and when it arrived it just begged to be used for my party table seeings as it matched the plates I bought perfectly.
Yup, I saw these plates online a little while back and I had to make them mine. They might be some of the most awesome paper plates I have ever seen. No I am not being paid to say this I just like to share this stuff so y'all can have pretty parties too. I bought them from Lark, they are made by Bash Party Goods.
The honeycomb balls were from discount dollar stores they were a couple of dollars each for the large ones and the smaller ones were in packs of 3 for the same price.
I made the swan pinata which involved the (humane) sacrifice of a unicorn pinata, I will do a post with a few progress pictures shortly.
I also made my own glitter dipped balloons by spraying adhesive glue spray to gold balloons and then sprinkling glitter onto them.
A few hours before the party I popped out for coffee with a friend and afterwards found those multi sized gold glitter dots at a discount store down at the local shop which were perfect placed randomly on the wall either side of the garland. The whole pack of dots cost $2.50 and if I don't keep them the kids will use them for craft so it's pretty much win win.
The geometric mint vase holder/ tealight holders were from the reject shop, and the cake stand and candy jars I have had for years.
Party Food with links to my recipes on this blog
We had an elegant mint green colour butter cream cake which was actually a chocolate layer cake filled with cookies and cream (CLICK HERE FOR CAKE RECIPE).
It was decorated with edible gold edged macarons (including a couple of empty macaron shells on the side of the cake) and some stars of buttercream piped randomly with a #195 tip. I stacked filled and decorated the whole cake in under an hour which was a lovely change for me.
Macarons in a matching mint shade (CLICK HERE FOR MY MACARON RECIPE) for the party table and as I made them myself I was able to make a variety of sizes to decorate the cake with.
Simple swan cookies in mint and white decorated with a little edible gold leaf which once again were quick to make (CLICK HERE FOR MY COOKIE RECIPE and how to add gold leaf to cookies).
We had chocolate covered Oreo's in ombre shades from black through to green with a little edible gold leaf. There was matching candy sixlets and bon bons.
Funny side story the whole reason I went for a swan party was to make choux swans after I got the Retro Baking (The Australian Women's Weekly) and I didn't end up making them or the really cool cake pop idea I had.
Yup this is my creative space room all dressed up to party.
CLICK HERE for details and more pics from when I renovated it
Finally I picked up some bunches flowers from the grocery store for under $30 for the lot and split them up between glass jam jars and one larger vase to fill up the spaces on the table and yay now I have fresh flowers for the rest of the week.