Friday, December 13, 2024

Textured Ombre Christmas Tree Macaron and Whipped White Chocolate Pistachio Ganache recipe


I'm a bit excited because I've recorded a new Youtube video. Oh my goodness, WOW! How much has technology changed in the last 10 years and by the way how fast does time go. Today was a learning curve, and some of the sound is a bit stilted, but new things are always fun and I'm looking forward to making more.

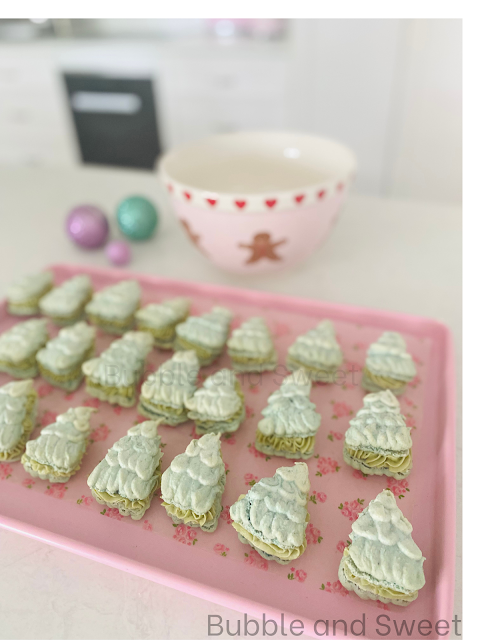
I thought I would jump back into it with some textured ombre Christmas Tree macarons, which is pretty much making up macaron mixture and not properly following through with the macaronage.

Which actually makes the whole process easier because no stopping and starting and counting out to see if the mixture is sinking back so it will make perfect shiny shells that won't collapse.

If you haven't made macarons before it might be a good place to start. I've used my regular macaron batter and piped the Christmas trees using Wilton petal tips 103 and 104 and then decorating with some royal icing.

I made the macarons in pink and green ombre which just means that they graduated from light to dark in the same shade. It would take a few steps out if you made them all the same colour and didn't decorate them and they look just as impressive.

The green macarons were filled with a delicious whipped pistachio ganache which I recommend, even if you decide not to make textured macarons (recipe below).

Happy Baking XX

Linda M


Macaron Recipe- Macarons should be filled a day prior to consuming and can be stored in fridge for a week. Filled and undecorated macarons can be wrapped in lots of 3-5 in plastic wrap, placed in an airtight container and frozen for a month.

190 gram (6 5/8 oz)almond meal (almond flour) blanched 190 gram pure icing sugar (6 5/8 oz powdered sugar) 190 gram granulated sugar (6 5/8 oz) 1 tsp powdered egg white (optional) 48 grams water (1 5/8 oz) 140 gram egg whites aged split into 2 lots of 70grams each (5 oz split into 2 lots of 2 1/2oz each) food color of choice 1. Mix the ground almonds and icing sugar together and pulse a few times in food processor to make almond meal finer. Do not over process as the meal can become oily. Sieve into a large bowl. Put 70g (2 1/2 ounce) of the egg whites in a bowl but don’t mix in yet. 2. Place remaining 70g (2 1/2 ounce) of egg whites in bowl of mixer fitted with the whisk. 3. Pop granulated sugar and water into saucepan stir to combine and cook without stirring to 118C (245 F). Brush down the sides with a pastry brush dipped in water as required to avoid the sugar crystallizing. Once the mixture reaches 115C (240 F) start mixing the egg whites on high. Make sure you have a pouring shield on your mixer, when the sugar syrup reaches 118C (245 F)remove from heat and immediately pour in a thin stream down the side of the mixer bowl continuing to whisk on high. 4. Continue to whisk the meringue on high until the side of the bowl is only a little warm to touch, around 50C (120 F). 5. Add meringue mixture to almond mixture and add in extra egg whites and using a large spatula fold the mixture together until it is just combined. 6. Split into 3 bowls with about 1/2 cup batter in one bowl, 1 cup in another and leave the remainder in the mixing bowl, then add colour to each bowl as desired making sure to not overmix. 7. Put each seperate colour into a piping bag fitted with a 103 or 104 petal tip. Line a tray with non stick baking paper or a silicone mat and using the darkest colour pipe a row with about 5 ruffles then another row with 4 ruffles, switch to the next lightest colour and pipe 3 ruffles and finally pipe a top swirl with the lightest colour.

Link to pink silicone mat AUSTRALIA AMAZON or US AMAZON
8. Allow to rest for 20 mins until the surface of macaron is just dry to touch and then bake at 135C (275 F) for 20 mins or until the tops of the macron is firm and does not jiggle when lightly pushed from the side. 9. Allow to cool and fill, I filled the green trees with Whipped White Chocolate Pistachio Ganache with a wilton open star tip, try tips 18 or 21.


Pistachio GanacheI used Pisti pistachio cream I picked up at Costco here in Australia you can get it here on CLICK HERE FOR PISTACHIO PASTE AMAZON AUSTRALIA 

or in US  CLICK HERE FOR LINK TO AMAZON PISTACHIO PASTE  

300g white chocolate

100g cream

80g pistachio paste

optional drop green food colour (I used eucalypt)

- heat the pistachio paste for 20-30 seconds to warm it, set aside until needed.

- mix together the white chocolate and cream in a microwave safe bowl and heat at hight for 1 minute, allow to sit for 1 minute and mix until smooth, if there are still lumps that have melted, heat for another minute and mix until smooth.

- add the pistachio paste to the white chocolate ganache mixture and mix until smooth, add food colour if required,

- allow to cool then whip to make a lighter airier consistency once it has set. 


Original photos and recipe from the Bubble and Sweet blog by Linda Mccubbin. I love when people share my blog ideas and give credit. Please feel free to link back to my blog for non commercial purposes. Affiliated links and adds may earn me money, however all ideas and opinions are my own,

Monday, December 2, 2024

Soft Gingerbread Christmas Honey Jumbles


Every year I am surprised when December comes around and I'm caught out by not organising my Christmas baking better. In fact I feel every year I might become even more disorganised.

I did move a number of years back from a house where I had a dedicated cake and crafting room to a smaller house where I need to pack away everything into separate rooms and cupboards each time I finish and clean up. Getting ready for a day of baking sometimes takes me an hour as I source all my equipment. I am trying at the moment to scale down and get rid of some superfluous items but it is much easier said than done. Instead of achieving a sleek streamlined kitchen, I have just accumulated a number of blogs and instagram accounts I follow that tell me how to do it.

Plus if I achieve my minimalist dream how would I have stuff like this adorable Christmas Greengate Deer to pop in my photo's.

Anyhoo, back to Christmas baking, and today I'm sharing a spiced up version of Honey Jumbles which is an Australian Biscuit (cookie) which was sold in supermarkets but discontinued a few years back. This basically turns an iconic Australian treat into a soft delicious fragrant gingerbread cookie. 

One of the key swap outs is golden syrup for honey which gives a richer flavour. If you are in the US you can buy Golden Syrup on amazon (Tate & Lyle GoldenSyrup) or substitute dark corn syrup or a mix of half honey/ half molasses.  Or in a pinch just use honey and you will still have a delicious cookie.

I've added some sweet fondant holly decorations made with a press out cutter/embosser for a simple pretty pastel Christmas theme. Click here for a link to holly cutter (AMAZON USA). You could easily leave off the decoration or use Christmas coloured sprinkles or decorations picked up at the local supermarket.

Happy Baking XX

Linda M


Honey Jumbles makes 10 - (Honey Jumbles were a cookie/biscuit sold by Arnott's Australia and discontinued. This is a soft gingerbread version.) Recipe can be doubled and will keep in an airtight container in the fridge or on the counter for 3 days.

40 g (1 3/8 oz) Unsalted Butter (if you use salted butter omit the salt added below) 

1/4 cup (125g or 4 3/8 oz)  Golden Syrup (can substitute dark corn syrup or a mix of honey and molasses) 

3/4 cup (115g or 4oz) - Plain / All Purpose Flour 

1 tsp ground ginger

1/2 tsp ground all spice

1/4 tsp bicarbonate soda (baking soda)

1/8 tsp salt

Icing (recipe for glaze icing below)

Melt butter and syrup until butter is just melted and mix to combine either in a saucepan over low heat or in microwave using short 20 second bursts.

Sift in all the dry ingredients and mix until combined and no lumps are visable.

Pop into fridge to chill for 30 mins.

Preheat oven to 170 C (340 F) fan forced. Dust counter lightly with flour, remove dough from fridge and give it a quick kneed to make it pliable.

Shape into 10 logs to place on baking tray, you can either do this by cutting the dough into two equal amounts, rolling each into a log about 35cm length and then cutting into 5 equal pieces around 7cm long.

Bake in the preheated oven for 12 minutes, allow to cool for 5 mins on tray and transfer to cooling rack.

Once cool you can mix up some icing to decorate by simply dipping the cookies into the icing. Add decorations if you like.

Simple Egg Free Glaze icing I sometimes use royal icing for these cookies but here I have used a simple glaze icing. The icing was best after a day when it had set hard, but was still soft to bite through. Recipe will actually make enough for a double of the cookies.

1 cup sifted Icing sugar (powdered sugar)

3 tsp boiling hot water

2 tsp corn syrup (or honey)

1/2 tsp colourless vanilla essence 

food colour as desired.

Mix together ingredients


I love when people share my blog ideas and give credit. All posts contain original ideas, photography and recipes by Linda McCubbin unless otherwise credited. Please feel free to link back to my blog for non commercial purposes.

Wednesday, November 27, 2024

Chocolate Basque Baked Cheesecake Recipe

Growing up I lived about 50 metres down the road from a cheesecake shop (although not THAT cheesecake shop) and they would sell half cheesecakes which my mum would sometimes get us as a treat. My favourite was the baked cheesecake topped with a layer of jelly/jello set with blueberries. Oh how I loved those cheesecakes.

Actually now that I am telling you about it, I am thinking I should try and recreate it. But this story is not about my childhood cheesecake it is about chocolate Basque baked cheesecake.

About a year ago we found a dessert restaurant a few suburbs over that makes on site delicious gelato and Basque cheesecakes.  They use good quality ingredients, which I am sure of as I am a little bit of a food stalker and I peer into their stock room and check out what they use. 

But alas for me (although happily for them) they seem to be very busy and every time we go now they are devastatingly out of my favourite chocolate Basque cheesecake.

Luckily baking is what I do so I decided to make my own and now I have cheesecake when ever I want and my only problem is that I eat way too much cheesecake. As a solution I have been making smaller cakes and the recipe below is for a 6" cake which is a lovely size if you have just a few people to serve. 

(note the cheesecake in these pictures is only 4" 
because I am trying to eat less cheesecake)

Basque cheesecake differs from regular baked cheesecake as it is has no biscuit base and is cooked at a high temperature which results in a dark top and creamy centre. It is important to cool the cheesecake for enough time for the middle to set, at least 4 hours for this recipe but preferably overnight.

Happy Baking

xx

Linda 

Chocolate Basque Cheesecake - makes a 6" cheesecake which will make 6-8 snack serves. I like to serve mine with cherries which is a lovely contrast to the velvety chocolate cheesecake. I use a good quality chocolate like Callebaut. Cheesecake slices can frozen wrapped individually in plastic wrap and thawed in the fridge.

450g (16oz) cream cheese at room temperature

200g (7 oz) dark chocolate melted

100g (3 1/2 oz) caster/ superfine sugar (use regular granulated sugar if that's all you have)

10g (4 tablespoons) cocoa sifted

3 eggs room temperature

1 tsp vanilla

225g (8oz) thickened cream (dollop cream) (heavy cream)

good pinch salt

Line a 6 inch wide by 3 inch high, round baking tin with baking paper. To do this crumple up the paper in your hands and then place over the baking tin and press down I used a spoon to press a line around the bottom rim and then turn the edges over the top rim.

Place cooking rack into middle of oven and preheat to 220 C Fan forced (430F).

Melt the chocolate in a microwave safe dish. I melted mine for 2 mins at 60%, stirred and then another 2 mins. Alternatively if you only have high setting heat for 20sec intervals stirring between each burst and being careful not to overheat. Set aside until needed.

Sift together the caster sugar and cocoa to ensure there are no lumps.

Make sure the cream cheese is at room temperature so the mixture will be silky smooth. Place into mixer bowl and mix at low speed until smooth and creamy. You do not want any lumps at this stage and also we are not trying to incorporate extra air or volume. The room temperature ingredients and slow mixing are key steps.

Scrap down the sides of the bowl add the caster sugar and cocoa and mix at slow speed. Add the eggs one at a time and vanilla and mix until well. Continue to scrap down the sides of the bowl until the mixture is completely combined and smooth.

Add the melted dark chocolate and fold in with a spatula, there should be no lumps and no streaks when you are finished.

Add the thickened cream and salt and mix well.

Pour mixture into the prepared tin and bake for 25 mins, increase temperature to 230C (450F) and cook for a further 5 mins. 

Turn oven off and allow to cool in oven with door ajar for 15mins. 

Put cheesecake into fridge for at lease 4 hours or overnight.

Prior to serving remove from tin and allow to sit at room temperature for 20 mins. If your cheesecake is stuck and you can't get it to release, it's just some of the fats set hard. Run a plastic spatula around the edge between the paper and tin and if it still won't come out pop the base into hot water for a second being careful not to splash the cake and it should easily slide out.


Saturday, November 16, 2024

Ring of Roses Strawberry Layer Cake


It's just been our birthday time of the year when we are lucky enough to celebrate a birthday every month, and no matter what ever else happens in life or how old we are, Birthday Cake is always a must.

Bubble's birthday is the first off the rank and she chose strawberry cake which has been a family favourite since as long as I can remember. It is a pretty pink cake flavoured and coloured using jelly crystals (jell-o box) which makes for a consistent cake all year round. My family recipe has had a few tweaks over the years so I've included the current recipe below.

The birthday girl decreed only a small amount of frosting. I decorated simply by covering with Italian Meringue buttercream (recipe below), adding some texture with varying shades of contrasting buttercream and edible gold and added a ring of big sweeping rose swirls on top using a 1M tip alternating between pink and white and then with random piped leaves. The pink colour is sugar flair dusky pink/wine and the green is sugar flair eucalyptus. Italian Meringue buttercream uses whipped egg whites and a sugar syrup and takes a bit more work than simple American buttercream. I like to use it as it is lighter and less sweet to my taste. 


To give the cake a bit of a lift I added pistachio cream between each layer, which to be honest, although nice was not really worth the effort (**keep your eyes out for a pistachio ganache recipe I have coming up which will be worth the wait). The pistachio cream was from Costco but seriously you can just leave it out and the cake will be just as lovely.


If you want to see another version of this strawberry cake decorated in a different way check out this sweet strawberry candy girl cake here on my blog. 

xx

Linda  

Pretty rose swirl strawberry cake - makes a 6 inch 3 layer cake

- 3 x 6" strawberry cakes (see recipe below)

- 1 x batch Italian Meringue buttercream (see recipe below)

- 1 cup Pistachio cream (optional) warmed in microwave just for a short time until it easily is spreadable but not hot.

Assembly Instructions

You can make this cake 2 or 3 days before you serve. Bake the cake, cool and wrap in plastic wrap. I trim the brown edges off this cake but you don't need to, I do it because I like the look of the sliced cake. You will however need to trim off any domed top to make 3 cakes approximately the same height.

-Place the bottom layer onto a 6"cake board (or straight onto a plate or stand if you are not using the cake board). 

-Pop a small dollop of buttercream under the cake to secure it in place and then using an offset spatula spread a layer of buttercream over the top. 

-Put some buttercream into a piping bag wth a large round tip and pipe a dam around the edge of the cake (see picture below). Spoon in half the pistachio cream and pop into fridge to chill until buttercream is firm. 

- Remove from fridge and top with a thin layer of buttercream to seal the pistachio cream. Add the next layer and repeat the above steps of spreading a layer of buttercream, piping a dam,  adding the pistachio cream and placing in fridge to chill again.

- Remove from fridge, top with a thin layer of buttercream to seal the pistachio cream, add the final cake layer and cover with a thin crumb coat, smoothing the sides and top. Place into fridge to chill until buttercream is firm to touch.

- Reserve around 1 1/2 cups plain white buttercream and colour the remainder in pink.

- smooth the pink buttercream over the cake in a thin layer, if you can't get it perfect do not stress, this cake has an imperfect textured look to it. If you have a cake turntable and a cake scraper it is easier to achieve a smooth finish, but if not use a knife or offset spatula to the best of your ability. I have been known to use a clean plastic ruler in a pinch. 

- Put the remaining pink and the white buttercream into seperate piping bags with a 1M tip and pipe the roses. If you look at my cake closely you will notice that there are only 3 pink swirls and 5 white swirls, with some pink stars piped in-between. The key here is to do what you want, it's your cake be creative. I also piped a border around the bottom with a small star tip. Then I coloured a small amount of the remaining white buttercream green (eucalypt) and piped the leaves. Pop into fridge to chill until firm.

I wanted a rustic casual look and added some of the left over buttercream to the sides randomly and smoothed it in with an offset spatula. Finally after another quick chill I added some edible gold leaf.


Sweet Strawberry Layer Cake (divide the batter into 3 x 6" pans to make a 4" high filled cake)
The jelly (jello) used in this recipe is the dry sugar crystals in the packet. If cake flour is not available use 310g (11 oz) plain (all purpose) flour and add 40g (1 3/8 oz)of cornflour (corn starch) instead.
*Note I like to use weight instead of cup measurements as standard cup sizes are not the same in USA and Australia.

350g (12 3/8oz) cake flour
2 1/2 tsp baking powder
200g (7oz) sugar
1 packet strawberry jelly crystals (jell-o) 85g (3oz approx)
225g (8 oz) unsalted butter at room temperature
4 large eggs at room temperature
1 tsp vanilla extract
240ml (8 1/2oz) full fat milk
135g (4 3/4oz) no fat greek yogurt 

Preheat oven to 170 C  (340 F) fan forced. Line the base and sides of 3 x 15cm (6") tins or 2 x 20cm 8" tins.

Sift the flour and baking powder and set aside until needed.

In the bowl of a large mixer at high speed cream together the butter, sugar and jelly (jello) crystals until light and fluffy.

Reduce speed to low and add the vanilla and then eggs one at a time mixing until combined and scraping down the sides as required.

Add 1/3rd of the flour mixture, mix at low speed until just combined scraping down sides as required. Add 1/2 the milk and mix until combined and then another 1/3rd of the flour mixture once again mixing and scraping down the sides.

Add the remaining milk and all of the yogurt and mix until combined and then the final third of flour making sure the sides and bottom of bowl have been scraped down and no lumps of flour are remaining.

Divide the mixture evenly between the prepared tins.

Bake until the cake is cooked all the way through and a skewer inserted comes out dry approximately 45 minutes.


Italian Meringue Butter cream This batch will make enough to fill and cover the cake and extra to decorate with buttercream flowers as in the example.

Make sure your bowl and mixer are clean to whip egg whites. I use a stand mixer with a pouring shield to make this butter cream, the sugar syrup is very hot, make sure you take appropriate safety precautions when pouring the hot sugar syrup mixture. Not suitable for young children to make.

300g white sugar (12oz)
75g (2 3/4oz) water
5 egg whites
450g (1 pound - 4 sticks) unsalted butter cut into smallish cubes
1 tsp vanilla extract

Place sugar and water into saucepan over high heat and bring to boil. Conintue to  heat until the sugar syrup mixture reaches 115 C (240F). Brush down the the sides of saucepan with a wet pastry brush as required to stop sugar crystals from forming.

Place the egg whites in the bowl of your mixer (make sure the bowl is quite large). When the sugar syrup reaches 110C (210F) start to whip the egg whites at high speed.

Once the sugar syrup reaches 115C (240 F) carefully pour the syrup into the whipped egg whites whilst the mixer is still beating on high.

Continue to beat until the egg and sugar mixture cooled to room temperature (or the bowl feels cool to touch) and then start to add a few cubes of butter at a time. Add the vanilla.

The mixture may become quite liquid, but continue to beat until it thickens and all the butter is evenly distributed. If necessary pop the mixing bowl into the fridge to cool down a little then continue to mix.


I love when people share my blog ideas and give credit. All posts contain original ideas, photography and recipes by Linda McCubbin unless otherwise credited. Please feel free to link back to my blog for non commercial purposes.