Showing posts with label Christmas tutorials. Show all posts

Friday, December 13, 2024

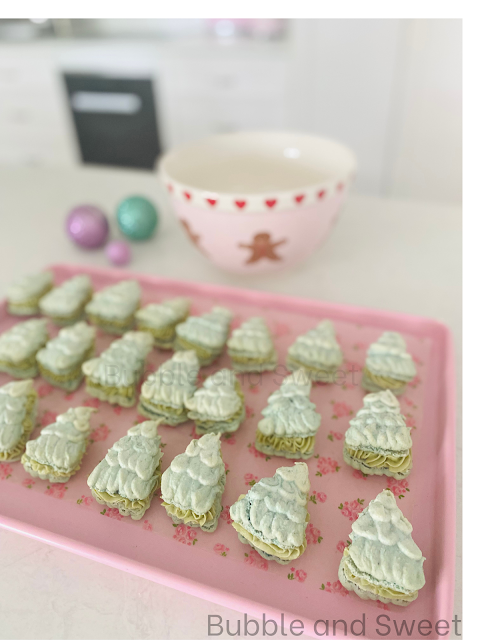
Textured Ombre Christmas Tree Macaron and Whipped White Chocolate Pistachio Ganache recipe


I'm a bit excited because I've recorded a new Youtube video. Oh my goodness, WOW! How much has technology changed in the last 10 years and by the way how fast does time go. Today was a learning curve, and some of the sound is a bit stilted, but new things are always fun and I'm looking forward to making more.

I thought I would jump back into it with some textured ombre Christmas Tree macarons, which is pretty much making up macaron mixture and not properly following through with the macaronage.

Which actually makes the whole process easier because no stopping and starting and counting out to see if the mixture is sinking back so it will make perfect shiny shells that won't collapse.

If you haven't made macarons before it might be a good place to start. I've used my regular macaron batter and piped the Christmas trees using Wilton petal tips 103 and 104 and then decorating with some royal icing.

I made the macarons in pink and green ombre which just means that they graduated from light to dark in the same shade. It would take a few steps out if you made them all the same colour and didn't decorate them and they look just as impressive.

The green macarons were filled with a delicious whipped pistachio ganache which I recommend, even if you decide not to make textured macarons (recipe below).

Happy Baking XX

Linda M


Macaron Recipe- Macarons should be filled a day prior to consuming and can be stored in fridge for a week. Filled and undecorated macarons can be wrapped in lots of 3-5 in plastic wrap, placed in an airtight container and frozen for a month.

190 gram (6 5/8 oz)almond meal (almond flour) blanched 190 gram pure icing sugar (6 5/8 oz powdered sugar) 190 gram granulated sugar (6 5/8 oz) 1 tsp powdered egg white (optional) 48 grams water (1 5/8 oz) 140 gram egg whites aged split into 2 lots of 70grams each (5 oz split into 2 lots of 2 1/2oz each) food color of choice 1. Mix the ground almonds and icing sugar together and pulse a few times in food processor to make almond meal finer. Do not over process as the meal can become oily. Sieve into a large bowl. Put 70g (2 1/2 ounce) of the egg whites in a bowl but don’t mix in yet. 2. Place remaining 70g (2 1/2 ounce) of egg whites in bowl of mixer fitted with the whisk. 3. Pop granulated sugar and water into saucepan stir to combine and cook without stirring to 118C (245 F). Brush down the sides with a pastry brush dipped in water as required to avoid the sugar crystallizing. Once the mixture reaches 115C (240 F) start mixing the egg whites on high. Make sure you have a pouring shield on your mixer, when the sugar syrup reaches 118C (245 F)remove from heat and immediately pour in a thin stream down the side of the mixer bowl continuing to whisk on high. 4. Continue to whisk the meringue on high until the side of the bowl is only a little warm to touch, around 50C (120 F). 5. Add meringue mixture to almond mixture and add in extra egg whites and using a large spatula fold the mixture together until it is just combined. 6. Split into 3 bowls with about 1/2 cup batter in one bowl, 1 cup in another and leave the remainder in the mixing bowl, then add colour to each bowl as desired making sure to not overmix. 7. Put each seperate colour into a piping bag fitted with a 103 or 104 petal tip. Line a tray with non stick baking paper or a silicone mat and using the darkest colour pipe a row with about 5 ruffles then another row with 4 ruffles, switch to the next lightest colour and pipe 3 ruffles and finally pipe a top swirl with the lightest colour.

Link to pink silicone mat AUSTRALIA AMAZON or US AMAZON
8. Allow to rest for 20 mins until the surface of macaron is just dry to touch and then bake at 135C (275 F) for 20 mins or until the tops of the macron is firm and does not jiggle when lightly pushed from the side. 9. Allow to cool and fill, I filled the green trees with Whipped White Chocolate Pistachio Ganache with a wilton open star tip, try tips 18 or 21.


Pistachio GanacheI used Pisti pistachio cream I picked up at Costco here in Australia you can get it here on CLICK HERE FOR PISTACHIO PASTE AMAZON AUSTRALIA 

or in US  CLICK HERE FOR LINK TO AMAZON PISTACHIO PASTE  

300g white chocolate

100g cream

80g pistachio paste

optional drop green food colour (I used eucalypt)

- heat the pistachio paste for 20-30 seconds to warm it, set aside until needed.

- mix together the white chocolate and cream in a microwave safe bowl and heat at hight for 1 minute, allow to sit for 1 minute and mix until smooth, if there are still lumps that have melted, heat for another minute and mix until smooth.

- add the pistachio paste to the white chocolate ganache mixture and mix until smooth, add food colour if required,

- allow to cool then whip to make a lighter airier consistency once it has set. 


Original photos and recipe from the Bubble and Sweet blog by Linda Mccubbin. I love when people share my blog ideas and give credit. Please feel free to link back to my blog for non commercial purposes. Affiliated links and adds may earn me money, however all ideas and opinions are my own,

Monday, December 22, 2014

Sweet Deer Cookies with silver leaf


I've been making super cute gingerbread deer cookies today.

Really I had planned to do this 2 months ago, so yes I'm just a little behind. I had this great idea for cupcakes with white chocolate Christmas tree shards and silver leaf and matching little deer cookies.

Then I went to make them and Oh My Goodness my deer cookie cutter was missing.

Greengate from Simply Sweet Home

It's kinda the sweetest little cookie and I just didn't want to make them without THAT cutter and I originally got it from Cakes by Bien but I wanted it quick so I had it sent from Cakers Bits and Bobs who are here in Australian and ship pretty fast so I got it within a day.

But then I realised I didn't order my silver leaf because, well because I was being cheap when I did the last online order and it can be a bit expensive. I was going to just pick up a little jar locally I figured it would work ok but then Oh My Goodness it was like $17 for a teensy weensy tiny jar so I decided to just order a whole book of transfer* sheets from Baking Pleasures which will last for cookies or sweets for ever (well not really but I don't use that much).

Then I kinda lost momentum.

But it's Christmas in a few days so I am baking like crazy and finally made them.


I tried them just white with silver leaf which was lovely and elegant, then with a little eye drawn on with edible marker, still adorable. Then I added a pink fondant nose and little pink ears which was super adorable.


Then I made some plain with the decorations and they worked out so well. I think gingerbread is the perfect colour just naturally with the spices for these little deer cookies and in fact the cutter is so sweet that the minimal decorating looked super dooper cute.


I guess the secret to these cookies is having a good gingerbread cookie recipe that will not spread out of shape so I've included my recipe below :)

Silver Leaf Elegant Deer Cookies
*I have used edible silver leaf on transfer sheet - not loose leaf which kinda flies all around the place for me. You can use the loose leaf if it works for you.

Deer cookies (see gingerbread recipe below)
White roll out fondant
Small plastic rolling pin
Deer cutter
Cornflour (or cornstarch)
Water and 2 clean brushes (used only for food)
Edible silver leaf transfer* sheet (I got mine at Baking Pleasures in Australia)
Optional - black edible marker


Knead white fondant until pliable, dust workbench with a little cornflour and roll out the fondant until quite thin. Cut out deer shape, brush water onto the cookie and then gently press the fondant onto the cookie.

Using a clean brush dab a teeny amount of water on the back area of the cookie. You just want the cookie to be slightly damp so wipe the brush on a paper towel to make sure it is barely wet.

Press the silver leaf transfer with the silver leaf facing down towards the cookie and rub your finger (or a cake tool) randomly on bits of the cookie. Pull the transfer off and allow the cookie to dry.

If you like you can add a small eye with the edible marker as shown in the picture.


Best Gingerbread Cookie Recipe
*Make sure that the spices you use are fresh as possible if you want your cookies to be aromatic and tasty. Conversions to imperial are approx.
I made these with both white sugar as per the recipe below and treacle (molasses, golden syrup, dark corn syrup) - the same weight and the recipe turned out well. I found it kept it's shape better with the white sugar which was important to me for what I was doing. The treacle gave a light fragrant undertone to the cookie and it had a more tender crumb, just putting the option out there for you. 

455g plain flour (1 pound all purpose flour)
2 tsp ground ginger 
2 tsp ground cinnamon
1/4 tsp ground allspice (or ground cloves if you prefer) 
1/4 tsp baking powder
1/4 tsp salt
1 Tbsp unsweetened cocoa(US 1Tbsp + 1 tsp)
230g unsalted butter (8 1/8 oz) softened (not too soft
70g dark brown sugar (2 1/2oz)
70g white sugar 
1 egg

Sift together flour, ginger, cinnamon, allspice, baking powder, salt and cocoa and set aside until required.

In the bowl of an electric mixer cream together the butter, brown and white sugar at high speed for 3 minutes. Reduce speed to medium low, add the egg and mix until combined.

Reduce speed to low and mix in flour mixture until the dough clumps together and is well combined.

Wrap the dough in plastic wrap and place in the fridge until firm.

Once dough is firm remove from fridge and roll out on a workbench dusted with a little plain (all purpose) flour. You may need to knead the dough a little to make it pliable.

Cut out shapes and place on a baking tray lined with baking paper.

Place trays of unbaked cookies into fridge for 30 minutes. Preheat oven to 160C (320F)

Bake for 8 to 12 minutes (depending on cookie size) remove from oven and allow to cool on trays for 5 minutes. Remove from trays carefully and place onto wire racks to cool completely. 

Greengate Summer White - It's what I'll be using for my Australian Christmas Setting

Linda Vandermeer is a blogger, baker, maker and author of the cookbook Sweets on a Stick: More Than 150 Kid-Friendly Recipes for Cakes, Candies, Cookies, and Pies on the Go! . Published in the US the book is available at most online book stores. 

This post is not sponsored by any of the companies mentioned and I purchased all the products myself however I am related to the owner of Simply Sweet Home

Amazon affiliate links may earn me money and contribute to supporting this blog.

Original Ideas, photography and recipes by Linda Vandermeer do not reuse without permission.

Tuesday, December 2, 2014

These are a few of my favorite things Christmas Edition roundup 2014

I love Christmas and I always have more ideas than time.

Plus I have so many favorite things from past years I want to make which makes it a super fun time full of baking for me but I don't always follow through with pictures and blog posts. Sometimes all I get is a quick Instagram picture (My Instagram CLICK HERE) and I'm off to the next treat on my list.

Yup if I've made it before chances are I won't be taking pictures so to solve that dilemma I'm posting a few of my favorite things on my list to revisit this year.


Gingerbread dress up cookie decorating party - forget the houses and make up batches of easy to decorate gingerbread people with little fondant clothes and accessories that the kids will have a ball decorating.


This is one of my favorite all time posts as my family had so much fun while I was taking the photo's and it's such a precious memory to me, plus there is even a picture of me included. CLICK HERE for full post and tutorial.


Oh Deer these cookies are so sweet. I adore these so much in fact I have a batch ready to decorate right now. They are perfect bit sized cookies and the cup edge gimmick is kinda fun. Plus you can always make them without the little cup edge hole and they are perfect sweet deer cookies. CLICK HERE for instructions.


Christmas nesting doll cookies - Quite a few years back I organised a cookie swap with a few other Australian cookie and cake decorators and it was such fun. These cookies remind me of how sweet and approachable everyone was despite the fact they all have such busy lives and businesses. Ireally wish I had of kept up with this tradition, it's on my wish list of things to do again. CLICK HERE for post


Ruffled 3D Christmas tree - I had this idea for a while for a ruffle rainbow cake but it was Christmas time so I decided to make a Christmas tree instead. I called it the Anit Fruit cake and it turned out to be just the right time it was a hit on Pintrest and I even did a version for The Cake Blog which was a lovely honor. The next year I made a Candy cane version. Each year I have a new idea, I'm really hoping I get time to make a different take on the cake this year. CLICK HERE for green ruffle Christmas tree instructions.
CLICK HERE for candy cane Christmas tree instructions.


Peppermint Cookie Fudge (that is all) - no really that is all I don't need to say anymore do I, I think you can see why this is in my list. CLICK HERE for recipe.

Christmas round up 2013 - See the below picture for last year's round up including that Pinata cake plus some seriously cute macarons and pretty sugar cookies. CLICK HERE for post.


Linda Vandermeer is a blogger, baker, maker and author of the cookbook ' Sweets on a Stick': More than 150 kid friendly recipes for cakes, candies, cookies and pies on the go!. Published in the US the book is available at most online book stores. 

Original Ideas, photography and recipes by Linda Vandermeer do not reuse without permission.  

Thursday, December 19, 2013

Oh Deer these cup edge cookies are too cute


Oh deer these cookies are too cute to eat.


I joke.

Actually around here the cutest cookies get eaten first.


The cookies from these photo's ended up being eaten by the kids, they had them in their mini Greengate cups with hot chocolate and marshmallows.

Yes those little kid size cups are unbelievably cute
from previous collection of Greengate CLICK HERE for link

They are smallish, around 6cm (2 3/4")  in size and are made from a regular (although super cute) cutter. I just cut out a little bit extra with the leg to make a bit to sit on the latte cups.

Deer Aimee cutter by Cakes by Bien CLICK HERE

See how I did that, yup no need to buy special cookie cutters at all.

These cookies were made using my gingerbread cookies recipe, it doesn't spread so much so there was no need to recut the little indent bit after baking.

CLICK HERE for gingerbread recipe.


Linda Vandermeer is a blogger, baker, maker and author of the cookbook ' Sweets on a Stick': More than 150 kid friendly recipes for cakes, candies, cookies and pies on the go!. Published in the US the book is available at most online book stores.

Original Ideas, photography and recipes by Linda Vandermeer do not reuse without permission.


Sunday, December 15, 2013

Gingerbread people dress up cookie party


This year instead of slaving over a gingerbread house we made gingerbread people dress up cookies. It was fun, easy and I could let the kids eat one (or two) straight away without the stress of breaking up the whole house.

I baked up a big batch of gingerbread men and women (Cookie recipe here).


Then I quickly cut out some fondant clothes using the cookie cutter and the kids got to stick them onto the cookies with royal icing like a dress up toy.

I made sure there were stacks of clothes with different colors and accessories for the kids to choose from. Kids are amazing and see the world differently. I think it might be lovely to see the world with flower eyes :)


Oh my goodness my kids truly love this type of cookie decorating, just love it!

The Destroyer (being a creator), Bubble and I, Sweet and Bubble

Plus perfect for Christmas, well actually my kids want me to say it's perfect for any time ;)

The hardest part of all of this was coming up with a ginger cookie recipe that didn't spread too much (otherwise the fondant clothes would be too small for the cookies). But I spent 2 weeks testing my own recipe so y'all don't have to worry about that, just click on the link in the instructions below.


I made some little mini lollipops and candy canes as well, the kids thought they were super cool.

Note - I have in the past made similar dress up cookies for my daughter's birthday party - but these gingerbread ones are way, way, way easier - trust me. You can check out the original 'paper doll dress up cookie' inspiration HERE:

These are the original dress up doll cookies I made CLICK HERE to see details

Gingerbread people dress up cookies
Make the fondant/sugar clothes as per the instructions below. Once the clothes have set and become hard enough to pick up you can let the kids decorate the cookies by squeezing royal icing onto the cookie and sticking the clothes in place. They can also add gingerbread faces and other decorations as they like.

EDIT update: I've recorded an easy to follow youtube video tutorial here as well:


Gingerbread men and women cookies (Click here for Gingerbread cookie recipe)
Gingerbread men and women cookie cutters
Fondant various colours
Cornflour (cornstarch)
small rolling pin
sharp knife
frilling tool (can use toothpick instead)
Royal Icing (for final assembly)


Line a tray with parchment/ baking paper.

Gingerbread men fondant/sugar clothes
Roll out the fondant onto a workbench dusted with cornflour (cornstarch). Use the gingerbread man cutter to cut out shape and then the sharp knife to cut out the top and shorts (see picture below). If you like you can adhere shapes like a star onto the fondant cut outs. Place cut outs onto the tray lined with paper to dry overnight.


For striped shirt, cut out thin strips of fondant and press onto a contrasting color fondant with the rolling pin, then cut out shapes with cutter as described above. I added a thin strip of vertical fondant on the sleeve edge.

Gingerbread women fondant/ sugar clothes

Roll out the fondant onto a workbench dusted with cornflour (cornstarch). Use the gingerbread woman cutter to cut out shape and then the sharp knife to cut out the top and skirts (see picture below). Place clothes on paper lined tray to dry.


If you like you can make the skirts and edge of the top ruffled by using the frilling tool, press down on the fondant and gently roll back and forth. I also added a thin strip of contrasting color fondant to the sleeve edge of some tops before pressing down with the fondant tool.

You can also cut a second strip to make a 'pettiskirt' underneath, just use the frilling tool to roll back and forth and then stick it underneath the top skirt, you might need to add a small amount of water to adhere the 2 skirts together.

 To make a lace pattern on the edge use the sharp edge of the frilling tool (or a toothpick) to dot holes (see picture below for example).


Accessories

To make a lollipop you will need fondant in 4 different colours and a small length of spaghetti. Roll each colour of fondant into a long thin strip and the twist the fondant together. Starting in the middle wrap the twisted fondant around in a spiral to look like a lollipop. Push the spaghetti into the fondant lollipop disk.
 
The example in this picture only uses 2 colours and is bigger but same concept

 Small flowers pressed out of fondant make great accessories, I used a small ejector cutter.

Linda Vandermeer is a blogger, baker, maker and author

Original Ideas, photography and recipes by Linda Vandermeer do not reuse without permission.


Thursday, December 12, 2013

Gingerbread Cookie recipe


Gingerbread.....it's that time of year and there are lots of recipes out there. But I've got a project coming up and I needed a recipe that tastes good but doesn't spread.


Yup like these ones in the picture above.


So starting with my original recipe I tweaked and tried, and tried and tweaked again (and again and again).

It's pretty warm where I am at the moment and I like to trial a cookie recipe for about a year until I'm happy with it - y'know they work different in different weather.

So this is the best of the batch, it rolled out the best with the minimum spread after baking and the taste was spicy and not overly sweet.

You can see in the picture that some are a little darker, those are the ones with cocoa in - you can omit the cocoa if you like and your cookies will end up a light golden colour.


These cookies in the pictures above are simply cut out with gingerbread men ejector cutters where you press out, press down to imprint the shape and then eject the cookie onto the tray. Bake for 8 - 10 minutes. I decorated them with a little royal icing and heart sprinkles in place of buttons.


Gingerbread Cookie Recipe
*Make sure that the spices you use are fresh as possible if you want your cookies to be aromatic and tasty. Conversions to imperial are approx.
EDIT - I made these with both white sugar as per the recipe below and golden syrup (molasses, treacle, dark corn syrup) - the same weight and the recipe turned out well. I found it kept it's shape better with the white sugar which was important to me for what I was doing. The golden syrup gave a light fragrant undertone to the cookie, just putting the option out there for you.

455g plain flour (1 pound all purpose flour)
2 tsp ground ginger
2 tsp ground cinnamon
1/4 tsp ground allspice (or ground cloves if you prefer)
1/4 tsp baking powder
1/4 tsp salt
1 Tbsp unsweetened cocoa(US 1Tbsp + 1 tsp)
230g unsalted butter (8 1/8 oz) softened (not too soft
70g dark brown sugar (2 1/2oz)
70g white sugar
1 egg


Sift together flour, ginger, cinnamon, allspice, baking powder, salt and cocoa and set aside until required.

In the bowl of an electric mixer cream together the butter, brown and white sugar at high speed for 3 minutes. Reduce speed to medium low, add the egg and mix until combined.

Reduce speed to low and mix in flour mixture until the dough clumps together and is well combined.

Wrap the dough in plastic wrap and place in the fridge until firm.

Once dough is firm remove from fridge and roll out on a workbench dusted with a little plain (all purpose) flour. You may need to knead the dough a little to make it pliable.

Cut out shapes and place on a baking tray lined with baking paper.

Place trays of unbaked cookies into fridge for 30 minutes. Preheat oven to 160C (320F)

Bake for 8 to 12 minutes (depending on cookie size) remove from oven and allow to cool on trays for 5 minutes. Remove from trays carefully and place onto wire racks to cool completely.


Linda Vandermeer is a blogger, baker, maker and author of the cookbook ' Sweets on a Stick: More Than 150 Kid-Friendly Recipes for Cakes, Candies, Cookies, and Pies on the Go! . Published in the US the book is available at most online book stores.

Original Ideas, photography and recipes by Linda Vandermeer do not reuse without permission.

Sunday, November 24, 2013

Christmas Pudding Pinata Cake

Please don't hate me, but I don't like Christmas pudding.

I'm just not that into it.

I guess you probably had a bit of an inkling a few years back when I confessed I didn't care for Christmas fruit cake and created the anti-fruit cake.

It's not the pudding, it's me, I love the idea of it.

So I've come up with a compromise and I think this pudding and I can agree to work together.


I've made a simple buttercream covered chocolate cake shaped like a pudding, covered with some simple fondant decorations and it's filled with chocolate and lollies (CANDY).

Oh yes I think me and this Christmas pudding pinata cake can get along just fine.

I've done up some quick instructions below, but I would recommend checking out my you tube tutorial here:


This cake was inspired by my dislike of pudding and this pinata cake on a subtle revelry.

Christmas Pudding Pinata Cake Instructions.
Although the cake will last for a few days, any coloured candy might bleed a little after a few hours. You can solve this by making as close to serving as possible or filling with wrapped lollies/candy (like the chocolate coins) or you can spread a thin layer of chocolate or ganache over the cut inside of the cake and let set before adding the candy.

I recommend watching the you tube tutorial CLICK HERE which shows me cutting the cake and hollowing it out.


Ingredients and Equipment

Chocolate cake baked in a bowl (mine was a mix that would normally make a 22cm chocolate buttercake)
Chocolate butter cream (I used Italian Meringue Buttercream as I had it handy but I would recommend a denser regular buttercream)
Large knife
Chocolate coins
Various lollies (candy)
small knife
spatula
White fondant, red fondant, green fondant
Corn flour/cornstarch
Large irregular cutter (Mine from an Ikea cookie cutter set)
holly cutter

*Note that blue cutter above is from a set of cutters from Ikea. I actually used the larger one. If you don't have one just cut out the shape you want by hand using a sharp knife.

Cut the top off the cake to make a flat base, then cut through the cake around 2 cm (just under an inch) from the bottom to get a flat base.


Using the sharp knife cut into the top domed cake to hollow out the top (see my you tube tutorial)

Place the base onto a cake stand or plate, pile up lollies and coins (candy) into the center.

Spread chocolate buttercream around the edge of the chocolate dome and stick it to the base ensuring the candy stays inside. Then cover the whole cake with chocolate buttercream. Chill if necessary.

Dust workbench with corn flour (cornstarch) and roll out the white fondant. Use cutter (or a knife) to cut out irregular shape to look like the sauce on top of a pudding (see picture). Carefully place onto the top of the buttercream covered cake.

Roll out green fondant onto workbench and cut out 3 holly leaves, use a knife to make indents to look like leaves. Place on top center of cake.

Roll a small piece of red fondant into a ball and place on the top center of the cake.


Linda Vandermeer is a blogger, baker, maker and author of the cookbook ' Sweets on a Stick': More than 150 kid friendly recipes for cakes, candies, cookies and pies on the go!. Published in the US the book is available at most online book stores.

Original Ideas, photography and recipes by Linda Vandermeer do not reuse without permission.

Sunday, December 23, 2012

Elegant Jewelled Snowflake cookies


I made up a list and I checked it twice,

trying to work out who was naught and who was nice.


But seriously my nice list way waaay too long and I really had to cut it back.

In the end I sent out just a few of cookie packages to a couple of people on my nice list.


Well actually the people that I did a cookie swap with last year because I forgot to organise one this year.

It seems Noo from Dessert Menu Please had the same idea and the day after I posted out my treats I received a package with a cracker and inside the sweetest hand drawn little festive cookies :)

Follow random pictures of my life on instagram: http://instagram.com/p/Tewm3zwlAy/

Above is a picture that I posted on my new instagram account. If your following me there you may have seen a few random photo's of my new creative/craft space and other random pictures of my life.

Anyhoo the cookies I sent out are an updated version of the elegant snowflake cookies I made a few years back but I added jelly gems.

Which by the way I am a bit smitten with at the moment.

Oooooohhhhhh Jelly Gems, so pretty..........

The actual cookie was a Christmas inspired cinnamon and cranberry sugar cookie. You can find my recipe in the free online Christmas edition of 'Tickle the Imagination' Magazine if you CLICK HERE.


The original decorating tutorial for the Winter Wonderland Snowflake cookies has a recipe for plain vanilla sugar cookies if your not keen on the Christmassy version. CLICK HERE for the original post and recipe. 


and thank you all so much for reading this year, it always brightens my day to receive comments or see my treats pinned.

From my family to yours wishing you safe and happy Holidays.

Xx
Linda V

Elegant Jewelled Snowflake Cookies

Sugar cookie dough
Snowflake cookie cutter (mine from Bisk-art)
Decorative stamp or embosser
White fondant#
Small plastic rolling pin
brush and water
Jelly Gems
2 round tip (mine was Wilton)
Royal Icing (I used queens royal icing mix from Woolworths - just add water)
Piping bag with small tip
 
edit update - I have a youtube video tutorial on how to make sugar cookie dough

#Fondant dries out pretty quickly so I work with a little fondant at a time covering one or two cookies. The remaining fondant I leave wrapped in a little cling wrap/ glad wrap until I need it.

Line a couple of trays with parchment paper.

Make up batch of sugar cookie dough, chill, roll out on workbench lightly dusted with flour and cut out snowflake cookies.

Pop the cookies onto the prepared trays and put in the freezer for around 15 minutes.
 

Meanwhile preheat over to160C (320 F) and then bake cookies for around 12 - 15 mins.

Remove from oven when they just start to become golden and using the small end of the icing tip quickly remove a small hole from the center of each cookie.

Ooops - no photos of the cookies with holes in them. Just use your imagination :)

Knead fondant until pliable and roll out on a surface lightly dusted with cornflour and using the same snowflake cookie cutter cut out the snowflake shape. Make sure the cookie cutter is clean and dry before you start cutting.

Brush a tiny amount of water onto the cookie and then adhere the snowflake fondant cut out to the cookie, gently rolling on with a small rolling pin if required.

Take the #12 tip and press down to remove a round of fondant from the center of each cookie. I needed to poke it out with the end of my brush.

OK just imagine there is a hole in the middle - I didn't get a picture of one :)

Using a clean foodsafe stamp or embosser press into the middle of each cookie to make a pretty indentation.

Pipe a circle of royal icing around the edge of the round hold in the center of each cookie and place a jelly gem inside using the royal icing to glue it into place.

Pipe decorative dots on the cookie as desired.


Leave out until royal icing is set.

Cookies can be stored in an airtight container at room temperature for a week.


....................

Recipe, photo's and post by Linda Vandermeer author of Sweets on a Stick: More than 150 Kid Friendly recipes for cakes, candies, cookies and pies on the go. You can pick it up at all good online book shops including these shops:


Or here at fishpond (Aus/NZ)

Sweets on a Stick: More Than 150 Kid-Friendly Recipes for Cakes, Candies, Cookies, and Pies on the Go!