Showing posts with label sugar blossom. Show all posts

Wednesday, April 30, 2014

How to make Pretty Shabby Chic Cookies


Mothers day is just about here and I thought I would share how to make these lovely sweet shabby chic inspired cookies.


I designed these cookies a while back for my lovely friend Jo's birthday high tea celebrations.

I truly love them and they are so pretty that you can use them for so many occasions. Plus of course you can change the colours (like I have in the photo's from pink to light blue) to suit any party scheme.


If you don't like fondant (or marshmallow fondant) of course you can always do a royal icing base instead of the embossed fondant and then just pop the frilled oval and flower decoration on top.

Pretty GreenGate tins from Mollegaarden Denmark

Not Too Shabby Cookies
Don't worry too much if you don't have the exact flower cutters, for example you could use a small blossom cutter in place of the small daphne cutter in a pinch.

Free video tutorial link:

Fancy square plaque cookie cutter (see link at end of post for example)
Fancy square plaque cookies (CLICK HERE FOR COOKIE RECIPE)
Patchwork quilting embosser (see link at end of post for example)
Cornflower/ cornstarch
Brush and water
small rolling pin
fondant (pink, blue, white)
Dark pink sugar flowers (Click here for tutorial)
Frilled oval cutter
Daphne plunger cutter (see link at end of post for example)
Flower/leaf shaping tool
Royal icing - White in piping bag with plain round tip (#2)
Royal icing - Bright green (I used Americolor Electric Green) in piping bag with leaf tip (#65)
** Remember that fondant dries out quickly so cover in plastic wrap while not in use and knead before rolling out.


Dust the workbench with cornflower/cornstarch and roll out the pink fondant. Press the fancy square plaque cutter into the fondant to cut out the shape.

Brush the cookie lightly with water and place the fondant on top of the cookie, press gently into place using the rolling pin.

Take the embosser and place it on top of the cookie, ensuring that it is evenly aligned with the top.Press down firmly with even pressure all around the cookie surface, lift the embosser off. If the fondant lifts, press it lightly back down in place.

Roll out the white fondant and use the frilled oval to press out a shape.

Lightly brush water in the middle of the cookie and place the oval in the middle of the cookie.

Use the sharp edge of the leaf shaping tool to pop a hole in each curve around the edge of the oval shape (see picture).

Roll out the blue fondant, cut out three small daphne flower shapes using the plunger. Use the leaf tool on each of the petals to press a 'vein' indent in the middle.


Secure the dark pink flower and the three blue daphne flowers in place with a dot of royal icing.

Pipe a center dot of royal icing in each of the blue daphne flowers. Then pipe a white dot of royal icing at each intersection of the quilting embossed design on the pink fondant (that is the corners where the lines meet).

Pipe a few leaves around the flowers using the green royal icing with the #65 leaf tip by placing the tip on the cookie where you would like the leaf to start at a 45degree angle, apply light pressure to the piping bag and pull the tip away from the surface moving slightly up and down parallel to the cookie. Release the pressure on the bag while continuing to pull the tip away to form a pointed edge.

Allow the decorations to set.

Decorated cookies can be made up to a week ahead stored in an airtight container.


Linda Vandermeer is a blogger, baker, maker and author of the cookbook ' Sweets on a Stick': More than 150 kid friendly recipes for cakes, candies, cookies and pies on the go!. Published in the US the book is available at most online book stores.

Affiliate links may earn me money and contribute to supporting this blog.

Original Ideas, photography and recipes by Linda Vandermeer do not reuse without permission. 


Thursday, April 17, 2014

How to make pretty chocolate Easter eggs

(How to decorate pretty Easter eggs tutorial down below)

Easter is almost here so I thought it would be fun to decorate some homemade Easter eggs.


These eggs are for non-chocolatier people like me. No fancy tempering the chocolate and the edges are a bit messy.

But what they lack in perfection they make up in charm and the kids sure didn't notice any problems with them.


I made a few in dusty pink and soft mint green, decorated them with some sugar flowers and then bribed the kids with the eggs so I could get a couple of nice pictures.


Oh how sweet is that old basket they are holding, I've had it for years and years. I may have even got it from the Easter Bunny when I was a little girl :)


The Destroyer even joined in, see that is I can believe I have to hold these eggs when I really want to be eating them face.

Easter egg moulds can be found for a very reasonable price in discount and dollar stores around Easter.

How to make pretty Easter eggs
These eggs are quite delicate and not really suitable for very warm weather, if you do a double layer of chocolate they will be a bit more stable. Can be made 1 week ahead of time and stored in a cool place.

Here is a quick free video tutorial showing how I made them, for written step by step instructions, plus links to the fondant flower see below:


Ingredients and Equipment

White chocolate melts  (US - these are actually white chocolate not candy melts)
Oil based food color (or gel food color and Flo-Coat)*
#optional - Oil based raspberry essence
Egg Mould
Sugar Flowers (see below for links to tutorials)
Royal Icing

How to make Blue fondant Flowers Tutorial CLICK HERE for link
How to make Easy Sugar Blossoms CLICK HERE for link

Place the white chocolate in a microwave safe bowl and melt at medium low heat in the microwave for 2 minutes. Make sure the heat is low otherwise the chocolate may seize and become unusable. Remove from microwave and stir for 30 seconds. If required return to microwave and heat at medium low heat for another 1 minute, then remove and stir until smooth. Continue until all the chocolate is melted.


To color the chocolate add a drop or 2 of oil based food color. You can not use regular water based food color* or the chocolate will sieze and become unusable.

*To make gel food color suitable to use with chocolate, add 1 drop food color to 11 drops flo-coat, mix until well combined and then add to the melted chocolate.

Optional - If you would like to flavor the chocolate add a few drops of the raspberry oil essence.

Spoon melted chocolate into the egg mould, using the back of your spoon to ensure the chocolate comes up to the edge and then tap sharply on the workbench quite a few time to bring any air bubbles out. Most of the chocolate will have pooled in the center of the mould, so use the back of your spoon to push it back up to the edges making the chocolate coverage as even as possible. Run a knife around the top to ensure that the edge of the egg is even.


Pop the mold into the freezer for a few minutes until the chocolate is completely set.

Remove the mould from the fridge, gently pull the mould away from the chocolate at the edges and then turn the mould over. The chocolate should release easily. If it happens to crack don't worry just remelt the chocolate and start again.


Using royal icing attach flowers or decorations as desired. I added 3 large blue fondant flowers and 3 smaller sugar blossoms to these pink eggs.


Gently join the eggs together using extra melted chocolate, the edges may look a little uneven, you can carefully press extra chocolate into the gaps rubbing over the top to smooth the chocolate, or add ribbon to hide the seam.


Linda Vandermeer is a blogger, baker, maker and author of the cookbook ' Sweets on a Stick': More than 150 kid friendly recipes for cakes, candies, cookies and pies on the go!. Published in the US the book is available at most online book stores.

Affiliate links may earn me money and contribute to supporting this blog.

Original Ideas, photography and recipes by Linda Vandermeer do not reuse without permission. 


Wednesday, April 16, 2014

Easy to make Blue Fondant Flowers


It's no secret I like to decorating with sweet blossoms and flowers and especially these easy to make embossed blossoms.

I love to make them in this teal blue color, they add such a lovely pop of color, and the best thing is you can make them weeks ahead of time and have them ready to put in place making decorating a cinch.

The step by step photo instructions are below plus I've even made a super fast YouTube tutorial up so you can watch me.


DIY Fondant Flowers

Equipment and Ingredients

 
White Fondant
Teal Fondant
cornflour (cornstarch)
Small plastic rolling pin
5 petal blossom cutter
Flower veiner or embosser (see link below)
Clean bush and water or edible glue
flower formers (I use a small artists palette)


Dust a workbench with a little cornflour (cornstarch) and knead the fondant until pliable.

Redust the workbench if necessary and roll out the teal fondant until around 1mm (16") or so in thickness. You may like to lift the fondant and turn a little to ensure it is not sticking.


Using the blossom cutter, press into the thinly rolled fondant to cut out the blossom shapes.

Place the cut out shapes onto the top of one side of the flower embosser/veiner. Place the other side of the embosser on the top and gently press down around the edges. Note if you press too hard you will press through the fondant.

Carefully remove the embossed blossom from the press.

Dust the flower formers (paint palette) with a tiny amount of cornflour (cornstarch) and place the shaped fondant blossoms into them to set/dry.


Roll 3 small balls from the white fondant for each flower and adhere 3 small balls of fondant in the center of each flower with a very small amount of water.

Once dry the flowers can be used immediately or stored for a number of weeks until required. I store mine in airtight containers. Some people like to pop little packets of food safe silica gel in the containers.

Linda Vandermeer is a blogger, baker, maker and author of the cookbook ' Sweets on a Stick': More than 150 kid friendly recipes for cakes, candies, cookies and pies on the go!. Published in the US the book is available at most online book stores.

Affiliate links may earn me money and contribute to supporting this blog.

Original Ideas, photography and recipes by Linda Vandermeer do not reuse without permission. 


Monday, July 29, 2013

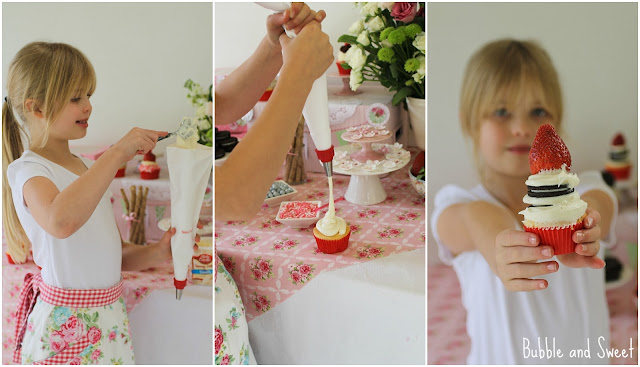
How to Host a Cupcake Decorating Birthday Party - Lilli's 9th Birthday Party


This year for Lilli's birthday party we decided to have a cupcake decorating party and it was a super sweet success.

Lilli is at that in between age where some of the kids get a bit bored with the usual party games we've had in the past. As a compromise we're still having pass-the parcel which is the birthday girl's favourite plus a pretty dessert table (my favourite - make sure to pop back next week to see those pictures) and filling up the rest of the time with cupcake decorating.


The great thing about a cupcake decorating party is that you can go as low cost or fancy as you choose depending on your budget, plus it's great for a wide range of kids (we had 4 years to 9 years olds).

Also, the actual cupcake decorating set up of the party was soooo easy!


I have to admit, I had a little help in the kitchen. I used Betty Crocker cupcake mix, which comes with ready to spread frosting. I also used a couple of tubs of Betty Crocker's ready-made frosting for extra piping. It made the preparation and clean up a breeze. And, because it's so easy, Lilli helped out baking the cupcakes, which gave us some special family time the night before the party and added to the fun.


Lilli and her friends are a pretty crafty and fun bunch so I thought we would set up a few stations with pictures of a finished cupcake at each station along with the ingredients needed. I explained how to pipe a frosting swirl, how to make a fondant flower or butterfly and a quick description of each cupcake on offer and then let the kids go to it.


Cupcake Decorating Ideas (all cupcakes in the pictures are made using Betty Crocker cupcake mix and ready to spread frosting):  

Pretty flowers and pearls

Ingredients
Vanilla Cupcakes and ready to spread frosting vanilla or strawberry
Sugar flowers (CLICK HERE to make your own or buy premade sugar flowers)
Candy coated chocolate balls* or cashous *sixlets (candy coated chocolate) from spotlight or cake decorating stores, cashous from supermarkets.


Directions
Put frosting into a piping bag fitted with a large open star tip. Starting in the middle pipe the frosting on working your way out in a circle. Top with pre-made sugar flowers and Candy coated chocolate.

Cookies and Cream

Ingredients
Vanilla Cupcakes and ready to spread vanilla frosting
Oreo Cookies


Directions
Chop up a few oreos into small pieces and mix into the vanilla frosting. Put the frosting into a piping bag fitted with a large round tip. Starting in the middle pipe the frosting on working your way out in a circle. Top with a whole Oreo Cookie. Alternately you can spoon the oreo frosting on, smooth into a mound with a knife and top with a whole Oreo Cookie.


Strawberry forever
Ingredients
Strawberry Cupcakes and ready to spread vanilla or strawberry frosting
Strawberries
Pink and white sprinkles


Directions
Spread a layer of frosting onto the cupcake and then dip the top in the sprinkles. Put the extra frosting into a piping bag fitted with a large open star tip. Pipe a swirl of frosting in the middle of the cupcake and top with a whole Strawberry.

Sundae Best

Ingredients
Vanilla Cupcakes and vanilla and chocolate ready to spread frosting
Jaffas
wafers or half flake


Directions
Put vanilla and chocolate frosting into separate piping bags fitted with a large open star tip. Starting in the middle pipe the vanilla frosting on working your way out in a circle. Pipe a small amount of chocolate frosting on the top. Place a jaffa onto the top center of the cupcake and then push a wafer cookie into the top off center.


Let's go crazy * suitable for all age groups

Ingredients
Cupcake and ready to spread frosting any flavour
Assorted lollies

Directions
Place frosting into bowls with flat knife or offset spatula and allow kids to spread the frosting onto the cupcake and then load lollies on as desired.


In the end the cupcake decoration directions were more a suggestion than a rule and the kids had a fun time coming up with imaginative ideas all on their own.

I loved the Oreo stacks they whipped up - cupcake, frosting, Oreo, frosting, Oreo, frosting and topped with a strawberry. Over the top - no way! They were perfect because the kids made them and had so much fun with each other along the way.


Cupcake Decorating Tips

- Don't skimp on the frosting. Go big or go home. I can not stress how important having enough frosting is. Remember these are kids and there WILL be some consumption loss during the decorating. This was one of the reasons I loved using the Betty Crocker tubs of ready made frosting - I had extra tubs on hand in the pantry just in case.

- Also don't skimp on the decorations - same rules apply as frosting.

- Try to make the cupcake designs age appropriate. Younger kids are happiest just adding as many lollies as they can fit, older kids appreciate a few different designs to choose from.


- Disposable icing bags and tips are available at grocery stores.

- Don't overfill the bags, half full is good, and secure the end with a rubber band. Warm hands will make any frosting a little bit runnier, see above tip re disposable icing bags


- It's a great idea to have some cupcake boxes to pop the finished cupcakes into. Mine were from the local discount store $2 for a set of 3. Make sure you write each guests name onto the box so that their fabulous creations do not get mixed up.


Other Party Tips

The rest of the preparation I did the weekend before. I picked up some cupcake boxes from the discount store and Lilli helped me pop them up and then I added a bit of extra decoration myself (yes because I just can not help myself). If you wanted to you could make decorating the box an extra activity for the kids to do themselves at the party.


I borrowed some kids aprons from a friend for the party guests which added to the fun. I have seen some tutorials around to make your own kids aprons from teatowels if you are crafty and can sew a straight line. Although on the day of the party I completely forgot about the aprons because I didn't have them in my preparation area - doh!


We had 15 kids so we used 5 boxes of Betty Crocker cupcake mix to make at least 4 cupcakes each. I found the mixes to be generous and we managed to make 16 cupcakes from each box. Each box of Betty Crocker cupcake mix actually comes with ready to spread frosting in the boxes, we used an extra 3 tubs of the Betty Crocker frosting for piping(see frosting tips above).
 

Lilli picked the invitations, we found these cute pop up cupcake girl ones from Paper Eskimo that were perfect for the party theme they come in a box with pretty matching envelopes and thank you post cards.

Take home party bags - The boxes of cupcakes double as a cake and take home party favour and are really enough. But we did up a little bag for everyone which included some fondant cutters (either flower or butterfly), decorating sugar pearls, cupcake cases and a little bag of lollies. The pink and white spot bags were from my local discount store for $2 or $3 for the set of 10. We popped on a little thank you card that came with the invites that Lilli personally wrote to everyone prior to the party.


Plus everyone took home their own box of Betty Crocker vanilla cupake mix so they could easily whip up their own home baked cupcakes.

Stockist Tips
Cupcake Mixes and Ready to Spread Frosting - Betty Crocker available all supermarkets
Fondant Cutters - Sunrise Wholesaler (similar available cake decorating shops online)
Pop up Invitations -  Paper Eskimo 
Cupcake Boxes and Party Bags - discount/dollar store


Disclosure: the ideas, words and opinions in this post are my own however this post was sponsored by General Mills.

Saturday, June 29, 2013

How to make simple sugar blossoms flowers from fondant


I'm feeling super generous so today I am going to share one of my secret decorating weapons with you, something I turn to when I need a quick fix but don't have a lot of time or money to spare.


Sweet sugar blossoms.

I've done up a quick and easy tutorial showing how simple it is to make up these sugar blossoms from fondant. Once you make them you can use to dress up anything from cupcakes, to cookies, or marshmallows and cakepops.

Yup pretty much anything you like.


There's no big trick to these flowers, just a few tools, a couple of practice runs and you will be on your way to creating a sweet posy of blossoms yourself.

They are so quick and easy to make I usually make more than I need and store them ready to use when I need a little extra something to brighten a treat up.


The step by step photo instructions are below plus I've even made a super fast YouTube tutorial up so you can watch me. Well watch my waist and arms :)


Oh and it would be super neat if you could take the time to follow me on Pintrest, Instagram or Bloglovin.

DIY Simple Sugar Blossoms

Equipment and Ingredients
White Fondant
Pink Fondant
Pink edible petal dust
cornflour (cornstarch)
Small plastic rolling pin
5 petal blossom cutter
Ball tool
dry clean brush
Separate clean bush and wateror edible glue
Non stick pad
flower formers (I use a small artists palette)
 

Dust a workbench with a little cornflour (cornstarch) and knead the fondant until pliable.

Redust the workbench if necessary and roll out the fondant until around 1mm (16") or so in thickness. You may like to lift the fondant and turn a little to ensure it is not sticking.


Using the blossom cutter, press into the thinly rolled fondant to cut out the blossom shapes. Place the cut out shapes on the non stick foam.

Use the ball tool to softly roll around each petal to thin it out and make it a cup shape.


Dust the flower formers with a tiny amount of cornflour (cornstarch) and place the shaped fondant blossoms into them to set/dry.

Once they are dry brush lightly with the petal dust using the clean dry brush. I start in the centre and dust outwards lightly on each petal. Remove any excess dust carefully with a soft bristle brush.


Roll 3 small balls from the pink fondant for each flower and adhere 3 small balls of fondant in the center of each flower with a very small amount of water.


Once dry the flowers can be used immediately or stored for a number of weeks until required. I store mine in airtight containers. Some people like to pop little packets of food safe silica gel in the containers.


The above pictures and post are original works and the property of Linda Vandermeer.

Linda Vandermeer is a blogger, baker, maker and author of the cookbook ' Sweets on a Stick': More than 150 kid friendly recipes for cakes, candies, cookies and pies on the go!. Published in the US the book is available at most online book stores: