Bubble's birthday party was last weekend. It was a fun budget birthday organised in under 2 weeks which I will be sharing as soon as I sort out the photo's.
In the meantime here is a quick bit of diy decorating that I did for her party. It's so pretty you could even use it for a grown up party.
I made up a bunch of gold glitter straw flags for the party which looked pretty fabulous considering they cost a few dollars for the whole lot.
Yup $2 for a pack of those cute chevron straws and $1* for a roll of gold glitter tape. Plus next to no time.
*I had a quick check online and the gold glitter tape I found was more expensive that the one I picked up at the discount store, so shop around or happily pay a little more and support local businesses your choice :)
Gold Glitter flag instructions
So pretty much all you do is cut a short length of tape, fold it in half to make a crease, take off the plastic backing, place it around the straw so that the fold you have made aligns along the straw to make sure it is even and then press the sticky sides together. You can leave the flag with a flat even edge, or if you like take a sharp pair of scissors and cut a little V away as shown in the picture. So easy peasy I know I didn't even need to put the written how to but it makes me feel like I'm doing something ;)
I'm not the first person to do this, my SIL did this glitter tape at my niece's
birthday party plus last year I did pretty much the same thing but used floral tape
instead of glitter. But it is soooo pretty I had to share the pictures.
Shopping notes:
Gold Glitter tape in pack of 4 from Big W discount department store Australia (pack of 4 glitter tape $4)
Pink Chevron Girl straws Shmick CLICK HERE
Pink polkadot and floral fabic tape from Choice discount stores Australia
Pink twine Greengate
Scissors - similar available on Ebay
Linda Vandermeer is a blogger, baker, maker and author of the cookbook '
Sweets on a Stick': More than 150 kid friendly recipes for cakes,
candies, cookies and pies on the go!. Published in the US the book is
available at most online book stores.
Original photography by Linda Vandermeer do not reuse without permission.
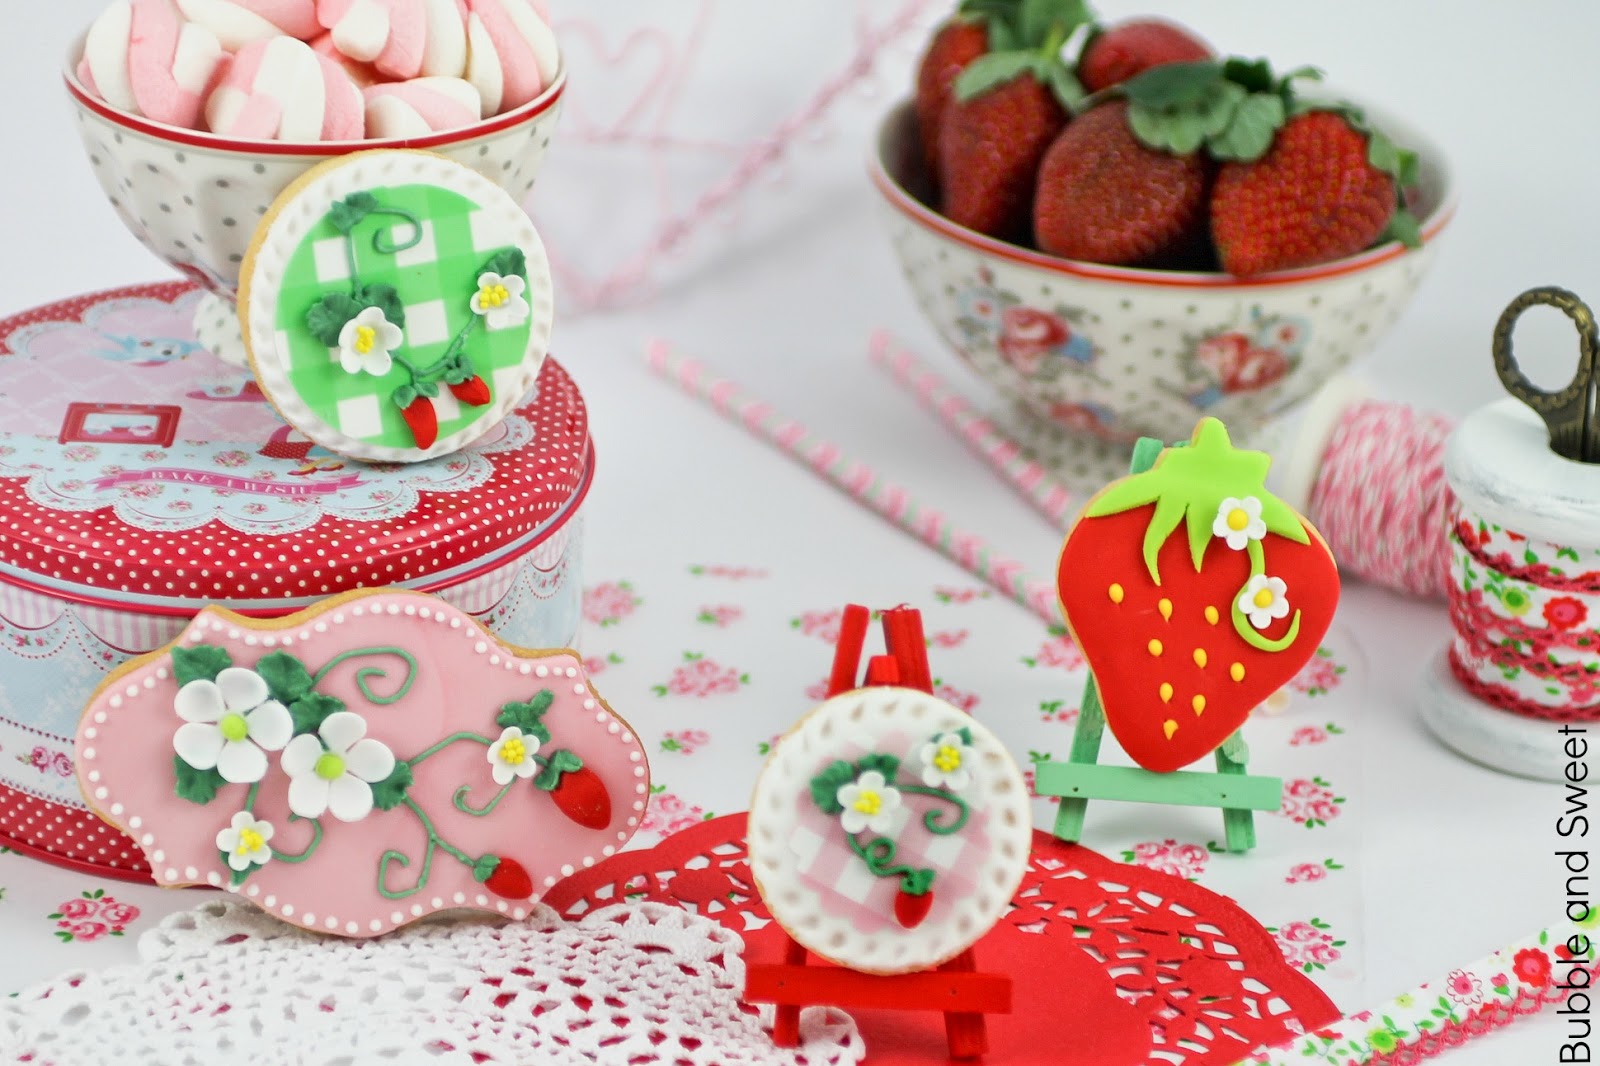
My niece had an adorable Strawberry themed birthday party on the weekend and I made up some cookies to go onto the party table.
Strawberries are so yummy and cute, I don't even know why I haven't had my own Strawberry party yet. Did I mention it was adorable? A-dor-able!
Plus there are so many cute things you can pick up for a bargain to match a strawberry theme. Hello red polka dots or pink and lime gingham. Plus ready made strawberry piñata's for decoration, oh my goodness it's a strawberry theme party decorators dream at the discount stores.
Anyway, like I said I was making the cookies plus some macarons, so about 10 days before the party I rang up my Sister in law (SIL) and said 'Hey I think I'll make the cookies this weekend because they keep really well and then I can just make the macarons the Friday before'.
Y'all know because macarons are best when they have sat in the fridge for at least a day so I was thinking I had it all planned.
So I heard a moments silence, and then my SIL let me know the party was actually in 3 days time, and that my own daughter's birthday party was the one in 10 days time (yup forgot my own daughter's party date...... more on that revelation in another post).
Eeeek! Anyhoo people that know me are probably not very surprised with this story.
So I started making cookies as soon as I hung up the phone and came up with this cute set to match the rest of the party.
Luckily I was able to quickly get some edible frosting sheets from Caketopia in pink and lime gingham which pretty much made decorating so much faster, and easier, and did I say faster 'cause that was really important.
Seriously people edible frosting sheets - try it, the ones I got from Caketopia were so easy to use.
The bigger plaque cookies were not exactly what I wanted, I was hoping to do pink and white royal icing stripes, but seeings as I was working on a new super short timeframe I was pretty happy with how they ended up.
Scroll down below for the step by step instructions on how to make your own strawberry cookies.
Plus if you like my strawberry cookies you might like these from some of the blogs I follow:
I've also popped up a free video tutorial of me making the strawberries cookies here:
Sweet Strawberry Decorated Cookie
The cookie dough recipe made up at batch of over 30 cookies. If you like you can add raspberry flavour to your red fondant to improve the taste - I did.
Strawberry shaped cookie (CLICK HERE for my favourite vanilla cut out cookie dough)
Strawberry shaped cookie cutter
Fondant (Red, green, white and yellow) either buy already coloured or buy white and colour with gel food colours^
cornflour (cornstarch)
clean brushes and water
sharp knife
small plastic rolling pin
small blossom cutter - mine is an ejector cutter
small fondant ball tool
dresden tool
non stick foam
^fondant dries out quickly, when not in use store in an airtight container or ziplock bag. To use fondant knead until pliable and smooth and roll out on a workbench dusted with cornflour (cornstarch).
Knead the red fondant until smooth and pliable. Dust workbench with cornflour (corn starch) and using the small plastic rolling pin roll out fondant until quite thin then using the strawberry cutter cut out a fondant shape.
Use the sharp knife to cut off the top section which resembles the leaves/stalk.
Brush a small amount of water onto the cookie and adhere the red fondant shape to the cookie, use the rolling pin to roll/push the fondant into shape if it is a little smaller than your cookie.
Knead the green fondant, dust the workbench and roll out the fondant. Cut out another strawberry shape, you only need the top third of the shape so you only need to cut that much out.
Using the sharp knife cut the stalk and leaves of the strawberry as shown in the picture.
Brush a little water onto the top of the cookie and a very small amount onto the very top of the red fondant and adhere the green stalk and leaves to the cookie.
Using your fingers roll out a long thin strip of green fondant to make a vine, I like mine to taper at the end, place it onto the cookie twisting it until it resembles a curly vine and press into place, if the fondant has not dried it should stay in place, if the fondant is a little dry use a tiny amount of water in one or two spots to stick the fondant in place. Remember when you press the blossoms in at the next step they will also help secure the vine. Cut any excess off where the vine meets the leaves at the top with the sharp knife.
Make the small 'strawberry' blossoms. Dust the workbench and roll out the white fondant, use the ejector cutter to cut out 2 small blossoms. Place the blossoms onto the non stick foam pad and press the ball tool onto each of the petals to make the petals thinner and cupped in shape. Pop the 'strawberry' blossoms onto the cookie on the fondant vine as shown in the picture, one at the top and one half way along and press into place. *Roll a small amount of yellow fondant into a ball and press into the center of the blossom.
(I actually have a whole tutorial on making simple sugar flowers CLICK HERE)
Using the knife or a fondant tool, press indents into the red fondant where you would like to place strawberry seeds. *Roll tiny pieces of yellow fondant into seeds and press into place with a fondant tool.
*Note the blossom centers and seeds can also be made by piping yellow royal icing.
Decorated cookies can be made a week in advance and stored in airtight containers.
Linda Vandermeer is a blogger, baker, maker and author of the cookbook '
Sweets on a Stick': More than 150 kid friendly recipes for cakes,
candies, cookies and pies on the go!. Published in the US the book is
available at most online book stores.
Original Ideas, photography and recipes by Linda Vandermeer unless otherwise stated do not reuse without permission.
Oh yes this has to pretty much be the easiest gender reveal cookie idea for a baby shower ever.
Secret gender reveal cookies with a sugar sprinkle baked in the back.
You can decorate your cookies any way you like and the gender reveal is
hidden on the other side.
So just in case you don't know. Gender reveal is when the mum to be has not yet announced whether a boy or girl is on the way. There is usually something at the party which reveals to the guests using the old pink or blue standby.
He or She,
What will baby be?
Turn over the cookie,
and you will see.
These cookies do all the work for you, just pop a sprinkle into the back of each cookie before baking and let each guest find out in their own sweet way.
I've had this idea for a while and when my friend had a pastel rainbow themed baby sprinkle (second baby shower) it was the perfect opportunity to try it out.
I didn't end up making a big deal of it, I just popped those sprinkles in and in fact I'm not even sure if anyone noticed. They all knew a baby girl was on the cards, they didn't need to be told via cookie message. It was like my sweet little secret.
If you were going to make a big deal of it all, maybe having a little sign next to the cookies with the above poem would let everyone know to check the cookie before they all get eaten.
So like many of the best ideas it is as easy as it sounds. Just buy a container of sprinkle shapes or quins in the colour you would like to use and press them onto the back of the cookie before baking.
Then you just bake as you normally would.
I have made up a super quick video of me making them here, it's less than 2 minutes:
I found pink heart sprinkles very easy to find at the supermarket, cake stores, online and pretty much everywhere. The blue star sprinkles were not everywhere but are easy to pick up on ebay and you will find them online at specialty cake decorating stores.
Now, I did make my own star sprinkles for the photo as I did not have any handy and plus I was just taking some photo's and I was being cheap. Make sure you do not use home made fondant sprinkles to bake in your cookies as they will melt during baking. I also recommend not using any super hard type decoration, sugar quins or sprinkles will work out best.
These cookies were part of a lovely pastel rainbow baby sprinkle CLICK HERE if you would like to see more pictures of the baby shower.
Here is my sugar cookie recipe
460 grams plain flour (16 1/4 oz all purpose flour)
1/4 tsp baking powder
1/4 tsp salt
230 grams unsalted butter (8 1/8oz)room temperature
220 grams caster sugar (7 3/4 oz superfine sugar)#
1 large egg
1 tsp vanilla extract
#use regular white sugar if you do not have caster/ superfine sugar
Sift together flour, baking powder and salt.
Cream butter and sugar in a large bowl using an electric mixer until light and fluffy. Reduce the speed to medium low, add the egg and vanilla and mix until combined. Reduce mixer speed to low and mix in the sifted flour mixture until combined. Wrap the dough in plastic and chill in fridge for 30 minutes or so.
Line a few baking trays with parchment/ baking paper.
Dust workbench with plain flour and using a large rolling pin roll out the dough until around 1/2 cm (1/4") in thickness. If the dough is to hard you may need to work/knead it a bit until you can roll it out.
Cut out cookies shapes and place the cookies on the prepared trays. (Knead and reroll dough as necessary, if it becomes to soft you can pop it back in the fridge.)
Pop the cut cookie dough trays into the fridge to chill again for around 30 minutes until firm (or in the freezer for 10 minutes).
Preheat oven to 160 C (320 F) and cook the cookies until they just start to turn golden, around 15 minutes (less or more depending on cookie size).
Cool on trays for 5 minutes and then carefully lift onto a wire rack to cool completely prior to decorating.
- Cookies can be stored in an airtight container for 1 week.
Linda Vandermeer is a blogger, baker, maker and author of the cookbook '
Sweets on a Stick': More than 150 kid friendly recipes for cakes,
candies, cookies and pies on the go!. Published in the US the book is
available at most online book stores.
Original Ideas, photography and recipes by Linda Vandermeer unless otherwise stated do not reuse without permission.
My friend Daneve from Ah-Tissue is having a baby and we helped celebrate with a baby sprinkle.
Yup a sprinkle, 'cause after the first baby is showered with gifts the parents really only need a 'sprinkle' of help.
Our mutual friend the lovely Carol from Creatively Bespoke Weddings and Events pulled the whole thing together organising and decorating the venue and pretty much everything else. She arranged the backdrop and printables from Emma Smith Stationery and the pretty sequin tablecloth from Memories are Sweet for the table, plus those lovely mirrored white trays the cookies are sitting on are all hers.
Carol set up the drinks station, center table, pastel parasols hanging overhead, and many other gorgeous little details including the sweet bouquets of flowers from Angie's Floral Designs. If you pop over to her facebook page they have lots more photo's of the lovely details - Creatively Bespoke Weddings and Events facebook.
Daneve's of course made the pretty tissue pom poms and paper flower decorations and her friend Mel organised the crafty activities, music and savory foods :)
and I did what I do, the sweets for the table. We had a rainbow macaron stand, stacked cookie towers, decorated square cookies, pastel meringues, strawberry cake pops and a swirly butter cream rainbow cake.
Oh and these sweet parasol cookies as take home favours.
Although I was in love with the parasol cookies, I did have a soft spot for the stacked cinnamon buttercream cookies in soft pink and green.
Oh and the shabby chic type decorated cookies in rainbow hues. I guess we all know I do love cookies.
It was all so very pretty and a great afternoon for friends to catch up, chat and share our joy with the mother to be.
Linda Vandermeer is a blogger, baker, maker and author of the cookbook '
Sweets on a Stick': More than 150 kid friendly recipes for cakes,
candies, cookies and pies on the go!. Published in the US the book is
available at most online book stores.
Original Ideas, photography and recipes by Linda Vandermeer unless otherwise stated do not reuse without permission.
This year instead of slaving over a gingerbread house we made gingerbread people dress up cookies. It was fun, easy and I could let the kids eat one (or two) straight away without the stress of breaking up the whole house.
I baked up a big batch of gingerbread men and women (Cookie recipe here).
Then I quickly cut out some fondant clothes using the cookie cutter and the kids got to stick them onto the cookies with royal icing like a dress up toy.
I made sure there were stacks of clothes with different colors and accessories for the kids to choose from. Kids are amazing and see the world differently. I think it might be lovely to see the world with flower eyes :)
Oh my goodness my kids truly love this type of cookie decorating, just love it!
The Destroyer (being a creator), Bubble and I, Sweet and Bubble
Plus perfect for Christmas, well actually my kids want me to say it's perfect for any time ;)
The hardest part of all of this was coming up with a ginger cookie recipe that didn't spread too much (otherwise the fondant clothes would be too small for the cookies). But I spent 2 weeks testing my own recipe so y'all don't have to worry about that, just click on the link in the instructions below.
I made some little mini lollipops and candy canes as well, the kids thought they were super cool.
Note - I have in the past made similar dress up cookies for my daughter's birthday party - but these gingerbread ones are way, way, way easier - trust me. You can check out the original 'paper doll dress up cookie' inspiration HERE:
These are the original dress up doll cookies I made CLICK HERE to see details
Gingerbread people dress up cookies
Make the fondant/sugar clothes as per the instructions below. Once the clothes have set and become hard enough to pick up you can let the kids decorate the cookies by squeezing royal icing onto the cookie and sticking the clothes in place. They can also add gingerbread faces and other decorations as they like.
EDIT update: I've recorded an easy to follow youtube video tutorial here as well:
Gingerbread men and women cookies (Click here for Gingerbread cookie recipe)
Gingerbread men and women cookie cutters
Fondant various colours
Cornflour (cornstarch)
small rolling pin
sharp knife
frilling tool (can use toothpick instead)
Royal Icing (for final assembly)
Line a tray with parchment/ baking paper.
Gingerbread men fondant/sugar clothes
Roll out the fondant onto a workbench dusted with cornflour (cornstarch). Use the gingerbread man cutter to cut out shape and then the sharp knife to cut out the top and shorts (see picture below). If you like you can adhere shapes like a star onto the fondant cut outs. Place cut outs onto the tray lined with paper to dry overnight.
For striped shirt, cut out thin strips of fondant and press onto a contrasting color fondant with the rolling pin, then cut out shapes with cutter as described above. I added a thin strip of vertical fondant on the sleeve edge.
Gingerbread women fondant/ sugar clothes
Roll out the fondant onto a workbench dusted with cornflour
(cornstarch). Use the gingerbread woman cutter to cut out shape and then
the sharp knife to cut out the top and skirts (see picture below). Place clothes on paper lined tray to dry.
If you like you can make the skirts and edge of the top ruffled by using the frilling tool, press down on the fondant and gently roll back and forth. I also added a thin strip of contrasting color fondant to the sleeve edge of some tops before pressing down with the fondant tool.
You can also cut a second strip to make a 'pettiskirt' underneath, just use the frilling tool to roll back and forth and then stick it underneath the top skirt, you might need to add a small amount of water to adhere the 2 skirts together.
To make a lace pattern on the edge use the sharp edge of the frilling tool (or a toothpick) to dot holes (see picture below for example).
Accessories
To make a lollipop you will need fondant in 4 different colours and a small length of spaghetti. Roll each colour of fondant into a long thin strip and the twist the fondant together. Starting in the middle wrap the twisted fondant around in a spiral to look like a lollipop. Push the spaghetti into the fondant lollipop disk.
The example in this picture only uses 2 colours and is bigger but same concept
Small flowers pressed out of fondant make great accessories, I used a small ejector cutter.
Linda Vandermeer is a blogger, baker, maker and author of the cookbook '
Sweets on a Stick': More than 150 kid friendly recipes for cakes,
candies, cookies and pies on the go!. Published in the US the book is
available at most online book stores.
Original Ideas, photography and recipes by Linda Vandermeer do not reuse without permission.
Lilli's pretty pink and mint green ruffle rosette party table.
Sometimes I see awesome catchy titles like 'best budgeting tips ever, see how this person paid off their house in 3 years' and I have to click over. I'm always disappointed. One of the top tips is inevitably to stop buying coffee. I'm not sure they fully understand my goal is to magically save money so I can constantly do the types of frivolous things the post is advising against.
Which brings me to today's post, this year instead of trying to top all the previous year's party and be even more over the top I went the other way and did the party on a budget (disclaimer I acknowledge in advance sometimes my understanding of budget may not be the same as yours, or more relevantly Mr Sweet's, but there are some real and sensible cost saving tips scattered in the post).
And it still looked good. I pretty much decorated this party with 5 pieces of scrapbook paper, a few pieces of ribbon and twine and a piece of material I had left over from something else.
Ok I admit - there is lots of other stuff on the table but I already had those things and this is my magical budgeting fantasy. It's the story I told Mr Sweet and I'm sticking to it.
Of course I made all the cakes and treats myself as well, plus I was also the entertainment as the party was a cupcake decorating party. Oh my goodness it sounds like I'm a super mum, but we all know that is far from true, y'all have seen my most embarrassing ever messy creative space before shots.
Anyhoo as well as doing all the stuff for the party I managed to whip up a couple of you tube video's to show how I made the decorations. Most of it is pretty easy stuff, but feel free to click through and check me out crafting to save money because it's too much fun not to ;) umm craft that is not watch me on youtube....
See me make DIY Easy cheap Paper Bunting you tube video:
Super cute rag ribbon bunting cake topper tutorial:
Make your own Paper rosette's:
Decorating the party table on a Budget
My brief to myself for this party was to use what I already had, thus the pink and green colour scheme, as I seems to already have a lot of stuff in those colours sitting around.
Drinking Jars - I used recycled jars that my friend gave me after one of her parties, which makes them re-recycled. Cute huh! They are decorated with some washi tape I had sitting around and the paper rosette's (see the you tube tutorial link) that I pretty much stuck on everything.
Straw flags - I already had these pink and white polkadot straws left over from a previous party, I added a little bit of green and pink shabby chic floral washi tape from Greengate to the tops and popped them in another tall re-recycled jar decorated the same as the drinking jars.
Bunting - I had been thinking of doing a pretty rag ribbon bunting behind the table but then I would have had to buy fabric - and I was budgeting remember. So I made this paper bunting myself from Tilda and Martha Stewart scrapbook paper I already had sitting around, it was easy, it was cheap, it was really fast to make and it gave the effect I was looking for. It used 3 pieces of scrapbook paper and I saved the offcuts for mini bunting and rosette's. I stuck it to the wall over a piece of ribbon using double sided tape.I did a quick video tutorial on how I made it/
Risers - (these are to give height to the table mostly for visual purposes) this is a bathroom storage box from the dollar store, it was about $9. I painted it pink (with paint I already had sitting around), and then added Tilda scrapbooking paper offcuts saved from the wall bunting above. I used double sided tape to stick on some pink and white twine, added the mini bunting using more double sided tape and finished off with a couple of those paper rosette's. Then in a complete turn around from the famous style tip to finish something and take one thing away - I added a paper doily, adhering it with a little double sided tape. When your decorating with me - 'More is more'.
Tablecloth - this was a piece of Tilda fabric off cut left over from other decorating in my house, it has big chunks cut out the back - but you can't see behind the table so I didn't care - remember I'm on a budget. I cut another strip off (behind the table) to use on the cake bunting. If your fancy you could no doubt finish off the edges with some pretty trim, I'm not that fancy and I always try to avoid sewing. Seriously there was a drink dispenser and candy/ lollies, like the kids were checking out if my tablecloth was finished.
Rag fabric bunting cake topper - Using more of the pink and white twine I tied strips of the tablecloth fabric and a little bit of excess lace trimmed from the bottom of the lace I used on the cake. Note - ok you guys are thinking at this stage I am going overboard using little scraps of left over lace, but there is a method to this madness. By using the little offcuts I am ensuring consistency, it simply matches better. (Link to you tube tutorial)
Hanging lamp frames - Hmmm what can I say, I saw a picture of a naked lamp HERE that I loved and PINNED it inspired these lamps. But remember I was on a budget, I tried checking out some of the second hand stores to find lamps to use but when I had no luck I took my old bedside lamp that I hadn't used for years and made what you see in the picture above. I loved the look but needed another......and I stole Mr Sweet's which unfortunately he still uses. I've been wanting to get overhead wall lamps for a while now so I guess it will be happening soon, and he wasn't upset at all, well not too upset ;)
Pink floral 2 tiered stands - I already had one of these that I had picked up a while back at the dollar store for around $14. When I went back there was only 1 left and it was wonky, they sold it to me for $11 and I bent it back into shape. I was using the other one to hand sugar flowers off each layer to dry so it is totally multi functional and worth it - *double bargin *.
Drink dispenser - I already had the drink dispenser, although it did take me many hours to find it, you may wonder how something that large can get lost, and I would agree with you. Anyhoo I decorated it with paper rosette's to continue my theme. See reverse styling note above, when in doubt add an extra paper doily - it works for me.
Cake Plates and Jars - I already had all of these sitting around. Beg, borrow or failing that hire some. Discount stores also have these types of things available for quite reasonable prices at the moment, but remember you will have to store them afterwards.
Party Food
Pink Lemonade - The kids made up the pink lemonade the day before the party, they thought it was awesome fun of course, were super proud of themselves and I only had to help out a little. It was win win. Plus there is no artificial colour in this baby - it's hand strained (frozen) raspberry :) Note according to the kids - drink dispensers rock. It was the biggest hit of the party after the cupcake decorating.
Ruffle Rosette Cake - The cake was pink and green layers with piped buttercream. Raspberry layer cake and a new pineapple flavour I was trying out - verdict. We won't be trying out that pineapple cake again, but the raspberry layer was delicious. The buttercream was Italian Meringue Buttercream flavoured with real raspberry so once again no food colour. I'm hoping to share how I made this one on the blog soon. Continuing on with my rosette theme I popped a few fondant rosette's all over the cake. The bottom layer was fake styrofoam covered in fondant - we really didn't need that much cake but I liked the extra height.
Macarons - green french almond macaron shells with raspberry white chocolate ganache to tie in with the colour theme.
Cake Pops - White candy chocolate dipped decorated with fondant rosettes in pink and green.
Decorated Cookies - Ruffled buttercream with fondant rosette, still carrying through that rosette theme. And fondant and royal icing decorated sugar cookies.
Candy / Lolly Green apple bon bons, white milk bottle and 'teeth' mix and pink/white swirl marshmallow.
We also had pass the parcel as that is the party girl's favorite party game. The prizes were mostly baking related ie. fondant plungers and cookie cutter sets.
Party favor's consisted of a pink and white bag from the discount store ($2 pack of 10) filled with some cupcake decorating treats like pretty cupcake cases, sugar pearls and a fondant flower or butterfly plunger plus a box of Betty Crocker vanilla cupcake mix.
Where to get stuff or make your own
How to make a paper bunting How to make rag ribbon cake topper How to make paper rosette's
Apple Bon Bon's - The Professor'
Other candy - Big W discount department store
Photography by Terri Vandermeer any especially blurry shot's might be by me :)
Fabric for Tablecloth and rag ribbon bunting - Tilda Rosalie Pink
Scrap paper - Tilda I picked mine up at Sewco in Brisbane
All cakes, cookies and macarons - Bubble and Sweet How to Host a Cupcake Party Blog
Cupcakes at cupcake party and packet mix used for party favours - Betty Crocker
Cake stand's, plates and drink dispenser's bought minimum of one year ago so stockist details are probably out of date sorry. The Cake Stand is Clara French, the Drink dispenser was from Sharnel Dollar Designs (no longer sells to public now party styling services and commercial styling), the white flat plates from Freedom Furniture, the
Linda Vandermeer is a blogger, baker, maker and author of the cookbook ' Sweets on a Stick': More than 150 kid friendly recipes for cakes, candies, cookies and pies on the go!. Published in the US the book is available at most online book stores:
This post is not sponsored. Affiliate links may result in earnings, however will not cost you any more :)