Showing posts with label heart. Show all posts

Monday, October 24, 2022

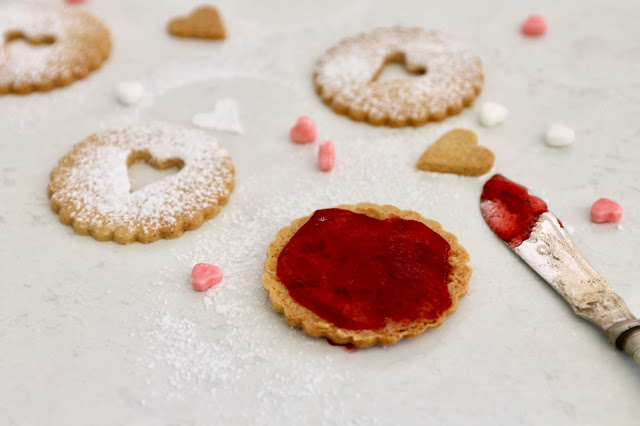
Raspberry Heart Linzer cookies


One of the things about owning a cafe was I rarely found enough time to blog or develop new recipes. Once customers found something they liked, I would be churning out the same cookies day after day. I can't call it a problem though as these Linzer cookies were always super popular and often sold out.

The cookies are lovely, buttery but still manage to be light with a hint of vanilla and cinnamon and once filled are not overly sweet and the perfect treat to have with afternoon coffee or tea. 

At the cafe they were filled with raspberry jam or lemon curd (raspberry was the biggest seller) and at Christmas we would change the heart cut out to a mini Christmas tree.

The cookie recipe calls for Almond Meal which is simply ground almonds. I actually often buy my almond meal from Costco and find it to be of good quality, I prefer the one with the skins removed but if you can only find ground almond still with their skin on the recipe would still work.


If you like you can freeze the dough in smaller batches before baking if you like, although I did scale my recipe back for you to make a smaller batch than I normally would.

The cookies can be stored for a few days, but I find them best if stored without the jam filling and then filled not long before you plan on eating them.

*I usually pop the unused egg whites into a ziplock bag in the freezer to use later to make meringue or macarons.

The dough is quite buttery so make sure you use the kitchen bench and rolling pin well with flour. I use an offset metal spatula to lift the cookies onto my baking tray.


I hope you enjoy these as much as my family and friends do.

xx

Linda

Linzer Cookie Recipe makes 16-18 double cookies filled with jam (7cm or 2 3/4")

170g unsalted butter (6oz) 1 1/2 sticks

100g caster sugar (3 1/2 oz)

1tsp vanilla extract

1/2 tsp ground cinnamon 

1 egg yolk

160g plain flour (5 5/8 oz)

75g ground almond meal (2 5/8 oz)

pinch salt

To finish

around 1/2 cup raspberry jam 

icing sugar (powdered sugar) for dusting 

Mix butter, sugar, vanilla and cinnamon on low until combined with an electric mixer (I use a stand mixer) then increase speed to high and cream until light and fluffy.

reduce speed of mixer to medium low and mix in egg yolk until combined. Scrap down the sides with a spatula as needed.

At low speed mix in the flour, almond meal and salt and mix until combined.

Put some plastic wrap on the counter, tip the cookie dough onto the plastic, wrap securely and pop in the refrigerator until it's firm enough to work with. 


Dust counter and rolling pin with flour, cut away 1/4 of the dough and roll out until 1/4 inch thick. Cut out circles and place on baking tray. 

Try cutters like this from Amazon (link to product)

On half of the circles cut out/remove a smaller heart shape in the centre as per the picture.

Bake at 160 C for 12-15 mins or until just turning golden. Allow to cool on trays.

Split the cooked and cooled cookies into 2 lots, the whole round cookies and the cookies with hearts cut out. Using a sieve, dust icing sugar (powdered sugar) onto the heart cut out cookies.


Place the whole circle cookies so the bottoms are facing up (the side that was on the bottom during cooking). Heat the jam in the microwave and then spoon 1/2 to 1 tsp jam on each round cookie and spread almost to the edge with a knife or spatula. Press the sugar dusted heart cookie on top of the jam.

Store in an airtight container for up to 3 days.


Wednesday, February 10, 2016

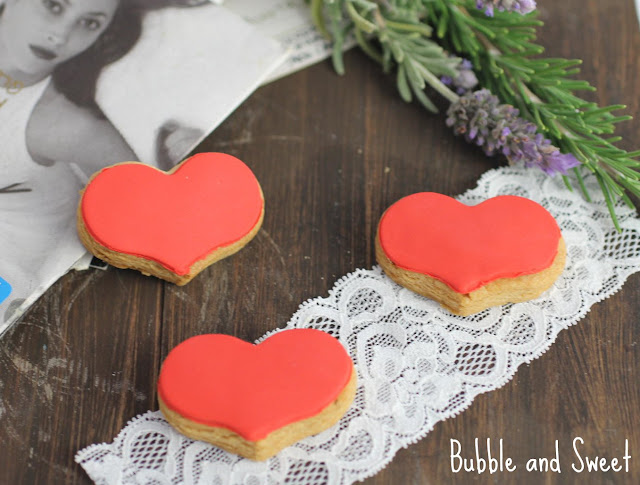
Hello Sweetie cutie patootie treats for Valentines Day


Valentines Day is one of my favourite days of the year. I mean how could I not love a day filled with hearts, love and lollies (candy).

This year I have come up with some cute heart cookie faces that were inspired by some Hello Kitty Pez dispensers I picked up at The Reject Shop and using a heart cookie cutter they sent me.

I'm calling them 'Hello sweetie!' My kids thought they were super cutie patootie and of course they adored the Pez dispensers.


I teamed them up with water colour and edible gold leaf decorated heart cookies to make a sweet set. Just add the Pez and some extra lollies and you have a perfectly cute little bundle.

Pink decorating set, pink twist marshmallows and pez from The Reject Shop

I also made up another set of cookies for The Reject Shop savvy blog using some of the baking products they have out at the moment. I was a bit smitten with the pink pastel squeeze bottles for decorating in The Art of Baking decorating set they sent me.

Happy Baking


Hello Sweetie cookies 

Heart Shape Cookies (see cookie recipe below)
Heart Cookie Cutter 
White rolled fondant
Violet, red and pink fondant
White food colour
Black edible marker
Pink edible dusting powder
Small Rolling Pin
Ball tool
Veining/Dresden tool
Brush and water
small thin brush
Another dry brush


^fondant dries out quickly, when not in use store in an airtight container or ziplock bag. To use fondant knead until pliable and smooth and roll out on a workbench dusted with cornflour (cornstarch). 

Knead white fondant until smooth and pliable. Dust workbench with cornflour (corn starch) and roll out fondant until quite thin then using the heart cutter cut out a fondant shape.

Brush water onto the cookie and adhere the fondant, use the rolling pin to smooth the fondant into place.

Take a small amount of red fondant a little larger than the size of a pea and roll into 3 tiny balls. Press the balls flat. Brush a little water on the top corner of the cookie and press 2 of the flat shapes onto the cookie - see picture above for example. Use a ball tool to press an indent in the center of the round shapes to make a bow. Press the third round shape into the middle of the other 2. Pain dots onto the finished bow using the thin brush and white food colour.

Draw eyes onto the cookie using an edible food colour pen. * On some of the other cookies I used black fondant to make bigger open eyes, you can play around and make the eyes however you prefer.

Pinch off 2 very small pieces of pink fondant and shape into lips, adhere to the cookie as per picture making a top and bottom lip. Press the ball tool in the middle to make the lips into a pucker. If necessary use the veining tool to push the lips into shape.

Use the dry brush to gently apply a little bit of pink dusting powder to the cheeks by brushing in small circles.


Sugar Cookie Recipe (makes 12 large cookies)

460 grams plain flour (16 1/4 oz all purpose flour)
1/4 tsp baking powder
1/4 tsp salt
230 grams unsalted butter (8 1/8oz)room temperature
220 grams caster sugar (7 3/4 oz superfine sugar)# 
1 large egg
1 tsp vanilla extract
#use regular white sugar if you do not have caster/ superfine sugar

Sift together flour, baking powder and salt.

Cream butter and sugar in a large bowl using an electric mixer until light and fluffy. Reduce the speed to medium low, add the egg and vanilla and mix until combined. Reduce mixer speed to low and mix in the sifted flour mixture until combined. Wrap the dough in plastic and chill in fridge for 30 minutes or so.

Line a few baking trays with parchment/ baking paper.

Dust workbench with plain flour and using a large rolling pin roll out the dough until around 1/2 cm (1/4") in thickness. If the dough is to hard you may need to work/knead it a bit until you can roll it out.

Cut out cookies shapes and place the cookies on the prepared trays. (Knead and reroll dough as necessary, if it becomes to soft you can pop it back in the fridge.)

Pop the cut cookie dough trays into the fridge to chill again for around 30 minutes until firm (or in the freezer for 10 minutes).

Preheat oven to 160 C (320 F) and cook the cookies until they just start to turn golden, around 15 minutes (less or more depending on cookie size).

Cool on trays for 5 minutes and then carefully lift onto a wire rack to cool completely prior to decorating.

- Cookies can be stored in an airtight container for 1 week.


Linda Vandermeer is a blogger, baker, maker and author of the Children's cookbook Sweets on a Stick: More Than 150 Kid-Friendly Recipes for Cakes, Candies, Cookies, and Pies on the Go! Published in the USA in 2011 the book is still available at Amazon and many online bookstores.

I was provided with product and paid to write the blog post featured over on The Savvy blog. The ideas created and words expressed are my own.

Affiliate links may earn me money and contribute to supporting this blog.

Original ideas, photography and recipes Linda Vandermeer please do not reuse without permission except for non commercial purposes where you may use 1 image, give credit and link back to original post.

Sunday, July 6, 2014

Best gender reveal baby shower cookie idea


Oh yes this has to pretty much be the easiest gender reveal cookie idea for a baby shower ever.

Secret gender reveal cookies with a sugar sprinkle baked in the back. You can decorate your cookies any way you like and the gender reveal is hidden on the other side.

So just in case you don't know. Gender reveal is when the mum to be has not yet announced whether a boy or girl is on the way. There is usually something at the party which reveals to the guests using the old pink or blue standby. 

He or She,
What will baby be?
Turn over the cookie,
and you will see.

These cookies do all the work for you, just pop a sprinkle into the back of each cookie before baking and let each guest find out in their own sweet way.


I've had this idea for a while and when my friend had a pastel rainbow themed baby sprinkle (second baby shower) it was the perfect opportunity to try it out.


I didn't end up making a big deal of it, I just popped those sprinkles in and in fact I'm not even sure if anyone noticed. They all knew a baby girl was on the cards, they didn't need to be told via cookie message. It was like my sweet little secret.


If you were going to make a big deal of it all, maybe having a little sign next to the cookies with the above poem would let everyone know to check the cookie before they all get eaten.


So like many of the best ideas it is as easy as it sounds. Just buy a container of sprinkle shapes or quins in the colour you would like to use and press them onto the back of the cookie before baking.

Then you just bake as you normally would.

I have made up a super quick video of me making them here, it's less than 2 minutes:


I found pink heart sprinkles very easy to find at the supermarket, cake stores, online and pretty much everywhere. The blue star sprinkles were not everywhere but are easy to pick up on ebay and you will find them online at specialty cake decorating stores.

Now, I did make my own star sprinkles for the photo as I did not have any handy and plus I was just taking some photo's and I was being cheap. Make sure you do not use home made fondant sprinkles to bake in your cookies as they will melt during baking. I also recommend not using any super hard type decoration, sugar quins or sprinkles will work out best.


These cookies were part of a lovely pastel rainbow baby sprinkle CLICK HERE if you would like to see more pictures of the baby shower.


Here is my sugar cookie recipe

460 grams plain flour (16 1/4 oz all purpose flour)
1/4 tsp baking powder
1/4 tsp salt
230 grams unsalted butter (8 1/8oz)room temperature
220 grams caster sugar (7 3/4 oz superfine sugar)#
1 large egg
1 tsp vanilla extract
#use regular white sugar if you do not have caster/ superfine sugar

Sift together flour, baking powder and salt.

Cream butter and sugar in a large bowl using an electric mixer until light and fluffy. Reduce the speed to medium low, add the egg and vanilla and mix until combined. Reduce mixer speed to low and mix in the sifted flour mixture until combined. Wrap the dough in plastic and chill in fridge for 30 minutes or so.

Line a few baking trays with parchment/ baking paper.

Dust workbench with plain flour and using a large rolling pin roll out the dough until around 1/2 cm (1/4") in thickness. If the dough is to hard you may need to work/knead it a bit until you can roll it out.

Cut out cookies shapes and place the cookies on the prepared trays. (Knead and reroll dough as necessary, if it becomes to soft you can pop it back in the fridge.)

Pop the cut cookie dough trays into the fridge to chill again for around 30 minutes until firm (or in the freezer for 10 minutes).

Preheat oven to 160 C (320 F) and cook the cookies until they just start to turn golden, around 15 minutes (less or more depending on cookie size).

Cool on trays for 5 minutes and then carefully lift onto a wire rack to cool completely prior to decorating.

- Cookies can be stored in an airtight container for 1 week.


Linda Vandermeer is a blogger, baker, maker and author

Original Ideas, photography and recipes by Linda Vandermeer unless otherwise stated do not reuse without permission. 

Sunday, February 9, 2014

10 sweet treats to make for Valentines

Clockwise starting left top corner: Love me love me not macarons (recipe and instructions),
Raspberry marshmallow heart fudge (recipe), Lollipop macarons (instructions),  
Tim Tam cookie pops (Recipe and instructions), Sweetie Valentine Cookies (Tutorial)
Conversation heart macarons (Instructions), Strawberry and cream cheesecake in a jar (Recipe Link)
Love is in the air cake pops (tutorial), High heel cupcakes (Tutorial Link), 
My love is blossoming for you cookies (Tutorial)


Yup, over the years I have made my share of Valentine treats.

Actually I think pretty much half of the stuff I make would make great Valentine treats, probably more than half, so I've rounded up 10 popular sweet treats from the past couple of years, the links are provided above under the picture.


Oh, and after I did up the 10 Valentine treats picture collage I came across these cookies I have always thought were cute so here is the link for them as well:

Are you thinking what I'm thinking cookies (Tutorial link)


Linda Vandermeer is a blogger, baker, maker and author of the cookbook ' Sweets on a Stick': More than 150 kid friendly recipes for cakes, candies, cookies and pies on the go!. Published in the US the book is available at most online book stores.

Original Ideas, photography and recipes by Linda Vandermeer do not reuse without permission. 


Monday, February 3, 2014

Valentine Oreos - no bake easy to make treats


Mr Sweet and I have been married for 21 years this April. I'm not one to push unwanted advice upon others, and I realise that a marriage spanning multiple decades is not on everyone's must have or even mildly want list but for the rest of you I will share one of my secrets.

I have never given Mr Sweet a furry toy or any type of balloon that declares how much I love him.

Not that there's anything wrong with it, but it's just not our thing and Mr Sweet seems to be happy with that.
However chocolate with hearts, and in particular easy to make treats that have Oreo cookies included in some way, do seem to be the way to my man's heart.


These no bake Oreo Valentine treats I whipped are pretty much store bought cookies, topped with some chocolate frosting and then a handmade fondant topper pressed on top.

They are easy enough for nearly anyone to make and pretty enough that they would even look great on a party table and you can replace the Oreos with a homemade cookie, brownies or cupcakes if you like.


No Bake Oreo Valentine Treats
I've made a quick you tube tutorial so click on the picture below to check it out before you read the instructions below:

You Tube tutorial:


You will need:
Fondant toppers (see instructions below)
Oreo cookies
Chocolate frosting
piping bag with star tip (I used #22)


Place Oreo cookies on a baking tray. Swirl on a dab of chocolate frosting. Press a fondant topper on top of the frosting.

Store in an airtight container until required. Up to 3 days.

Fondant Topper Instructions
You will need to make toppers at least one day in advance. You can make one type or a variety:

White fondant#
Red fondant#
cutters (specific cutters under each photo instruction)#
small plastic rolling pin#
cornflour (cornstarch)
brush and water

#Fondant, rolling pin and cutters can be purchased at online cake and decorating stores, ebay or craft stores.


Line a flat tray with baking/ parchment paper.

Heart Toppers
This is the easiest topper and you can find heart cutters at most supermarkets or discount stores.


Cutters required: heart cutter approx 4cm (1 1/2")

 Dust workbench with cornflour (corn starch) and roll out red fondant until quite thin. Cut out heart shape and place on prepared tray overnight or until set.

Topper 2
Cutters required:
carnation cutter 5cm (1 5/8th")
5 petal heart cutter 2.5cm ( 1")

Dust workbench with cornflour (corn starch) and roll out white fondant until quite thin.Cut out carnation shape and place on prepared tray.

Roll out red fondant until thin and cut out the 5 petal heart cutter shape. Brush a little water into the middle of the white carnation shape and press the red 5 petal heart shape into the middle. Leave on tray overnight or until set.

Topper 3
Cutters/equipment required:
round scalloped cutter 4.5cm (1 3/4")

heart cutter approx 2.5cm ( 1")
toothpick

Dust workbench with cornflour (corn starch) and roll out white fondant until quite thin.Cut out round scalloped shape and place on prepared tray.

Roll out red fondant until thin and cut out the small heart shape. Brush a little water into the middle of the white scalloped round shape and press the red heart shape into the middle.Using the toothpick press a hole into each rounded scallop on the edge of the white round fondant shape.

Leave on tray overnight or until set.

 Topper 4 (pressed fondant flower)

Cutters/ingredients required:
rose/ flower cutter 6cm (1 7/8")
red sprinkles

Dust workbench with cornflour (corn starch) and roll out white fondant until quite thin.Cut out rose shape and place on prepared tray.

Pinch off a small amount of red fondant and roll into a round Brush a little water into the middle of the white rose shape and press the red fondant into the middle and then flatten out. Brush more water all over the red middle and then shake red sprinkles on the middle of the flower.

Leave on tray overnight or until set. Once set remove excess sprinkles.


I've added this idea over at Tip Junkie's Tip me Tuesday:
Tip Junkie Handmade Projects

 Linda Vandermeer is a blogger, baker, maker and author of the cookbook ' Sweets on a Stick': More than 150 kid friendly recipes for cakes, candies, cookies and pies on the go!. Published in the US the book is available at most online book stores.

Original Ideas, photography and recipes by Linda Vandermeer do not reuse without permission. 


Sunday, February 10, 2013

This is our love story cookies


I had an idea for a cookie. I was going to make up the pretty shaped plaque cookie and write out our love story.


But after I started and wrote one out I found it a bit personal to share. Y'know not with you guys, but once it's out there I felt like it would no longer be our love story. Plus it was a lot of writing, and I'm not very neat :)

So I made the cookies blank in anticipation of all that is still to be..........and just added a little love.

I guess in the end I found the simpler version more striking and visually pleasing. The cookies in these photo's has a heart which was decorated by hand, but they look really good with just the plain hearts as well (I have a photo of the plain heart version on my instagram account back a few weeks ago).


Cookie cutters are from Ecrandal.Or you can search for plaque cookie cutters.

Anyway once again I didn't get to all the things I wanted to share before Valentines, so I'll just pop a collage of some of my fav past sweet loves that would make great gifts. Click on the treat name below the photo for the link to the original post and recipes or instructions:

Clockwise from top left (click on the names below for links to the original posts):
1. My love is blossoming for you cookies
2. Caramel Candy Oreo Pops
3. Love me love me not macaons
4. Caramel mini cheesecakes

This is our love story cookies - Simple instructions
I made a few large plaque cookies and then lots of 'filler' cookies which are the small hearts. The filler cookies are great as they are smaller which makes them easier to eat and make.


The cookies are sugar cut out cookies based on the recipe from Sweets on a Stick, but any good recipe will do.

Cut out the cookies with a plaque shaped cutter, bake as per directions, allow to cool.

Roll out white fondant until quite thin on a workbench dusted with cornflour and then using the same plaque cutter cut out the shape. Brush the cookie with a little water and adhere the fondant to the cookie, using a rolling pin to press it on gently and push out to the edges where required.


Roll out some red fondant and cut out a small heart.

Use a toothpick,skewer or fondant tool with a sharp edge to make small holes around the edge like in the picture.

Once you have them in the right spot press the tool in and wiggle it around to make it bigger so you can see the holes.

Then take the tool and press into the heart around the edge in between where each hole meets, it will make the edge look a little ruffled.


If you like you can use stamps to press in a message. I just hand wrote Love on mine by making lots of tiny little dots, kinda like a tattoo.


Pop the heart onto the middle of the white plaque cookie using a tiny amount of water to adhere it if required.


 Linda Vandermeer is a blogger, baker, maker and author of the cookbook ' Sweets on a Stick': More than 150 kid friendly recipes for cakes, candies, cookies and pies on the go!. Published in the US the book is available at most online book stores:

Link to Amazon:

Or at Fishpond (free shipping Australia)
Sweets on a Stick: More Than 150 Kid-Friendly Recipes for Cakes, Candies, Cookies, and Pies on the Go!