One of my favorite cookies ever is the babushka doll (nesting doll) which I first posted on this blog about a year ago here and then an even prettier version earlier this year HERE. After I posted tutorial instructions one of my lovely readers Jody emailed me a picture of a set of Santa nesting dolls suggesting they would make a great set of cookies to which I totally agreed and ever since I have had it in the back of my mind to do just that.
So when I was thinking of ideas for the Christmas Cookie swap I was part of, Santa nesting doll cookies was one of the first things I thought of. But I needed to make a set and so this snowman was the second thing that popped into my head.
Snowman cookies are nothing new, but this version with the nesting doll cookies is cool as you can easily make a family, and once I post the instructions for a couple of the other cookies in the set you can make quite a few Christmas themed cookies using the one basic shape.
Plus anything that uses nesting doll cookie cutters is just really neat!
If you don't have a set of nesting doll cookie cutters, you could follow these instructions and use a regular ole' snowman cookie cutter and they would look just as cute. Well almost.
Over here in Australian I got my nesting doll cookie cutters from Bisk-art HERE
In the US I have noticed them at Fancy Flours and Ecrandal have a super pretty copper 5 set.
Snowman nesting doll cookies
These instructions use the medium nesting cookie cutter, follow the exact same instructions for small or large nesting doll cutter. Sugar cookies made using medium nesting doll cookie cutter
white rolled fondant shop bought or home made marshmallow fondant
colored rolled fondant any colors (or home made marshmallow fondant)
small amount of orange rolled fondant (or home made marshmallow fondant)
black edible writing pen
small rolling pin
nesting doll cookie cutters
small sharp knife
clean brush and water
Roll out the white fondant onto a clean benchtop dusted with cornflour/ cornstarch. until a couple of mm (1/8") in thickness. I like to lift my fondant frequently and turn it like pie dough to ensure it does now stick to the bench while rolling it out.
Use the nesting doll cookie cutter to cut out a shape. Lightly brush a cookie with water and place the fondant over the cookie, using the rolling pin lightly press down to adhere the fondant to the cookie.
Repeat with remaining cookies.
Roll out a small amount of the colored fondant on a cornflour/ cornstach dusted workbench until a couple of mm (1/8") in thickness and using the nesting doll cutter cut out the head, then using the side of the nesting doll cutter where it curves at the shoulder section press down about .5cm from the top of the head to make a little beanie/ hat. You can make the hat bigger or larger as you like. Adhere the hat to the snowman cookie as shown in the picture using a very small amount of water and pressing down lightly with the rolling pin as needed.
Still using the curved side of the rolling pin, press in down lightly about 1mm from the bottom curved edge of the hat to make a small decorative indent. If you like you can use the square corner edge of the cookie cutter to make more decorative indents in the hat to look like knitting. If you like you can roll a small ball of white fondant and adhere it to the top of the hat to look like a little pom pom.
Repeat for remaining cookies.
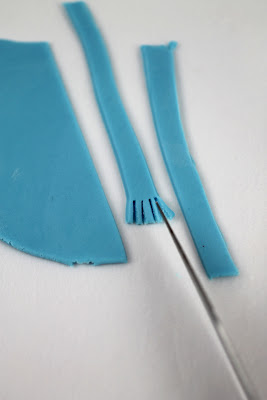
Make the scarf by rolling out some more of the fondant and using the sharp knife cut out 2 strips around .5cm wide and 3-4cm long. At one end using the sharp knife to cut a fringe around .5cm long with about 4 to 5 pieces as per the picture.
Using a small amount of water adhere the scarf pieces around the neck of the snowman.and cut any overhang at the neck off using the sharp knife.
Shape a small nose using the orange fondant and adhere to the middle of the face with a very small amount of water.
Allow the fondant on the snowman to dry a couple of hours and then using the edible pen draw on 2 eyes and 5 dots for the mouth. I find starting with the center dot and working my way out makes for a more even smile.
Now for some great news (well for me anyway) it seems some of the online book shop warehouses have started receiving my book and have emailed people on the waiting lists to say the book is on its way soon. I had a few copies delivered during the week and I'm so happy with how it turned out. Remember it's a US release book and the weights and measurements are written accordingly although there is a conversion chart in the back of the book. It's available lots of places, here is a link to Amazon:


Adorable! I didn't know you had a book - sweet ;o)
ReplyDeletehttp://www.thegirlieblog.com
http://www.geekettegazette.com
These are just darling Linda! I ordered your book. Can't wait to get it.
ReplyDeleteI will definately make them for xtmas! Thanks for sharing!
ReplyDeleteThe details on these are amazing Linda! :O Especially the scarves and the beanie details! :D I'm so honoured that I got a mention in your book too!
ReplyDeleteSo beautiful, Linda! I'm going to try fondant before the year is out! You inspire me:)
ReplyDeletelove!!
ReplyDeleteGod-given talent. Exquisite!
ReplyDeleteThat snowman is amazing. I love his scarf and hat! : )
ReplyDelete