Monday, November 3, 2014

Retro recipe - Caramel Macadamia Tart


Have I ever mentioned that Mr Sweet does not really love decorated cake.

It's just not his thing. He likes lots of sweet stuff like ice-cream and chocolate and pie, often all together.

Anyhoo, I am not just saying that randomly, I mention it because he really liked these 'caramel' tarts which I baked a while back.

In fact I made quite a few different versions and he pretty much liked them all. I think he's a fan of retro desserts, that is, anything from back when we were growing up :)


Also I know that cooking condensed milk is not truly caramel, but this is what we called it when I was growing up so I'm just going to have to keep calling it that.

Hopefully once you taste the crisp buttery shell combined with the creamy delicious filling you will forgive me.


Caramel Macadamia Tart Recipe - makes 6 tarts
If you do not care for macadamia nuts you can omit them from the recipe.

6 tart shells unbaked (click here for recipe and instructions) 8cm (US around 3")
1 tin condensed milk 395g (US 14oz)
1 Tbsp golden syrup (US - 1 1/2Tbsp use dark corn syrup if golden syrup not available)
60g unsalted butter (2 1/8oz)
1 cup raw unsalted macadamia nuts

Preheat oven to 180C (360 F)

Place unbaked tart shells into oven and bake for 7 minutes. Shells should be chilled and have baking paper and weights in place ready to blind bake.


Meanwhile place condensed milk, syrup and butter into a saucepan and cook over medium low heat stirring constantly for approx 8 minutes.

Remove tart shells from oven and remove baking paper and weights. Return to oven and bake further 5 minutes.

Reduce oven to 160 C (320 F)

Remove baked shells from oven and spoon condensed milk mixture in until 3/4 full. Mix the macadamia nuts into the remaining condensed milk mixture and then spoon onto the top of the partially filled tart shells.


Bake for further 8 minutes, the condensed milk mixture around the nuts should just start to turn golden.

Remove from oven and allow to cool, take the tarts out of the baking tins and the refrigerate for a few hours.

Store in fridge in an airtight container for up to 3 days.


Linda Vandermeer is a blogger, baker, maker and author of the cookbook ' Sweets on a Stick': More than 150 kid friendly recipes for cakes, candies, cookies and pies on the go!. Published in the US the book is available at most online book stores.

Original Ideas, photography and recipes by Linda Vandermeer do not reuse without permission. 


Tuesday, October 21, 2014

Happy ghost cup edge cookies for Halloween


Believe it or not this may be my only Halloween post this year. Yes that's right this is a Halloween post despite the pretty floral china in the photo's.


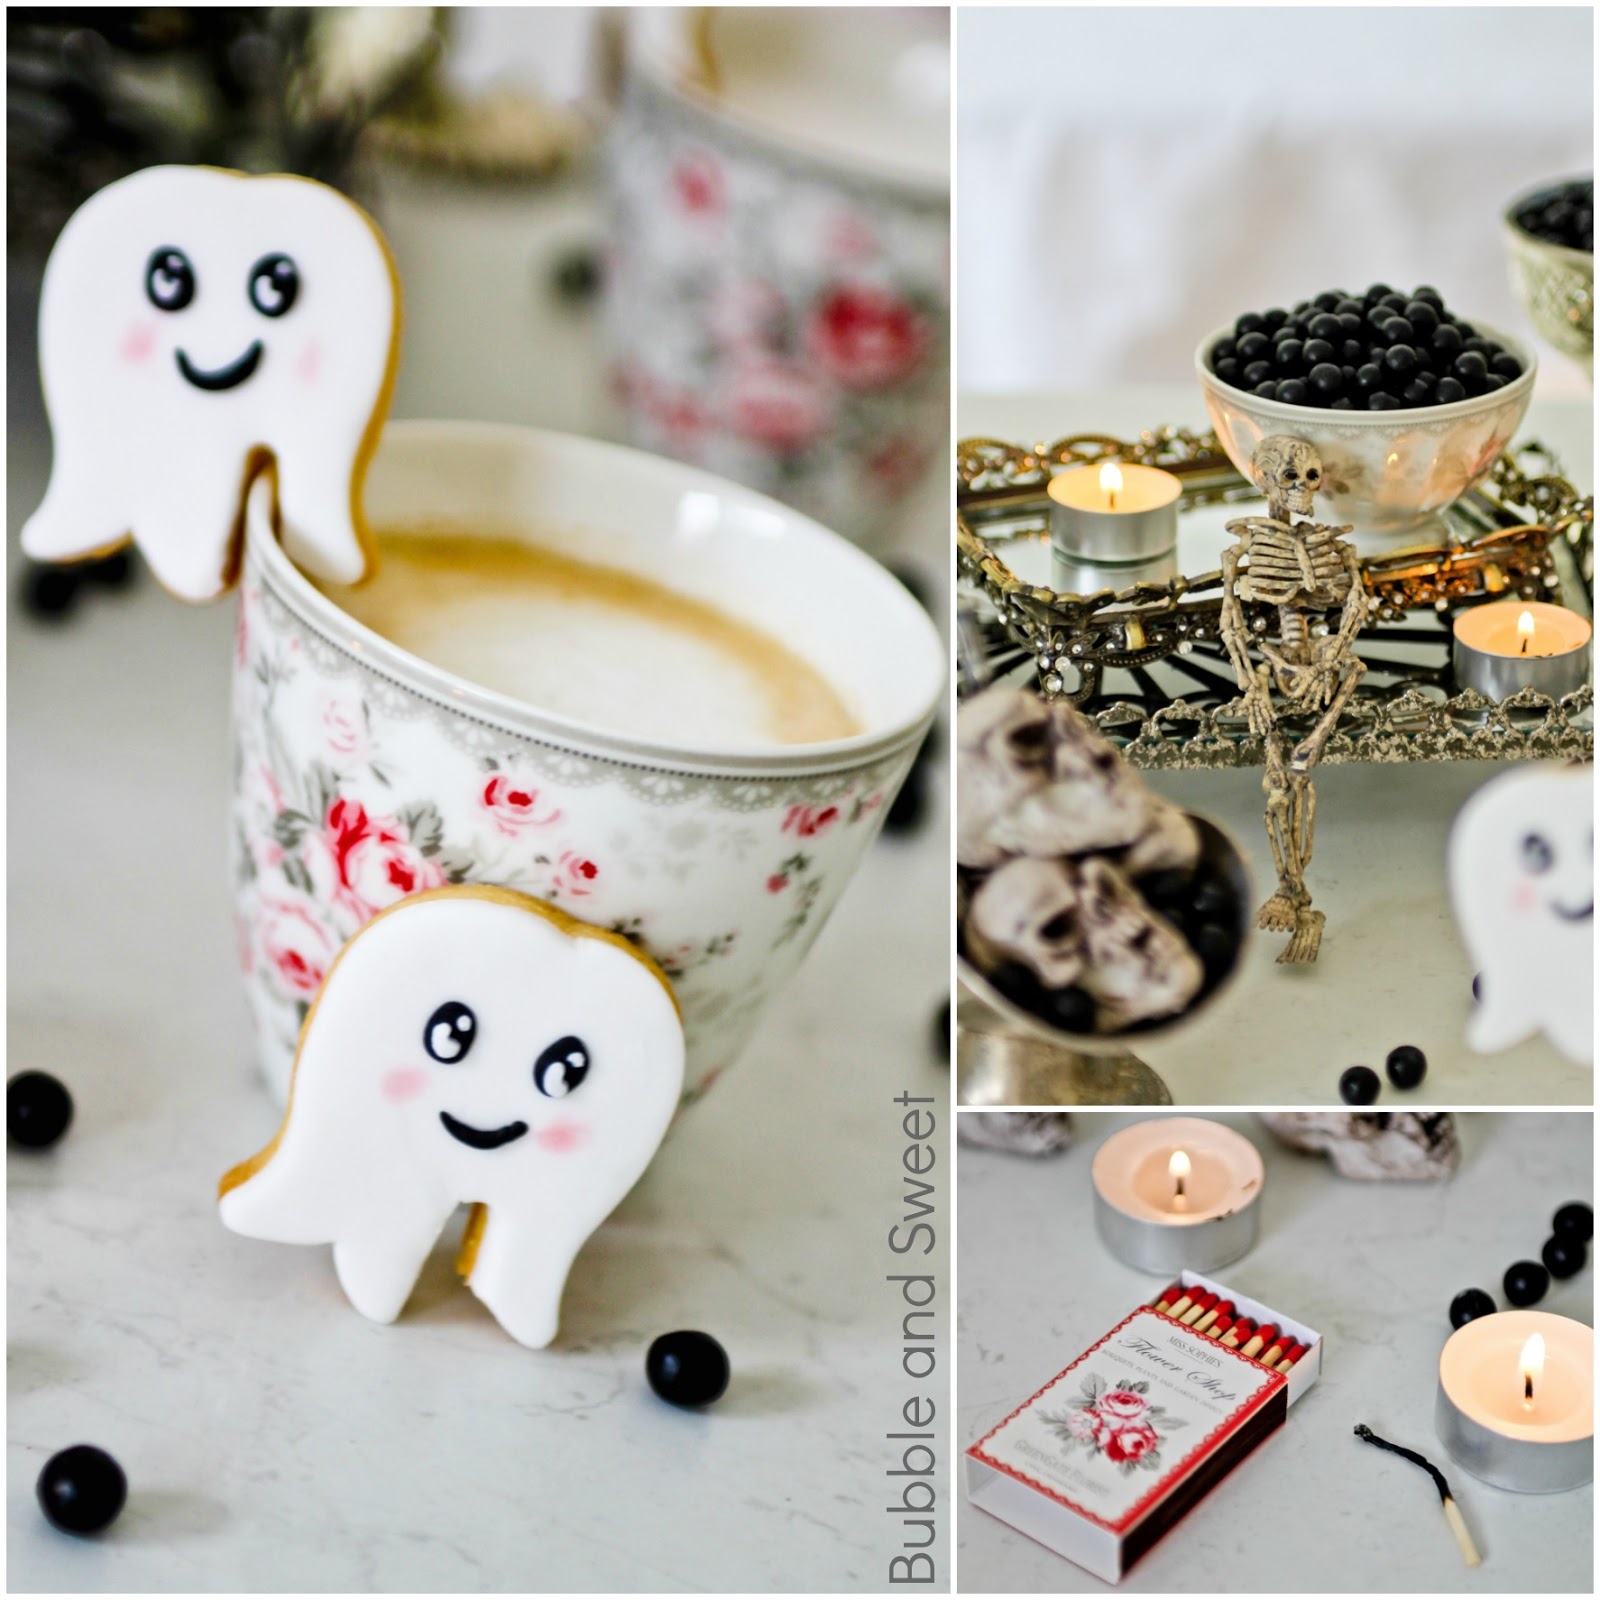
I am what I am and at the moment it seems happy ghosts that are too cute to scare anyone perched on the edge of  latte cups are on the menu around here.


Anyhoo the fun thing about these cookies is that the cutter is not a ghost cookie cutter, or even a cup edge cookie cutter.

Nope these cutters are upside down tulip cutters and the edge of the broom from a witch cookie cutter.


I've seen tulip cutters used for ghost cookies all around the place at the moment they seemed to be the perfect size and as luck had it I had some tulip cutters on hand.


Works out pretty sweet - huh. If you prefer royal icing to fondant you can of course make the cookies by outlining and flooding with white royal icing and then piping on the eye and mouth detail, otherwise to make as I have follow the instructions below.

Oh and if you like these cup edge cookies you should check out the sweet deer ones I made for Christmas last year.


Happy Ghost tutorial
If you prefer just to make cute ghost cookies that do not sit on the edge of your coffee cup just omit the section where you cut out the indent.

Sugar cookie dough (recipe below)
Rolling pin
Tulip cutter (I used Cake Boss Decorating Tools 4-Piece Springtime Fondant Press Set, Red )
Any cutter with a thin long section (mine was a witch from a bucket of cookies or alternatively use sharp knife to hand cute shape)
White ready roll fondant ^
Black ready roll fondant ^ (optional use a edible pen instead)
Small plastic rolling pin
toothpick
cornflour (corn starch)
2 small brushes
water
pink edible dusting powder

 ^fondant dries out quickly, when not in use store in an airtight container or ziplock bag. To use fondant knead until pliable and smooth and roll out on a workbench dusted with cornflour (cornstarch).


Using the cookie recipe and instructions below cut out and tulip cookies then using the broom section of the
witch cutter cut out thin indent from the bottom of the cookie as per pictures below. Cook as per instructions until golden.

Knead white fondant until smooth and pliable. Dust workbench with cornflour (corn starch) and roll out fondant until quite thin then using the tulip cutter cut out a fondant shape, then using the witch broom cut a thin indent the same as the cookie (see picture below).

Brush water onto the cookie and adhere the fondant, use the rolling pin to smooth the fondant into place.

Break off two small pieces of black fondant and press into oval shapes, press onto ghost cookie for eyes. Pinch of two very small amount of white and roll into a small ball, press one onto each of the black eye, use the toothpick to press in the top right corner of the circle to make the eye, then pinch off an even smaller bit of white fondant and press it into the top right corner of the black oval eye.

Make a mouth by rolling a small amount of black fondant into a thin rope, curving into a smile and pressing into place.

Use a clean dry brush to lightly dush pink cheeks on either side of the mouth as per picture.

 
Sugar Cookie Recipe (will make around 60 to 80 small ghost cookies)

460 grams plain flour (16 1/4 oz all purpose flour)
1/4 tsp baking powder
1/4 tsp salt
230 grams unsalted butter (8 1/8oz)room temperature
220 grams caster sugar (7 3/4 oz superfine sugar)#
1 large egg
1 tsp vanilla extract
#use regular white sugar if you do not have caster/ superfine sugar

Sift together flour, baking powder and salt.

Cream butter and sugar in a large bowl using an electric mixer until light and fluffy. Reduce the speed to medium low, add the egg and vanilla and mix until combined. Reduce mixer speed to low and mix in the sifted flour mixture until combined. Wrap the dough in plastic and chill in fridge for 30 minutes or so.

Line a few baking trays with parchment/ baking paper.

Dust workbench with plain flour and using a large rolling pin roll out the dough until around 1/2 cm (1/4") in thickness. If the dough is to hard you may need to work/knead it a bit until you can roll it out.

Cut out cookies shapes and place the cookies on the prepared trays. (Knead and reroll dough as necessary, if it becomes to soft you can pop it back in the fridge.)

Pop the cut cookie dough trays into the fridge to chill again for around 30 minutes until firm (or in the freezer for 10 minutes).

Preheat oven to 160 C (320 F) and cook the cookies until they just start to turn golden, around 15 minutes (less or more depending on cookie size).

Cool on trays for 5 minutes and then carefully lift onto a wire rack to cool completely prior to decorating.

- Cookies can be stored in an airtight container for 1 week


Linda Vandermeer is a blogger, baker, maker and author of the cookbook ' Sweets on a Stick': More than 150 kid friendly recipes for cakes, candies, cookies and pies on the go!. Published in the US the book is available at most online book stores.

Original Ideas, photography and recipes by Linda Vandermeer do not reuse without permission.  


Sunday, September 28, 2014

Sweet's gardening party with pink and grey party table


Sweet's 8th birthday party this year was a pretty grey and pink dessert table with a garden theme to tie in with the main party activity which was.......gardening.


We purchased some packets of easy grow flower seed and pots that eventually break down and the kids got to fill the pots with soil and plant the seeds. The pots were just the right size to fit into cupcake boxes which made packing up and taking home both pretty and easy.

I was lucky enough to find some little trowels the week before the party for $1 each at the local supermarket which the kids took home along with their little garden boxes.


If your not trying to be as economical as me this would work as well with a few punnets of plants instead of the seeds, but I managed to get enough for 12 kids along with a few of those sunflower and tomato ready to grow pots (that I used as party prizes for other games) for under $20.

All the rest of the stuff I used to decorate the gardening table with I already had (see that pink polka dot fabric it was from Bubble's 5th birthday party I blogged about 5 years ago).

Apron and string in tin - Greengate
Garden pots, seeds - Big W discount department store
Trowels - Coles supermarket
White plant stand with blackboard - Bunnings hardware
Pink polkadot cupcake boxes and pinwheels - Choice discount variety store


Party Table

The party table colour theme was based on the lovely grey with pink rose and white dot fabric I used as a table covering. I picked it up because it was so pretty intending to have dresses made for the girls, it was from Lincraft at around $8 a meter.

I had a fake window/mirror shutter I had from a while back I got in a closing down sale and was part way through restoring an old wooden plate rack I picked up on Ebay, so I added them to the table. The pink riser that the candy jars are on is a bathroom caddy I picked up at a discount dollar store last year and painted pink for another party.

Then when I was out one day I spied those big moss balls and I don't know why but I got them. For some reason I really like them, anyhoo they added some colour to the table and a bit of texture the big one was $10 and the 2 smaller ones $5 each from Vast Interiors.


The day before the party I picked up a stack of flowers to pop in little pitchers and vases scattered around the table. It was a pretty relaxed table.

Overhead are some pink hanging lanterns which don't quite make it into the photo's.

Party table menu

Decorated cookies - royal icing stripe cookies with fondant rose accent and fondant pink quilted cookies with white royal icing dots (Click here for free tutorial to make similar quilted cookies)


Birthday cake  - Ombre butter cream decorated cake in shades of storm and pink sunset - Italian meringue butter cream with strawberry cake. The butter cream was applied with an offset spatula to evoke the feeling of an artist's pallet.


Candy - Chocolate sixlets, marshmallows and bon bons. There were also pink pig sours on top of the white plate rack and I bought out a selection of other lollies for the kids to fill up their own take home loot bags.


Homemade raspberry macarons (Click here for recipe) served in a Greengate Sophie Vintage bowl.


Cinnamon scrolls with pink cream cheese frosting- we are loving cinnamon scrolls at the moment so we prettied them up with sugar flowers, butter cream piped leaves and sugar sprinkles. What more can I say - yum (click here for a cinnamon scroll recipe)


Linda Vandermeer is a blogger, baker, maker and author of the cookbook ' Sweets on a Stick': More than 150 kid friendly recipes for cakes, candies, cookies and pies on the go!. Published in the US the book is available at most online book stores.

Original Ideas, photography and recipes by Linda Vandermeer do not reuse without permission.  


Sunday, September 21, 2014

Ice cream sundae macarons


These neapolitan ice-cream sundae macarons might be some of the funnest looking macarons ever.

I made them for Bubble's 10th birthday party which had an ice-cream bar and they worked in perfectly with the theme. (Ice-Cream Party CLICK HERE)


The red 'cherries' are sixlets which are candy coated chocolate balls (if you're Australian that's like a smaller size jaffa without the orange flavour), the dripping chocolate topping is chocolate royal icing and the white swirl of cream is stiff peak royal icing.

If you don't happen to have any sixlets about you could always just add some extra sprinkles on the top and they still look extra sweet.


I used macarons I made myself but of course you could pick up some from the store and do the decorations yourself

Ingredients and equipment

Macarons *see note below (Click here for recipe)
White Royal Icing (stiff peak consistency)
Chocolate royal icing (add few Tbsp sifted cocoa to 1 cup royal icing or you can just add brown food colour) 20 second consistency#
Red sixlets
pink sprinkles
Round piping tip (eg #2) in piping bag
Star piping tip (eg #18) in piping bag

 *Macarons can be shop purchased and any type you like. However I made mine using the recipe in the link and then coloured them in a neapolitan theme. When making the macarons divide mixture in half and colour part pink and part brown. My filling was raspberry flavour whipped white chocolate ganache with americolor white food color added.
#20 second icing is when you run a knife through the royal icing mixture and the line disappears after 20 seconds :)


Put the chocolate royal icing in the piping bag with the small round tip. Pipe an uneven splat outline on the top of the macaron, going right to or over the edge in some spots. Fill the splat shape (I left the middle un-iced just to reduce the amount of icing I was using as it gets covered with the white swirl) with chocolate royal icing.


Sprinkle a few pink jimmy sprinkles over the top of the chocolate royal icing shape. Allow to set.

Pop the stiff peak white royal icing into the piping bag with the star tip. Pipe a swirl/ rosette onto the top of each macaron by holding the bag upright and piping a tight circle.

Place a sixlet in the middle of each white rosette and allow to set.


Linda Vandermeer is a blogger, baker, maker and author of the cookbook ' Sweets on a Stick': More than 150 kid friendly recipes for cakes, candies, cookies and pies on the go!. Published in the US the book is available at most online book stores.

Affiliate links may earn me money and contribute to supporting this blog.

Original Ideas, photography and recipes by Linda Vandermeer do not reuse without permission.  

Monday, September 15, 2014

Vintage Royal Albert Enchantment China and a pretty afternoon tea


One day I spied some Royal Albert Enchantment china on Pintrest. It was so pretty and I was immediately  smitten.


It didn't have a name or even brand in the comments, but I searched and searched and finally found it.

I don't use it everyday, but now and then I pull it out. The other day I made up some cinnamon scrolls and decorated them with pearl sixlets, little blue flowers and sprinkles to match and we had a sweet afternoon tea.


I think the new vintage look Christina Re forks and spoons match perfectly.

I'd love if you let me know if you have any favorite vintage china patterns or maybe a favorite pintrest board to check out.


 Linda Vandermeer is a blogger, baker, maker and author of the cookbook ' Sweets on a Stick': More than 150 kid friendly recipes for cakes, candies, cookies and pies on the go!. Published in the US the book is available at most online book stores.

Original Ideas, photography and recipes by Linda Vandermeer do not reuse without permission.  

Monday, September 8, 2014

Free video tutorial how to make a marshmallow and macaron tower


Phew that took me longer than I thought but YAY, I've done up a video showing me making that super pretty macaron and marshmallow tower so y'all can make your own of you like.

Click on this picture below to check it out:


Of course if you just prefer the written step by step instructions CLICK HERE for my previous blog post :)


 Linda Vandermeer is a blogger, baker, maker and author of the cookbook ' Sweets on a Stick': More than 150 kid friendly recipes for cakes, candies, cookies and pies on the go!. Published in the US the book is available at most online book stores.

Original Ideas, photography and recipes by Linda Vandermeer do not reuse without permission.  

Wednesday, September 3, 2014

How to make a macaron, marshmallow and strawberry tower


It all started with the marshmallows I had left over from Sweets party but it didn't end there.......

Yup I had strawberries left over as well. Lots and lots of strawberries. Now I'm not going to dwell on the obvious issue which is why I didn't just put them out on the dessert table regardless of whether they colour matched the rest of the stuff.


I'm a glass half full type of girl so I decided to take those strawberries and the rest of the left overs and make them so fabulous that no one could resist them.

I had already made up my pretty macaron and marshmallow tower and then I thought, hmmm this looks good but what if I added strawberries.


So I did and it looked great. It transformed the tower from a dreamy pastel tower of sugary sweetness into a more complex textural and vibrantly coloured dessert offering with a choice for anyone who wanted to join in but still be healthy.

Or something like that. It looked good and it tasted great so I guess that is the main thing.

I did think about dipping the strawberries in white chocolate coloured pink and adding some more sugar flowers but that would take away some of the texture and colour, plus I mostly believe that the strawberries are best on their own. This way you can have the fresh fruit and then a macaron as well.

I was a little worried that the strawberries would weep and ruin the tower, but I left it out for a few hours as an experiment and it still looked great with just minimal juice running down the fondant (note the weather was mild when I tried this out).


How to make a macaron, marshmallow and strawberry tower
This is a modified version of my last post just replacing the mini macarons. Make sure everyone eating from the tower knows there are toothpicks being used and check kids marshmallows before they eat them to ensure sticks have been removed.

Styro foam cone 10cm (4") bottom by 25cm (10") high (available craft stores)
Ready Roll Fondant
Large Rolling pin
Toothpicks
8-10 medium strawberries washed, dried and with the leaves cut off
15-20 regular macarons (Click HERE for macaron recipe)
up to 40 marshmallows (mine from Big Lolly)
Sugar Flowers (CLICK HERE for instructions to make your own)


Knead fondant, dust workbench and roll out fondant until quite thing. Brush the cone with water and then wrap the fondant around cutting off any excess at the back where it joins and pressing the fondant down it into place on the cone. Use fondant smoothers if you have them otherwise you can use your hands,

Cut toothpicks in half and starting at the top push a toothpick into the cone through the fondant. Stick a strawberry onto the toothpick and then repeat the process working your way down in a softly spiraling line as shown in the picture (the picture shows mini macarons instead of strawberries). This will be the front center of your tower so make sure it is adhered in a pretty even line. Push a whole toothpick into the top point of the fondant covered cone.


Starting at the top again attach a layer of marshmallows on either side of the strawberries. I used toothpicks in the picture, but you can use royal icing# to adhere the marshmallows as the toothpicks can lodge in the marshmallows when being removed.

#do not adhere macarons with royal icing as the delicate shells will not easily lift off, toothpicks do not stick to the macarons the same as they do marshmallows.

Work a layer of macarons on each side of the marshmallows. Continue to adhere marshmallows and macarons to the back of the tower. The back of the macaron tower will not be as pretty as the front, but try to work the macarons and marshmallows in a design that looks even.

Finish the tower off with a regular sized macaron at the top of the cone (in the whole toothpick you popped in the top at the start).

Using royal icing adhere a few sugar flowers to the macarons as decoration.


Linda Vandermeer is a blogger, baker, maker and author of the cookbook ' Sweets on a Stick': More than 150 kid friendly recipes for cakes, candies, cookies and pies on the go!. Published in the US the book is available at most online book stores.

Original Ideas, photography and recipes by Linda Vandermeer do not reuse without permission.