Showing posts with label caramel. Show all posts

Monday, October 17, 2022

Walnut caramel coffee slice, new beginnings and learning to breathe

Wow what happened there, I took a little break to run a cafe, blinked and there went 6 years. For real that just flew by.

Note to self, live every moment. I know you all learnt this a few years ago when COVID happened and everything shut down. But that's not what happened to me. Because I owned a cafe in Australia so I got up every single day put on a mask and went to work to keep that cafe running, do the admin, pay the staff so that hopefully there was still a cafe at the end of it all.

And then after 2 years came the end of restrictions, which was soul destroying because there was no way for the me to keep the cafe going.

Anyhoo I learnt a long time ago that endings are really just beginnings and I'm grateful for all the lessons I learnt, skills I gained and all the wonderful friends I made.

So I'm taking a little bit of time at the moment to focus on my health and my family. I'm working in a low stress job, focusing on some yoga training and learning to breath again.

And I'm blogging, because it's something I've always loved. But whoa everything's changed (but me) and it's taking me a little while to learn how to do everything.

So......like I said I owned a cafe in the suburb where I grew up. It was pretty old school and the people that came there were the sweetest bunch of people. It used to feel like inviting my friends over to my breakfast table, it wasn't fancy and everyone knew everyone else.

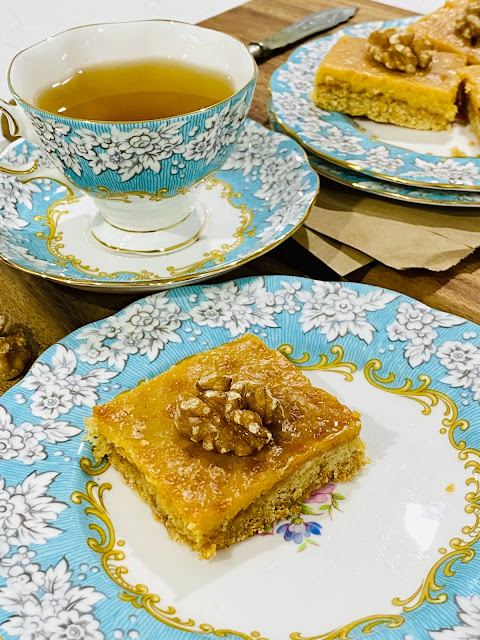
This is one of the cafe OG recipes, a simple old fashioned condensed milk 'caramel' slice. The staff used to bake this on site in the oven. We served it topped it with some walnuts but it's just as lovely plain if you prefer or drizzled with a little chocolate.

It's almost the opposite to the current crazes of fancy big cookie recipes out at the moment, it's so simple, you can eat a piece and still fit in your lunch. Plus it's perfect to freeze and you can slice it up after baking, freeze individual slices and pull out a piece to have for your afternoon tea or pop in your lunch bag.

xx Linda

Walnut Caramel Slice (makes 12 pieces)

Base

1 cup self raising flour

1 cup desiccate coconut

1/2 cup brown sugar

125g melted unsalted butter (4 oz)

Caramel Layer

1 tin condensed milk

2 Tbsp golden syrup (US 2 TBSP plus 2 Tsp)

25g unsalted butter (7/8 oz)

Topping

1 cup chopped walnuts *I used 12 halves, you can substitute with pecans or drizzled chocolate


- grease (I lightly spray oil) and line a shallow rectangle baking tin (mine was27.5cm X 17.5cm X 3.5cm or 11" X 7" X 1.5 ") with baking paper and preheat oven to 180 C (355 F).

This is a link to the pan I used on Amazon

- pop the flour, coconut, brown sugar and melted butter into a bowl and mix together well to combine.

- press the mixture down evenly into the prepared baking tin.

- place in middle of preheated oven and bake for 10 - 12 mins until it's golden brown.

- remove from oven and while it's cooling make the caramel (don't turn the oven off you still need it). *note if you don't let the base layer cool a little bit at this stage the condensed milk caramel layer will sink into it and not spread as well.

Make the caramel layer 

- place condensed milk, golden syrup and butter into a microwave safe dish and microwave on high for 1 minute, mix well. 

-Continue to microwave for 30 second bursts until a light golden colour and the mixture has thickened a little like the picture below. Don't go too far it's still got to cook for a little bit in the oven. Usually a total of 2 mins (thats 4 X 30 second bursts).


Spread the mixture evenly over the bottom of the cooked and slightly cooled base and bake for a further 10 -12 minutes the edges will bubble and start to turn brown. See picture of the finished slices to see what it should look like.

Remove from oven, if you are topping with walnuts gently sprinkle onto the top ensuring you do not touch the hot caramel

Allow to cool for a few hours until the caramel is set (you can place in the fridge for a few hours to speed the process up)

Cut into 12 pieces (4 along the long side and 3 on the short). Keep in an airtight container for up to 5 days in the fridge. 

This slice can be frozen whole wrapped in plastic and placed in an airtight container for 1 month. Or sliced and wrapped into individual pieces in an airtight container. Just take out what you need from the freezer and allow to defrost in the fridge.


Sunday, July 24, 2016

White Chocolate and Caramel Brownie Recipe

White Chocolate and Caramel Brownies - recipe below

I'm back home living with my parents whilst my new house undergoes some renovations.

So when I received a box of goodies from Nestle to join in the #Bakeityours challenge instead of reaching for the chocolate like I normally would I decided to make something with white chocolate and add in one of my dad's favourite lollies Jersey Caramels to come up with a treat he would appreciate.


The resulting brownies were dense and a little chewy which I liked and quite sweet. I think they improved after a day losing some of the initial sweetness and impving in texture.

Anyway onto the reason Nestle sent out the box of goodies is to let y'all know they have a new Nestle Bakers' Choice range. I like the suggestions on the front of the packets that say things like 'for coating and decorating' or 'for adding and pouring' and found the white chocolate to be quite a nice creamy texture which melted quite easily.


White Chocolate and Caramel Brownies
(makes 12 store in air tight container in fridge for up to 3 days) Wilton 195 piping tip used for decorating.

150 g ( 5 1/4 oz) butter
200 g ( 7 oz) white chocolate
3 eggs lightly beaten
1 tsp vanilla extract
1 cup lightly packed brown sugar
1 2/3 cup plain flour
220 g (7 3/4 oz) Jersey Caramels chopped
Whipped jersey caramel topping (see below)
6 Jersey Caramels cut into half extra for decorating

Line a rectangle slice tray approx 18cm x 28cm ( 7" x 11") with baking paper

Preheat oven to 180 C (350 F)

Melt butter and white chocolate in a microwave safe dish for 2 minutes on medium low heat. Mix (the mixture will not be soft yet) and then heat for another 2 minutes at medium low heat. Whisk until no lumps remain.

Add eggs and vanilla and whisk until just combined.

Fold through the flour and then the jersey caramels and spread the mixture into the prepared tray.

Bake for 30 minutes until the brownie is golden and cooked through in the middle.

Cut into triangles and pipe a dollop of whipped ganache into the middle of each brownie and top with half a jersey caramel.

Jersey Caramel whipped ganache topping

5 jersey caramels
1/2 tsp water
100 g (3 1/2 oz) white choc
25 g (7/8oz) cream

Melt the jersey caramels and water for 60 seconds at low rest and stir and then heat for another 60 seconds in the microwave and mix until smooth.

Melt the white chocolate and cream together at medium low heat 2 minutes and mix until smooth. Add in the melted caramel mixture and allow to cool to room temperature.

Whip with an electric mixer until light and fluffy.


Linda Vandermeer is a blogger, baker, mother, owner of The Biscuit Cafe and author of the children's cookbook Sweets on a Stick: More Than 150 Kid-Friendly Recipes for Cakes, Candies, Cookies, and Pies on the Go! Published in the US in 2011 the book is still available online at Amazon and other online book stores.

Affiliate links may earn me money and contribute to supporting this blog

I love when people share my blog ideas and give credit. All posts contain original ideas, photography* and recipes by Linda Vandermeer-McCubbin unless otherwise credited. Please feel free to link back to my blog for non commercial purposes.

I was sent a box of nestle product to assist in the development of recipes for this blog post. No sponsorship or financial incentive was received.


Monday, November 3, 2014

Retro recipe - Caramel Macadamia Tart


Have I ever mentioned that Mr Sweet does not really love decorated cake.

It's just not his thing. He likes lots of sweet stuff like ice-cream and chocolate and pie, often all together.

Anyhoo, I am not just saying that randomly, I mention it because he really liked these 'caramel' tarts which I baked a while back.

In fact I made quite a few different versions and he pretty much liked them all. I think he's a fan of retro desserts, that is, anything from back when we were growing up :)


Also I know that cooking condensed milk is not truly caramel, but this is what we called it when I was growing up so I'm just going to have to keep calling it that.

Hopefully once you taste the crisp buttery shell combined with the creamy delicious filling you will forgive me.


Caramel Macadamia Tart Recipe - makes 6 tarts
If you do not care for macadamia nuts you can omit them from the recipe.

6 tart shells unbaked (click here for recipe and instructions) 8cm (US around 3")
1 tin condensed milk 395g (US 14oz)
1 Tbsp golden syrup (US - 1 1/2Tbsp use dark corn syrup if golden syrup not available)
60g unsalted butter (2 1/8oz)
1 cup raw unsalted macadamia nuts

Preheat oven to 180C (360 F)

Place unbaked tart shells into oven and bake for 7 minutes. Shells should be chilled and have baking paper and weights in place ready to blind bake.


Meanwhile place condensed milk, syrup and butter into a saucepan and cook over medium low heat stirring constantly for approx 8 minutes.

Remove tart shells from oven and remove baking paper and weights. Return to oven and bake further 5 minutes.

Reduce oven to 160 C (320 F)

Remove baked shells from oven and spoon condensed milk mixture in until 3/4 full. Mix the macadamia nuts into the remaining condensed milk mixture and then spoon onto the top of the partially filled tart shells.


Bake for further 8 minutes, the condensed milk mixture around the nuts should just start to turn golden.

Remove from oven and allow to cool, take the tarts out of the baking tins and the refrigerate for a few hours.

Store in fridge in an airtight container for up to 3 days.


Linda Vandermeer is a blogger, baker, maker and author of the cookbook ' Sweets on a Stick': More than 150 kid friendly recipes for cakes, candies, cookies and pies on the go!. Published in the US the book is available at most online book stores.

Original Ideas, photography and recipes by Linda Vandermeer do not reuse without permission. 


Sunday, September 8, 2013

Chocolate caramel pecan 'pretzel' pastries - Sticks of Awesomeliciousness


I found these pastries the other day while I was walking through the supermarket. Ohh I thought to myself, they kinda look like pretzel sticks,  well not really but they were sticks so y'know I had to buy them and see what I could make.

As it happened it was the week after Father's day and I had some of the ingredients left over from making Snicker's Fudge.

Yeah, you know where this is going, although I switched it up a little and used pecans and made a turtle version of dipped 'pretzel' sticks and you guessed it they taste pretty awesome.


Then because they tasted so good I made some more with salted peanuts instead of the caramel and they tasted just as (or maybe even more) awesome. In fact they are so good I wanted to call them something like awesomelicious sticks except pretty much that sounds a teensy bit weird. But then I was all like they totally are sticks of awesomeliciousness and no one is gonna care what I call them once they try them.

But if your weirded out by the name maybe call them turtle sticks, cause that is way more normal ;)

Anyhoo back to those pastries they are like a puff pastry twisted together brushed with sugar, I'm guessing you could probably make it yourself pretty easy, but they were like $3 for a pack of 18 in the self serve deli area at the local supermarket*.

Or you could use actual pretzel sticks for a similar result with these instructions, they are mostly just the vehicles for chocolate, caramel and nuts so pretty much your choice what you use :)

Oh and before we get to the instructions, I shared my kids current fav treat in the latest issue of 'Tickle the Imagination' Magazine, which happens to be the kids issue. Seriously I am to-to in love with some of the shoots/ photo stories, eek even sweeter than my recipes! CLICK HERE to pop on over and see it all.


Awesomeliciousness Sticks
Salted Peanuts can be used in place of pecans. Dipped pastries can be stored in an airtight container for up to 3 days. In warm weather you may wish to store the container in the fridge. You can add 25g copha (7/8 oz paramount crystals) to the chocolate during the melting process if you wish to make the mixture more fluid and easier to dip, however it is not essential.

12 pastry sticks or pretzels*
300 g hard/chewy caramel (10 1/2 oz) - (the caramels are like the square ones in the pictures eg pascal columbines)
25g cream(7/8 oz)
1 1/2 cups roughly chopped raw pecans
300 g milk chocolate (10 1/2 oz milk chocolate)


Line a tray with parchment/ baking paper.

Place the chopped nuts into a shallow plate.

Place ingredients into microwave safe dish and microwave at high for 30 seconds, stir and microwave for further 30 seconds at high. #note the caramel will be very very hot - do not get any on you, use an oven glove or something similar to handle then bowl and do not not even think about licking the spoon while it is hot, seriously, no mater how tempting it seems.


Dip the pastries into the caramel, I then used a spoon to spread it 3/4 of the way up the stick. Allow any excess caramel to drip off, quickly dip into the chopped nuts and roll gently to cover lightly in nuts. Place onto the prepared tray to set.

Repeat for all remaining pastry sticks. Work quickly, if the caramel starts to thicken, return to the microwave for 10 seconds at high.

Allow the caramel to set, when set you should be able to peel/remove from the baking/parchment paper without it sticking.

Melt the chocolate in a microwave safe dish at medium for 2 minutes stir and then heat for another 1 - 2 minutes at medium heat. The mixture should be smooth and lump free. Dip the caramel/nut covered sticks into the chocolate, use a spoon to help cover 3/4 of the way up so the caramel and nuts are all encased in chocolate.

Place chocolate dipped pastries back onto the parchment/baking paper lined trays to set.

*I my pastry sticks were 'Le Sfogliatine' I picked up at Woolworths (Brisbane, Australia).


Linda Vandermeer is a blogger, baker, maker and author of the cookbook ' Sweets on a Stick': More than 150 kid friendly recipes for cakes, candies, cookies and pies on the go!. Published in the US the book is available at most online book stores:

Link to Amazon:

Or at Fishpond (free shipping Australia)
Sweets on a Stick: More Than 150 Kid-Friendly Recipes for Cakes, Candies, Cookies, and Pies on the Go! 

This post was not sponsored

Thursday, August 29, 2013

Snickers fudge and more Father's day ideas


 It's Father's day this weekend around these parts and I needed to make up a batch of treats for the Kindi day stall.

Earlier in the year I made up sweet pink fudge with hearts for mother's day so I thought some peanut caramel fudge would be a great idea for father's day. I had seen some delish looking Snickers fudge on pintrest and it inspired the snickers fudge (recipe below) you see here.


If your looking for some other yummy home made Father's day treats check out these (link to recipe by clicking on the names below picture):

1. Sugar Spice Cranberry Popcorn,
2. Totally Boss Chocolate Malt Macarons,
3. Peppermint Cookie Fudge, 
4. Mini Caramel Cheesecake.

Snickers Fudge makes 1 large tray or about 60 pieces (depending on the size you cut) conversions are approximate. Inspired by Snickers Fudge from Somewhere in the Middle.

Chocolate layers
450 grams milk chocolate (16 oz semi sweet) split into 2 lots of 225g (7oz)
120 grams smooth peanut butter (4 1/2oz) split into 2 lots of 60g (2 1/4oz)

Peanut fudge layer
55 grams unsalted butter (2 oz)
200 grams sugar (7oz)
65 grams evaporated milk (2 1/4oz)
200grams white marshmallows (7oz)
60g (21/4oz) peanut butter
55g (2oz) white chocolate
1 tsp vanilla

200grams (7oz) salted roasted shelled peanuts

Carmel Layer
400 grams hard caramels (14oz) (like pascal columbines)
50 grams cream (1 3/4oz heavy cream)

Instructions
Prepare a 20cm X 30cm (around 9" X 13") tray by lining with aluminium foil.

Chocolate Layer
Chop 225 g (8oz) chocolate into fine pieces and microwave at medium heat for 2 minutes. Stir or whisk and then heat for another 1 minute at medium heat. The chocolate should be smooth and lump free (if not continue to microwave for 30 second bursts) add 60g (2 1/4oz) the peanut butter and mix until smooth.

Pour into the prepared tray and smooth evenly over bottom of tray with the back of a spoon and place in fridge until set.

Peanut Fudge Layer
Place sugar, evaporated milk, butter and marshmallows into a saucepan and heat on medium low heat until the marshmallows are melted. Heat for 5 minutes stirring continuously without allowing the mixture to boil. Remove from heat and add the peanut butter, white chocolate and vanilla.
 

Stir until combined and the mixture is smooth. Pour into the prepared tray over the chocolate layer.

Sprinkle the peanuts over the fudge and gently press into place, place in fridge until set.


Caramel Layer*
Place ingredients into microwave safe dish and microwave at high for 1 minute, stir and microwave for further 30 seconds at high. Pour over peanuts and gently spread with knife to make even. Place into fridge to set.

*note the caramel will be very very hot - do not get any on you, use an oven glove or something similar to handle and do not not even think about licking the spoon while it is hot, seriously, no mater how tempting it seems.

Final chocolate layer
Follow instructions for the first chocolate layer as above and pour over the caramel layer, using the back of a spoon to spread evenly in place. Pop into the fridge to set.

Once set turn out of tray onto a cutting board and cut into squares using a sharp knife. For clean cuts run the knife under hot water and dry between each cut.


Linda Vandermeer is a blogger, baker, maker and author of the cookbook ' Sweets on a Stick': More than 150 kid friendly recipes for cakes, candies, cookies and pies on the go!. Published in the US the book is available at most online book stores:

Link to Amazon:

Or at Fishpond (free shipping Australia)
Sweets on a Stick: More Than 150 Kid-Friendly Recipes for Cakes, Candies, Cookies, and Pies on the Go! 

Sunday, July 22, 2012

A vintage dress inspired wedding cake filled with flowing pockets of salted caramel peanut


My sister in law got married and we have finally officially welcomed her partner of many years into our family.

We always think of my brother in law as the new kid on the block, but he has been a more than welcome part of our family for almost 10 years.

Photo by Ashley Oostdyck

Not one to do things the traditional way, they eloped and got married over in Canada in a pretty low key wedding with the bride wearing a vintage dress that was previously worn by the grooms mother on her own wedding day.

It was so special and reflective of the bride and grooms personalities.

So when Mr Sweet offered up my services to make a cake for their Australian reception I felt that a traditional white wedding cake with bows and lace wouldn't capture the vision of their unique wedding day.

The groom's mother kindly sent me a picture of her own wedding day and I did my best to come up with a cake design to tie in with the color theme of the dress.

I decided to go with a streamlined layered bottom and a handpainted top tier to look like the pattern on the dress. In the end the cake matched the picture I was sent perfectly.....but over the years the photo must have faded and the color was a little lighter than the dress in real life.....and the pattern was a little different than the actual dress as it was difficult to see in the picture.

But I think we were all happy with it.

and because it was family and if it didn't work out I knew nobody would really mind, I created a recipe for a mud cake filled with chocolate ganache and pockets of flowing salted caramel with peanuts.

Yup that's right little surprise pockets with gooey sticky salty caramel and peanuts.


Dan and Michelle's Reception Party Cake


Bottom Tier - 24cm X 15cm (H) Chocolate Mud Cake with Chocolate Ganache and pockets of salted caramel with peanuts. Decorated with streamlined light aqua fondant ruffles.


Top Tier 15cm X 15cm (H) Gluten Free Almond Orange Cake with Chocolate Ganache. Covered with light aqua fondant (not gluten free) and hand painted design to match the wedding dress. I used food color mixed with rose spirits and icing sugar for texture, highlighted with edible gold luster dust.

Cake Stand - Clara Fench
Wedding Dress Photograph by Ashley Oostdyck

Sunday, April 29, 2012

Oh Sweet Mum - A rustic pie buffet party table


I love my mum.

Without a doubt she has been the hugest female influence in my life. She taught me to cook, to love and to be the best I can be, she made me who I am and if my own children end up loving and respecting me as much as I do my own mother...then I'll be pretty happy and call my time here a success.


So when Jacki from Blissfully Sweet asked if I would like to be involved in an E-vent being organised in memory of her own mother I was honored to participate.

When I signed on I had no idea how gorgeous the Oh-Sweet Mum E-vent would be. Jacki co-ordinated a group of super talented stylists, artists, florists, florists, cake decorators and more from within Australia and around the world to come up with a day of amazing events.

I would highly recommend that you CLICK HERE to read the E-Magazine that was created to showcase the E-vent. It includes so many beautiful images, information about the contributors, recipes and diy ideas including my recipe for Caramel Slice.

Want caramel slice to rival these babies
....click over to the E-zine it includes my recipe

Anyway......my mission (if I chose to accept it) was to create a Pie, Tart and Slice E-vent and I decided the best way would be a dessert buffet.


That little Mission Impossible pun is due to the fact that Pies are not really my thing.

But I think I met the challenge and came up with a rustic inspired pie and slice table with my own Bubble and Sweet spin. Although there are a couple of traditional pies on display I have included 'Pie' Macarons, Whoopie Pies, Pie Pops and pretty little Chiffon Pumpkin verrines with mini macarons and pecan pie crust bites.

I'm pretty happy with the end result which I'm going to admit is only this good due to the contributions of Naomi V Photography and Ah-Tissue.


With the original concept of the Oh Sweet Mum E-vent in mind and in the interests of women's health, I am going to donate a dollar for every comment on this pie table post up to $100 to the National Breast Cancer Foundation.  (I know that there are many other important aspects of women's health and other great organisations I have just chosen this one this time).

Also as a mother to 3 young children myself I know that sometimes my own health takes a back seat to everything else going on. But regardless of what is happening I do make sure I always keep any of my regular doctor's check up appointments and I try to remember to keep up my own self-examination routine. Please if you take anything from this post today I hope that it how important you are to your friends and family and that you should look after your health.... and the same applies to all you men out there as well :)

OK now that I've got off my soap-box, back to the yummy treats:


Rustic Pie and Party Table menu included:

Sky High Apple Pie
Rustic Cherry Pie


Pumpkin Chiffon Pie with mini chocolate macarons and pecan piecrust bites


Pie Pops (recipes from Sweets on a Stick)
Peanut Butter Boston Cream Pie


Rustic Chocolate Pecan Pie


 Chocolate Cream Mousse Pie with mini chocolate macarons and Hazelnut Tart Shell


Whoopie Pies


Assorted Slices (Rocky Road (recipe from Sweets on a Stick), Mum's Sweet Caramel Slice and Cheesecake Slice)


 Chocolate chunk fudge brownie Slab; and


 Apple Pie macarons


The table theme was inspired by the chocolates and caramels in the treats with some gold and teal highlights.


Ah-Tissue created an amazing display of paper and hessian wall pom poms which I can only describe as wall art.

The gorgeous photography is by Naomi V Photography. and the photo's are taken at her studio

(This was my favorite photo of the day - apart from the girls of course - 
I think because they were my favorite treat - super yum)


Printables are by Style Me Gorgeous.


The dresses and hair pieces that Bubble and Sweet are wearing are Tea Princess purchased from Tea Princess and Vintage Ladybird.


Recipes for the Pie Pops, Boston Cream Pies and the Rocky Road are from Sweets on a Stick


Sweets on a Stick 0ver 150 Kid Friendly Recipes available from Amazon and Fishpond 
(and lots of other places too)

Sweets on a Stick: More Than 150 Kid-Friendly Recipes for Cakes, Candies, Cookies, and Pies on the Go!