Showing posts with label cookie pop. Show all posts

Sunday, January 20, 2013

Sweetheart Valentine Cookie pops


Some people don't love Valentines day.

Me - I'm all for it, although I guess waiting for a certain day to express your love does seem a bit odd. I'm really more a every day should be filled with hearts and love kinda girl.


Take for example these cookies, I would happily eat them any time of the year.


But they do make a sweet little display, which if your into the whole Valentines day thing is perfect :)


I make these cookies all the time, they are a favorite of the kids, we just like to mix it up and decorate them differently.


The design and recipe is based on the Sweetheart cookie pops from Sweets on a Stick (details below).

And of course you don't need to pop them on a stick, they are just as sweet if you make them as regular cookies.


Shop the photo vendors

Cookies based on Sweetheart cookies page 90 of Sweets on a Stick - details below
Pink food color used on cookies - Sugarflair dusky pink
Pink fabric background - Tilda Rosalie fabric
Small White Letter Rack - Early Settler
Pink Candy - Strawberry bon bons - The professors

Paper straws used to cover cookie sticks (cut in half)


Linda Vandermeer is a mum, wife, blogger and author of the cookbook ' Sweets on a Stick': More than 150 kid friendly recipes for cakes, candies, cookies and pies on the go!. Published in the US the book is available at most online book stores:


Or here at fishpond (Aus/NZ)

Sweets on a Stick: More Than 150 Kid-Friendly Recipes for Cakes, Candies, Cookies, and Pies on the Go!

Sweets on a Stick also available at the Bleeding Heart Brisbane: contact details info@bleedingheart.com.au

Wednesday, January 25, 2012

Thought Bubble Cake Pops


I was making up a batch of cloud shaped cake pops the other day when I had a thought.

A thought about thought bubble cake pops. Hmmm I thought to myself that would be kinda cool.

So I made them up and they worked out great. Just like I thought they would.

Now after reading that repetitive story you can truly see how much thought goes into the treats I make :)


And you must excuse my messy 'thoughts' written onto the pops with edible markers. I might have mentioned this before but I am a really messy writer. I can pipe acceptable lines and swirls and other designs if need be, but if it comes to writing - scrawl city. It's always been the case, if you were ever to check out my school report certificates from when I was really young there was a long line of A's and Very Goods and then - next to hand writing a big Not Satisfactory.

Please don't judge me by my hand writing.

If you are a super neat writer and good at piping the words would be lovely piped with candy writers.

Thought Bubble cake pop instructions

1 batch cake pop mixture (click here for oreo pop recipe,mix up your own with cake and buttercream or see my book sweets on a stick for lots of cake pop mixture recipes)
white candy coating
paper lollipop sticks
black edible pen
small flower/blossom cookie or fondant cutter squashed into cloud shape
styrofoam block to hold the pops upright for setting

Holding the flower/blossom cutter between your thumb and pointer squish together to shape into a mini cloud.

Line a tray with parchment paper and place the cloud cutter on top of the paper lined tray. Take a few teaspoons of the cake pop mixture and press it into the cloud cutter pressing down firmly until it is evenly packed in, turn it over to check that there are no gaps underneath. Use your fingers to gently press the mixture out of the cutter so it remains on the lined tray. Repeat until about 2/3rds of the mixture is used up.


With the remaining 1/3 mixture make up 2 small balls, one a little larger than the other (see picture for example). Those balls will be the bubbles leading up to the 'thought' cloud. Place the balls on the parchment lined tray.

Place tray in fridge to chill until firm.

Melt up a bag of white melts/ candy coating. Mix in quite a bit of copha or paramount crystals during the melting process until the mixture is very fluid (but not so much that it is watery). The mixture should be like thick cream.

I melt my chocolate in the microwave on medium low, medium is too hot and high is way too hot. If you heat your chocolate at too high a temperature it will burn and not be salvageable for dipping .Remember medium/low for short bursts of 60 to 90 seconds.

Grab a bunch of lollipop sticks. Holding one end of the stick dip the other end into the melted chocolate/candy coating and insert it into a cloud cake pop shape so the stick is sitting in the bottom side of the cloud and the stick is parallel to the tray (see picture above). Repeat for remaining clouds.

Follow the same dipping process for the small ball shaped using toothpicks in place of the lollipop sticks.

Place the tray back into the fridge to chill for 10 minutes or until the sticks are secure.

Make sure the chocolate/candy coating is still melted, if needed remelt in the microwave. Holding the end of the stick dip the whole cloud cake pop into the melted chocolate/candy coating. Lift it up and allow as much of the candy/chocolate mixture to fall off as possible. tap gently on the side of the bowl if necessary. Place upright in a stryofoam block to set.

Follow the same process for the small balls.


Remove the toothpicks from each ball by gently twisting the toothpick and pulling it out. 

Ensure that the candy coating is still melted and holding the larger ball by the sides dip the top into the candy coating and then press it onto the bottom left of the cloud pop. I dipped the side which has the toothpick hole. You can either hold the ball against the cloud shape until secure or place something foodsafe underneath the ball to hold it in place until it is set (I used small sets of metal fondant cutters I had sitting around - you can just use whatever works like scrunched or folded tin foil maybe).

Pop into the fridge until set.


Repeat for the smaller ball, dipping, attaching and waiting for it to set.

Then you can use an edible marker to write words on each pop.

Store in the fridge in an airtight container for up to 3 days.


If you are in a humid area the pops may get condensation when you remove them from the fridge. Condensation will naturally evaporate away, however if you have pops with cream cheese or other ingredients which need to be kept cool, use a small piece of clean paper towel (absorbent paper) to wipe over the area you will be writing on.

 
.........................................................................................................

For more cake pop mixture recipes see my book Sweets on a Stick. It's a cookbook that includes recipes for all types of Sweets on a Stick, from pies to cakpops, cookies to fruit and candy - all on a stick. The recipes are kid friendly. It's a US release for measurements and ingredients although it does have a conversion table in the back for metric. Available here at Amazon:


Or here at fishpond (Aus/NZ)

Sweets on a Stick: More Than 150 Kid-Friendly Recipes for Cakes, Candies, Cookies, and Pies on the Go!

Wednesday, December 21, 2011

Peppermint Candy Christmas Cake pop


I'm not the hugest fan of hard candy like lollipops and hard peppermints but I adore the look of them. I think that is why I am often making fake candy versions out of other sweets that I do like, y'know cookie and cake pops, cupcakes....macarons. Well pretty much mostly everything other than hard candy.

So I made up this version of peppermint candy that is a choc mint flavoured cake pop, it looks pretty, tastes minty, but best of all for me I can easily bite into it.


I also made some candy cane pops, but I was not the hugest fan of these, they worked ok, but there were a few breakages during the dipping and although I think it was the dodgy packet of melts I had I can't be sure so I'll just share the pictures this time.


In Australia we have a cookie called Mint Slice which is made by Arnotts. It is a hard round biscuit (cookie) topped by a layer of mint icing (frosting) and then completely enrobed in dark chocolate.

If you don't have a local cookie like the Mint Slice you can just use a plain Oreo truffle recipe like this one (CLICK HERE) and add peppermint oil or extract to taste.


Peppermint Candy Christmas Cake pop
In this recipe I use a Fondant cake pop decal to decorate the cake pop. I am going to refer to it as a Ca-popper to save time in the recipe

Capopper (Fondant cake pop decals)
White fondant
green fondant
red sanding sugar
royal icing
candy shaped cookie cutter
small rolling pin

Roll out the white fondant onto a bench dusted lightly with cornflour until quite thin and use the cookie cutter to cut out a candy shape.
Roll out the green fondant and cut out the candy shape. Remove the edges so you just have the round middle and then cut the middle into 10 equal (ish) triangles. Pop 5 of the triangles onto the white fondant candy to look like swirls in a hard peppermint candy - use a little water to adhere if necessary.

Fill in the remaining white spaced with a little royal icing and then sprinkle over red sanding sugar.

Allow ca-popper to set for at least a day.

Place flat onto a parchment covered tray

Mint Slice Truffles
1 packet Mint Slice Biscuit
35g full fat cream cheese

Place all ingredients in a blender and mix until well combined.

Candy shaped pops
Ca-popper - see above made at least one day before
cake pop or cookie truffle mixture
hard candy shaped cookie cutter
red or while candy coating (like wilton melts)
lollipop sticks (around 6")
small microwave safe bowl, large enough to dip a whole pop into completely.

Take around 25g (7/8 oz) of the biscuit/ cookie truffle mixture and push into the candy shaped biscuit cutter just filling the inside round as per the picture. Use a lollipop stick to make a hole in the bottom where you will later be inserting the final lollipop stick, place on a parchment lined tray and pop into the fridge until firm.

Melt candy coating in the microwave at bursts of 90 seconds on medium low heat stirring in between until all lumps are melted and the mixture is smooth and fluid. I add copha (or paramount crystals) before I melt the candy coating as I find it is too thick to dip easily without the addition.

Take the chilled rounds out of the fridge and holding the end of a lollipop stick dip one end into the melted candy coating and then insert the stick into the round cookie truffle (or cake pop) mixture. The sticks should be laying parallel to the tray as per the picture. Repeat for all the pops and then return to the fridge to chill again.


While the pops are chilling, arrange the ca-popper on  a parchment lined tray with the decorated side facing down. You are going to lay the dipped pops on top of the so make sure there is enough room for the sticks

Once the pops are chilled, make sure the candy coating is still melted and fluid, if necessary pop back into the microwave for a short time (at medium low heat).

Holding the end of the lollipop stick submerge the whole pop into the melted candy coating. The lift it out of the candy mixture. You need to keep holding the pop upside down for a while until the excess candy coating mixture drops off otherwise it will run down your hand and the lollipop stick. I gently tap mine against the edge of the bowl to help the excess drip off.

Allow the candy coating to almost set and then carefully lay the pops on top of the ca-popper.


For a stack of other cake pop recipes and ideas check out my newly released book Sweets on a Stick available here at Amazon.


Or the book depository (Click HERE)

Or here at fishpond (Aus/NZ)

Sweets on a Stick: More Than 150 Kid-Friendly Recipes for Cakes, Candies, Cookies, and Pies on the Go!
The end

Tuesday, October 4, 2011

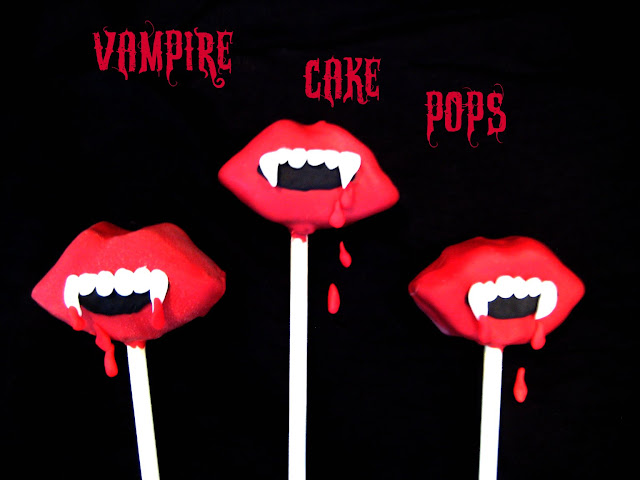
Vampire Cake Pop Redux


Remember these vampire mouth cake pops I made last year inspired by True Blood........


well it's coming up to Halloween again and although I know any time is a good time for vampire cake pops I have had lots of questions on how to make them recently so here is bit of a better explanation of what I did.

Although sorry still the same mildly blurry over exposed photo's I used the last time :)


I made these from tim tam cookie truffles, or you could use oreo truffles (recipe at the bottom). I find that the consistency of the cookie truffles makes shaped pops a little bit easier, plus it is way quicker.

Shape the cookie truffle mixture into a mouth shape, I made an oval, flattened it down and pinched out the edges with my fingertips, then made a little lip/bow at the top. Pop your mouth shaped cookie truffles onto a parchment lined tray, grab a lollipop stick and make a hole in the bottom of each mouth (see the picture for a guide as to where you will be sticking the lollipop stick), remove the lollipop stick, repeat for the remaining mouths.Stick the tray into the fridge to chill.

Now for the purposes of this post I am going to be calling the chocolate coating 'candy coating' as that is what I buy. You can get compound chocolate melts (nestle brand) from the supermarket in Australian or other types from cake and hobby stores but I use the US candy coating/melts as they are already colored and set well on the pops. In Australia you can get candy melts from Spotlight and specialty cake stores, or online from Cakes Around Town who sell Merckens red candy coating and Baking Pleasures who sell red Wilton Candy Melts.

Melt some red candy coating (melts) in the microwave on medium low heat. Do not be tempted to melt at higher temperatures as you will burn the candy coating. If you like you can add some extra red to make it a deeper color but make sure you use special oil based color or the candy will be ruined (chocolate much like witches is destroyed by water in most instances). Melt the candy coating with some paramount crystals or copha until it is smooth. I use quite a lot of the copha, up to 1 part copha to 7 parts candy coating if I'm using Wilton, different brands will require different amounts of copha or paramount crystals, add it gradually to see what works best, the candy melts should not be thick the mixture should flow easily, kinda like this picture.

Yup I know this is blue and not a mouth it's just an idea of how your candy coating should look

Take lollipop sticks and holding one end dip the other into your melted candy coating and then insert the lollipop stick into the hole you have already made in each mouth. Repeat for remaining mouths and return to the fridge to chill for another 10 minutes.

Make sure the red candy coating is still melted sufficiently, remove the cookie truffle mouths from the fridge and holding the end of the lollipop stick dip each one into the candy coating, submerging the whole truffle and then lift out, tap gently to remove excess candy coating, and allow to set upright. I use large squares of styrofoam covered in glad wrap.

Once the mouths are set you can decorate, I lay mine back down flat on the tray to do this. I used ready rolled fondant (plastic icing) which you can get from specialty cake stores, grocery stores (in Australia) or hobby stores (in the US). Color some black and leave the rest white. Use your fingers to shape the black opening to the mouth and press onto the mouth cookie truffle pops, mine stuck without anything extra but if you have trouble adhering it try using a little royal icing or edible glue.


Shape the white fondant into teeth making four smaller front teeth and then two larger vampire canine type teeth for the edge. Adhere the teeth to the black mouth using a really teensy amount of water (really just a tiny amount of the black will smudge everywhere) and press on lightly.

Allow to set and serve.

The red drops of blood in the top picture are just more ready rolled fondant colored red and shaped into blood droplets.

Oh and Not Quite Nigella made a fun version of these last year for her Halloween party based on my original post - I love the photo where she is holding them up - so fun.


Oreo Cookie Pops

Note for US conversion, for the Oreo's just add half the amount of cream cheese to what ever size packet oreo's you get. So if you have a 16oz package of Oreos add 8oz cream cheese which will make around 23 or 24 Oreo truffles.

300g Oreo Cookies
150g Cream Cheese at room temp

Crush Oreo cookies finely in a food processor add cream cheese and process until the mixture clumps together. Shape mixture into a ball for traditional pops or follow the directions above for vampire pops.

Oh and for lots more fun ideas for sweets on a stick, check out my book being released in the US in December:


Tip Junkie handmade projects


Friday, August 19, 2011

Lilli's 7th Birthday Party Mermaid Party inspired by Driftwood, the ocean and dreamy little girls


I have finally put together a quick post to show you the pictures of Lilli's Mermaid Party and I must mention the party was featured over on the wonderful Kara's Party Ideas which we adore.

Lilli's party was inspired by driftwood, the ocean and dreamy little girls.


As usual I made all the sweet treats. I had seen a tiered macaron tower in a wedding book which I really liked. But I decided to add my own twist and popped on some Tim Tam pearl Truffles for the top layer. Don't worry I'll be popping a tutorial up for this soon.


The cake was inspired by the ocean and was three tiers with the cake wrapped in graduation fondant. Inside the cake was flavored with Blue Haven Jelly Crystals and Italian Meringue Buttercream once again flavored with the Blue Haven Jelly Crystals. I know it's weird.....but blue is one of the birthday girl's favorite flavours. The pretty cake stand is from Sharnel Dollar Designs.


The Mermaid Cookie pops were a huge hit of course and are a vanilla cookie decorated with fondant. Once again I will post a tutorial shortly.


We also had hand dipped oreo's topped with a fondant 'pearl' and the candy and bowls are from Sharnel Dollar designs.


I've found in the past that with a complete candy or sweet buffet there is so much left. As it was sea themed and sushi is one of the birthday girl's favorite things we had Sushi 'de la mar' and 'sea' cucumber sandwiches to balance out all the sweets.


All the amazing paper pom poms were from Ah Tissue.


The mermaid dresses and tablecloth were hand made by Karen McCubbin and had the most amazing swirly detail. The mermaid fabric on the tablecloth was so pretty and is from Spoonflower. If you love fabric you must check them out, they custom print.


Invitations, party bags, party bag tags, candles and napkins were from Paper Eskimo.


We had pass the parcel and made mermaid necklaces with 'pearls' and shells with premade holes from the local discount store which the kids took home as a memento.


Every one had blue lips from the candy, sorry to all the other parent's Xx


Lovely Suppliers

Cake, Macaron and cake pop Tower, Mermaid Cookie pops and dipped oreo's by Bubble and Sweet
Pom Poms Ah Tissue
Cake Stand, Glass Jars and Green Beanies Sharnel Dollar Designs
Invitations, Party Bag and Tags, Napkins and Candles Paper Eskimo which I bought from Details Details (they were super helpful)
Wooden Scoops for Lolly Jars Polka Dot Prints
Table cloth and Mermaid Costume by Karen McCubbin
Photographs by Terri Vandermeer
Mermaid fabric from Spoonflower


Special thanks to mum for making the cucumber sandwiches, Dad for the orchid's and the lovely people at the sushi shop at Arnedale Springwood for coming in on a Sunday to make up Lilli's favorite Sushi.


Linda Vandermeer is a blogger, baker, maker and author of the cookbook ' Sweets on a Stick': More than 150 kid friendly recipes for cakes, candies, cookies and pies on the go!. Published in the US the book is available at most online book stores:


Or here at fishpond (Aus/NZ)

Sweets on a Stick: More Than 150 Kid-Friendly Recipes for Cakes, Candies, Cookies, and Pies on the Go!


Xx

Sunday, July 31, 2011

Milk and Cookies cake pops made from white tim tam truffles


Who doesn't love milk and cookies. Also cake pops, I know we all love them. So really these milk and cookie cake pops were just destined to happen.

I came up with this idea ages ago while I was making some scrap inspired bird cookies.....see this pic here. I loved my little 'Scrappy Bird' but no one else was quite as taken with him.


Poor Scrappy Bird - is this a cookie only the creator (me) could love........

Anyhoo, while I was making Scrappy Birdy I trimmed off some fondant 'twine' and it looked like insy little striped paper straws. So I started wondered what I could do with a stack of teensy little fondant straws and then I thought of course..... milk and cookie cake pops.


These pops are made from my white chocolate tim tam pop recipe, because that's what I had around, but afterwards I realised it was a great idea as now there are cookies inside AND outside of my milk and cookie cake pops.

Dont'ya just love it when stuff like that works out without even really thinking about it.

Milk and Cookie Pop tutorial

So these are pretty simple,  be sure to make the straws a couple of days prior to assembling the pops so they have had a chance to set.


Ingredients
small amount of fondant half colored red, half white
batch of cake or cookie truffle pops (I used Tim Tam cookie pops click here for recipe)
white candy coating/melts (or white chocolate melts) I am going to call it candy coating for the rest of the tutorial.
copha/or paramount crystals/or crisco for melting.
mini store bought cookies (I used mini chips ahoy)
lollipop sticks
styrofoam block for resting the pops in

Take some red and some white fondant and roll them (seperately) into a thin log using your fingertips and the workbench until they are quite thin. Twist the 2 them around each other like a rope and once again using your fingertips roll the combined, twined fondant back and forth gently on the workbench. Make sure to use really really gentle pressure or you might end up with the fondant twine being uneven. ( Although I guess it will not be such a big problem if your cutting it into small mini straw pieces). Once you have made the twine cut it into pieces about 1.5cm (1 1/2 inch) in length and leave on some parchment paper to set for a day or so.

Make the cake or cookie truffle pops and shape into a milk glass shape by making a cyclinder that tapers up slightly. Chilli n the fridge until set.


Melt the white candy coating in the microwave at bursts of 60 to 90 seconds at medium low. Do not overheat the chocolate. If you want your finished pop to have a really smooth finish you need to add some type of shortening to make the candy coating more fluid. I recommend copha if you are in Australia at a ratio of around 55g to every 400g candy coating, or paramount crystals in the US at a ratio of around 2oz to every 14oz candy bag. If you can not get paramount crystals in the US try crisco but it's not quite as good and you may need to work on the ratios.

Once the candy coating is melted dip the end of a lollipop stick into it and insert into the bottom (thinner tapered end) of the milk shaped pop. Place onto parchment lined trays and chill for 10 minutes.

Ensure candy coating is still fluid and if not remelt at medium low heat. Remove pops from fridge and holding the end of the lollipop stick completely submerge into the melted candy coating. Lift out and hold over the bowl gently tapping to remove excess candy coating. Take a bit of time with this step otherwise your finish may not be as smooth as you might like.


Place the pop upright into the styrofoam block and using a toothpick make a hole in the top of the milk glass pop and push the premade fondant straw in. Take one of the mini cookies and hold it onto the front of the pop until it sets a little and is secure.

 So there you have it, my quick how I made milk and cookie pops. Obviously you can make the straws any color you like and change up the cookies (I think mini oreos with blue and white straws would look great).

Also I have been wondering if those jumbo candy cane sprinkles you can get at Christmas time might work as straws if you cut off the rounded end....but seeings as I don't have any and making the fondant straws is kinda easy I'm just gonna keep on wondering.