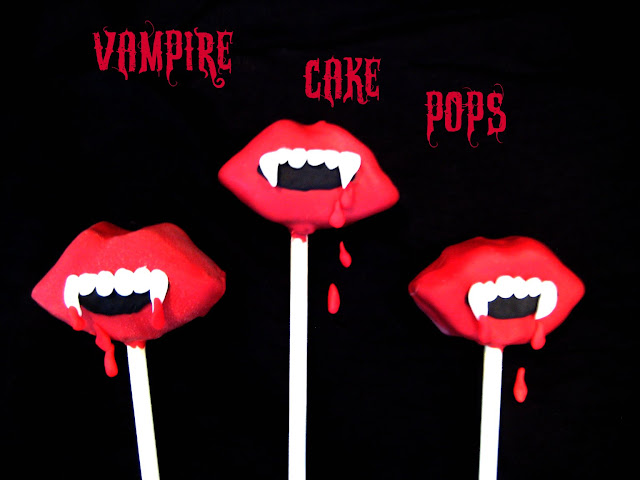
Remember these vampire mouth cake pops I made last year inspired by True Blood........
well it's coming up to Halloween again and although I know any time is a good time for vampire cake pops I have had lots of questions on how to make them recently so here is bit of a better explanation of what I did.
Although sorry still the same mildly blurry over exposed photo's I used the last time :)
I made these from tim tam cookie truffles, or you could use oreo truffles (recipe at the bottom). I find that the consistency of the cookie truffles makes shaped pops a little bit easier, plus it is way quicker.
Shape the cookie truffle mixture into a mouth shape, I made an oval, flattened it down and pinched out the edges with my fingertips, then made a little lip/bow at the top. Pop your mouth shaped cookie truffles onto a parchment lined tray, grab a lollipop stick and make a hole in the bottom of each mouth (see the picture for a guide as to where you will be sticking the lollipop stick), remove the lollipop stick, repeat for the remaining mouths.Stick the tray into the fridge to chill.
Now for the purposes of this post I am going to be calling the chocolate coating 'candy coating' as that is what I buy. You can get compound chocolate melts (nestle brand) from the supermarket in Australian or other types from cake and hobby stores but I use the US candy coating/melts as they are already colored and set well on the pops. In Australia you can get candy melts from Spotlight and specialty cake stores, or online from Cakes Around Town who sell Merckens red candy coating and Baking Pleasures who sell red Wilton Candy Melts.
Melt some red candy coating (melts) in the microwave on medium low heat. Do not be tempted to melt at higher temperatures as you will burn the candy coating. If you like you can add some extra red to make it a deeper color but make sure you use special oil based color or the candy will be ruined (chocolate much like witches is destroyed by water in most instances). Melt the candy coating with some paramount crystals or copha until it is smooth. I use quite a lot of the copha, up to 1 part copha to 7 parts candy coating if I'm using Wilton, different brands will require different amounts of copha or paramount crystals, add it gradually to see what works best, the candy melts should not be thick the mixture should flow easily, kinda like this picture.
Yup I know this is blue and not a mouth it's just an idea of how your candy coating should look
Take lollipop sticks and holding one end dip the other into your melted candy coating and then insert the lollipop stick into the hole you have already made in each mouth. Repeat for remaining mouths and return to the fridge to chill for another 10 minutes.
Make sure the red candy coating is still melted sufficiently, remove the cookie truffle mouths from the fridge and holding the end of the lollipop stick dip each one into the candy coating, submerging the whole truffle and then lift out, tap gently to remove excess candy coating, and allow to set upright. I use large squares of styrofoam covered in glad wrap.
Once the mouths are set you can decorate, I lay mine back down flat on the tray to do this. I used ready rolled fondant (plastic icing) which you can get from specialty cake stores, grocery stores (in Australia) or hobby stores (in the US). Color some black and leave the rest white. Use your fingers to shape the black opening to the mouth and press onto the mouth cookie truffle pops, mine stuck without anything extra but if you have trouble adhering it try using a little royal icing or edible glue.
Shape the white fondant into teeth making four smaller front teeth and then two larger vampire canine type teeth for the edge. Adhere the teeth to the black mouth using a really teensy amount of water (really just a tiny amount of the black will smudge everywhere) and press on lightly.
Allow to set and serve.
The red drops of blood in the top picture are just more ready rolled fondant colored red and shaped into blood droplets.
Oh and Not Quite Nigella made a fun version of these last year for her Halloween party based on my original post - I love the photo where she is holding them up - so fun.
Oreo Cookie Pops
Note for US conversion, for the Oreo's just add half the amount of cream cheese to what ever size packet oreo's you get. So if you have a 16oz package of Oreos add 8oz cream cheese which will make around 23 or 24 Oreo truffles.
300g Oreo Cookies
150g Cream Cheese at room temp
Crush Oreo cookies finely in a food processor add cream cheese and process until the mixture clumps together. Shape mixture into a ball for traditional pops or follow the directions above for vampire pops.
Oh and for lots more fun ideas for sweets on a stick, check out my book being released in the US in December:


A-ha - I knew my melted candy melts were too thick for dipping! A very [scary] looking pop - love it!
ReplyDeleteThese look perfectly creepy, just as they should!
ReplyDeleteI need to figure out how to put my microwave on medium low heat.
Wow, those look great. I hope you will link this up to my Wickedly Creative Halloween Ideas Party.
ReplyDeletehttp://www.itsybitsypaperblog.com/2011/09/wickedly-creative-halloween-ideas-linky.html