Tuesday, June 29, 2010

Debbie Brown Brisbane Australia Workshop, Amazing cakes and making new friends


On Sunday the 27th of June I was lucky enough to secure a place at the Brisbane Workshop held by the famous and fabulous UK cake decorator, author and teacher Debbie Brown.

Debbie has a stack of wonderful cake decorating books published, and these books have long been a favorite of mine. The books are beautiful and  easy to follow and I do have a number of them but I still found it so worthwhile to see Debbie in action. Goodness the ease and perfection when she models arms and hands is a sight to behold.

Gorgeous and Gruesome Cakes for Children


Debbie Brown's new book available 25th July 2010. I've preordered my copy


Debbie held 4 workshops here in Brisbane and the session I managed to secure was a 'Funky Fairy' cake.


Sunday, June 27, 2010

Chocolate Pavlovas with Chocolate Marscapone Mousse - June 2010 Daring Bakers


The June 2010 Daring Bakers’ challenge was hosted by Dawn of Doable and Delicious. Dawn challenged the Daring Bakers’ to make Chocolate Pavlovas and Chocolate Mascarpone Mousse. The challenge recipe is based on a recipe from the book Chocolate Epiphany by Francois Payard.

I'll start this by saying yum, it was a very delicious challenge. I'm not always one for creamy sauces or mousses but these ingredients all worked together so well that I was happy to eat the various versions I put together.


I started with a layered parfait topped with raspberries, then used some of the leftovers for a mini version in shot glasses,


and finally tried out a deconstructed plated version, decorated with some gorgeous chocolate modeling paste butterflies.


Saturday, June 26, 2010

Raspberry and Dark Chocolate macarons


This picture reminds me of the nursery rhyme build them up build them up build them higher, build it up, up, up into the sky. Think it's the clouds in the background.


A batch of macrons with Raspberry Dark Chocolate ganache filling, using the same recipe as the rose macarons, Click Here for recipe link.

Just omit sprinkling crystallised rose on the tops and fill with Dark Chocolate Raspberry ganache. I actually made it with raspberry chocolate oil instead of real raspberries to make the ganache a little more stable.


Recipe after jump

Thursday, June 24, 2010

I heart macarons


Just a couple of pics of some macarons I popped a heart onto with some gel food colour.

They are actually just a tad undermixed as I was adding some food colour to the batch but wanted a couple of white ones as well, see  how they are a little bit too domed at the top, although they still have the feet/frill at the bottom and do taste perfectly lovely.

Oh macaron I do  ♥  you but you are so temperamental.
 
  
♥  ♥ ♥

Saturday, June 19, 2010

Macaron mushrooms, cute coffee macaron and ganache treats

 
Mushroom macarons, now that you've seen them I bet your wondering why you didn't think of it first.

It's just so deliciously obvious isn't it. Well it was to me while I was making my mediocre mocha macarons a couple of weeks ago. It's like an obsession for me, I see something and immediately I think of at least 10 different things to cook that I write down in my little ideas book. If only I had the time to bake everyday I might be able to make a dint in all those ideas, but luckily for me and you I did get around to making these macaron mushrooms and they are amazing.


These mushrooms taste even better than they look, the base is a coffee ganache, creamy dark chocolate with a hint of coffee and the top is french almond macaron, a crisp outer shell and meltingly delicious center topped with bitter coffee grounds. A treat for your mouth with contrasting sweet and bitter tastes and crisp and creamy textures.

I also made a white chocolate version which is just as yummy and I really like the colour of the ganache 'stem'.


I've decided these coffee macaron mushrooms are one of my favourite coffee recipes and have submitted it to Not Quite Nigella's win a Nespresso machine You should pop over and have a look if you are in dire need of a new coffee machine like me.

Oh and now that I've made these mushrooms I have another 10 ideas I want to try out, I need so much more time in my days.....

Of course the macarons and coffee ganache from this recipe can also be used to make traditional macarons as well. 


Coffee Macaron Recipe

Ingredients
150g (5  1/4 ounce) ground almonds
150g (5  1/4 ounce) Icing (confectioners) Sugar
110g Egg Whites, (3 7/8ounce) aged at least 3 days, separated into 2 lots of 55g (1 7/8 ounce)
150g (5  1/4 ounce) Granulated Sugar
37g ( 1 1/4 ounce) Water
ground coffee

1. Mix the ground almonds and icing sugar together and pulse a few times in food processor to make almond meal finer. Do not over process as the meal can become oily. Sieve into a large bowl. Add  55g (1 7/8ounce) of the egg whites to the sugar/almond mixture but don’t mix in.

2. Place remaining 55g (1 7/8 ounce) of egg whites in bowl of mixer fitted with the whisk.

3. Pop granulated sugar and water into saucepan stir to combine and cook without stirring to 118C. Once the mixture reaches 115C start mixing the egg whites on high. Once the sugar syrup reaches 118C remove from heat and immediately pour in a thin stream down the side of the mixer bowl continuing to whisk on high.

4. Continue to whisk the meringue on high until the side of the bowl is only a little warm to touch, around 50C.


5. Add meringue mixture to almond mixture and using a large spatula fold the mixture together until it starts to shine and forms a ribbon that stays visible for about 30 seconds.

6. Add the mixture to a piping bag fitted with a plain tip and pipe in lines onto parchment lined baking sheets. To make the macarons as even as possible I apply a constant slow pressure to the piping bag and count a few numbers like up to 3 for each one. Sprinkle a little ground coffee onto the top of half of each macaron.

7. Set aside for about 30 minutes or until the macarons have formed a skin that doesn't stick to your finger.

8. Meanwhile preheat oven to 140C (285 F). Once ready bake the macaroons for around 13 to 15 minutes depending on size, they should not be browned. Remove the baking trays and immediately slide off the macarons and the parchment onto the work surface and let cool completely before removing the shells.

Dark Chocolate Ganache
100ml cream
200g (7 ounces)good quality dark chocolate
1 1/2 to 2 tsp instant coffee or to taste

Bring cream to boil, add coffee and stir until dissolved, pour mixture over finely chopped chocolate and stand 5 mins. Stir until all chocolate has melted. Allow ganache to almost set.

Dissolving the coffee into the cream

(to make a white chocolate variation substitute 200g (7 ounces) white chocolate in place of the dark chocolate and reduce amount of cream to 75ml.)


To make Mushroom macaron

Place ganache into a disposable piping bag and cut across to make an opening approx 1.5 cm or 1/2 inch across. Line a baking tray with parchment paper.
Pipe enough mushroom stems for each macaron leaving enough space between stems for macarons. Allow ganache to set for a while and then top each stem with a macaron. To help adhere macaron you may need to pipe a small amount of ganache directly onto the macaron to use as a 'glue'. Don't press down too hard or the stem will break through the macarons thin delicate shell.


Pop tray into refrigerator until set and remove from tray with a small offset spatula. Remove from refrigerator and allow to return to room temperature prior to serving.

Thursday, June 17, 2010

Butterfly and Blossom Birdcage cake putting it together


Sorry for anyone reading these posts that has no interest in this cake but I needed to break it down into a couple of days for my sanity. This is the last one.

I promise in a couple of days I will have a lovely non birdcage related post ready...........

Now that all the hard work has been done comes the fun part, finishing off the Butterfly and Blossom cake.


Tuesday, June 15, 2010

Marshmallow Fondant Recipe - Oh no it can't be that easy

The pink covering this cake is marshmallow fondant

 A long, long time ago I came across a recipe for marshmallow fondant which can be used to cover a cake in place of rolled fondant.

This looks too easy to be true I thought to myself, and it was relatively easy to make, but surprisingly it worked well, tasted good and ever since that first time I have been a convert.

It is made up of....... yup you guessed right........marshmallow, and sugar and it will taste pretty much like the marshmallows you make it out of. I like to use pascals and where possible the pink and white mix ones. If you use nasty tasting cheap marshmallows, your fondant will taste like those same nasty marshmallows.


These happy little bees are marshmallow fondant with chocolate modeling paste stripes and eyes

It's not suitable for all cakes and situations, but for this butterfly and blossom birdcage cake it worked well.
It is also the recipe I use to make the lollipop cookie pops.

So if your following my instructions on the birdcage cake pictured at the top of this post, I made this fondant on day 2 (night) along with the cakes so they would be ready for icing/decorating the next day.  (Part one consists of making the decorations click here to link)

 This lollipop cookie is made by twirling different coloured marshmallow fondant together

 
Marshmallow fondant recipe
Half recipe will cover the birdcage cake which was a dome shape 14.5 cm (7 1/4 inch) tall and 19 cm  (9 1/2 inch) diameter

750 g ( 1 pound 10  1/2 oz) icing sugar sifted
475 g (1 pound) marshmallows
Crisco (available online from USAfoods in Australia)
3 tsp (1 US Tbsp) water

Pop marshmallows and water in a LARGE microwave safe bowl (this is gonna get messy and sticky). Melt in 30 second increments for 2 1/2 mins total stirring at each interval.

Scary night time photo with poor lighting, but you get the idea. Melt those marshmallows!!

Add icing sugar and mix well.

Grease surface and hands VERY well with crisco, have more ready to regrease as necessary. Knead until smooth and stretchable. If fondant is tearing add 1/2 tsp water at a time and knead again.

Wrap in plastic wrap and refrigerate overnight. Microwave for 10 seconds when ready to use.

To use roll out on surface lightly sprinkled with cornflour (or icing sugar).

Notes for colouring

If you use pink and white marshmallow your fondant will turn out the pink colour of the birdcage cake. I sometimes make half batches separating the pink and white so I can colour the white however I like. It is possible to buy bags of all white pascals marshmallows.

You can add colour at the mixing or kneading stage, or leave plain and colour smaller batches as required.

I use gel colours.

Recipe update - make sure to keep the fondant in a ziplock bag or wrapped with plastic wrap when not using as it will dry out and go hard. If that happens microwave again and add a little bit more crisco. Try to work very quickly.

Saturday, June 12, 2010

Tweet, tweet, this is so very very sweet......Butterfly and Blossom Birdcage Cake

I'm adoring this cake I made for a 40th Birthday. Bluebirds, blossoms and butterflies what a sweet combination.

I have come up with a bit of a basic tutorial on how I made it which is pretty long winded and will be broken into a few days, but here it is the first  installment of the Blossom and butterfly birdcage cake epic.

I received a request for a 40th birthday cake which was not specific, just that there were about 100 people coming. After some questioning, I found out that the birthday girl likes chocolate, her favourite colour is purple and that some of the family are gluten intolerant. Follow up questions determined there would be a number of desserts served and not everyone would have cake so serving 100 was optional.

Eeeek - so it was up to me. I looked through my many books for inspiration and came up with a 3 tiered design topped with a faux cupcake with layers of pink and purple. Then I considered the Planet Cake 40th Birthday Cake in their book and popped over to their community and then I saw it...........

Bellasmommy  had as her avatar a birdcage cake and I had to try it. No instructions just a pic of a perfectly cute cake.

Luckily I had so much leeway that all the plans I had already made were turfed and I redrew my decorating schedule for the week.

Yes that's right, for just one cake I do up a schedule after I have drawn a design of the planned cake. This is not just for time management but to ensure that I will have the required equipment and ingredients at each step and in this case to allow time for the bird and tops of the cage to dry/set a little.

My schedule pretty much went roughly like this:

Day 1 make bird, pointy top/handle for cage, blossoms, butterflies and leaves
Day 2 make marshmallow fondant and make both cakes
Day 3 make buttercream and ganache, cut and fill cakes, crumb coat (cover with the ganache or buttercream). Cover the birdcage with fondant and add all decorations.
Day 4 place dowels into bottom tier. Assemble cakes and add any finishing touches such as ribbon.

(Day 3 and 4 could easily be combined)

Day 1 Make bird, handle, blossoms, butterflies and leaves
(where I have used chocolate modeling paste you can just use gumpaste coloured black or brown)

Bird, colour a small amount of rolled fondant blue and shape a flat oval the approx size of the bird required, manipulate the head and tail until shape resembles bird. Make a second smaller ball, flatten and shape into wing, adhere to bird body with tiny amount of water.


Make eye and beak out of small amount of chocolate modeling paste, a tiny round for eye and very tiny and thin log folded to make beak. Adhere to bird and pinch into shape if required.


Place bird on parchment paper to air dry.

Handle shape chocolate modeling paste into log and pinch into a point at middle, manipulate with fingers to make required handle shape pinching together at bottom. Cut excess off with knife.


Make another long log and twirl around in a type of snail shape to make base of handle. Place both pieces on parchment paper to air dry.


Pink Blossoms colour fondant as required and roll out with rolling pin. Cut blossom shapes, place onto non stick foam and using a ball tool with gentle and even pressure rub in small circles to thin out each of the blossom petals. Gently lift into a flower former. Pipe a small dot of royal icing in the middle and pop decorating pearls into the center. I used 3 on the large blossom and 1 in the small.


Small blue Blossoms are made using a small plunger cutter and ejector set with royal icing dots in center.

Leaves colour fondant green and roll our with rolling pin. Cut leaves with PME plunger cutter by pushing down once to cut shape and a second time to indent leaf veins. Place finished leaves on parchment paper.


Butterflies using remaining blue and pink fondant and a PME butterfly plunger cut the butterfly shape and place on cardboard folded into a M with parchment paper and allow to air dry.

 Ok this is a pic of chocolate fondant butterflies but you get the idea


Variations if you do not have the equipment required - 
you could purchase already formed sugar flowers and butterflies from a cake decorating store or supermarket. 
blossoms and leaves could be replaced with buttercream flowers and leaves piped directly onto the birdcage. 
A non edible bird could be purchased from a craft store to replace the edible fondant bird. 
A clean draw handle could be sourced to used on top of cake.
Handle could be made by piping chocolate onto parchment paper (although the chocolate would be very delicate and care would be required.

Friday, June 11, 2010

Mudarons - not quite mud puddles and not quite macarons


So I was sitting around having a chat with my friend jojobirdo when she mentioned a recipe she had just made for Chocolate Mud Puddle Biscuits which consisted of only 5 ingredients and turned out with a delicious brownie texture.

Of course I was instantly intrigued, easy, chocolatey and delicious who wouldn't be. So I copied the recipe into my ideas book with the thought I might try it one day.

But that very night after dinner the craving stuck me and luckily for me I had all the ingredients handy.....almost. Jojobirdo and I had mused how similar the ingredients were to a macaron, except the mud puddle recipe called for crushed nuts instead of ground almond.

So I made a little modification and came up with this cookie which as it turns out looks nothing like the Mud Puddle Cookies I googled, which should spread out while cooking into a flat shiny textured cookie with a crackly finish.


But I am happy with my not really Mud Puddles, they looked a bit like a messy macaron. They are actually really yummy and only took 20 minutes to mix, cook (and eat).

I think I might call them Mudarons.

I also made a variation with marshmallows, and it seems they were so good warm I didn't have any left the next morning for pictures.


Thanks Jojobirdo.

Mudarons makes approx 30
(any US conversions in brackets)

2 cups icing (powdered) sugar
1/3 cup cocoa
1tsp vanilla
2 egg whites
150g (5 1/4 oz) ground almond

Preheat oven to 180 C (350 F) and line baking trays with parchment paper.

Place all ingredients in bowl and  mix with a hand held or stand mixer. Mixture will be very stiff and sticky.

Pop approx 2 tsp onto baking trays allowing a little room to spread.

Bake for 10 mins or until just cooked.

Remove from tray after 5 mins to wire rack. 

Variation Hot Chocolate Mudarons - after 8 mins remove trays and place a marshmallow onto top of each cookie. Return to oven and bake further 2 mins.

Thursday, June 10, 2010

Debbie Brown Cake Decorating Workshop in Brisbane


Squeee - this is the sound of me squealing in excitement. I have just booked in for a Debbie Brown Cake decorating workshop to be held in Brisbane, Australia in a couple of weeks time.

Debbie Brown is the author of numerous amazing cake decorating books. I just had a quick peek in my bookshelf and saw I have 50 Easy Party Cakes, Enchanted Cakes for Children and Cartoon Cakes, and I can't say this about all my decorating books I have actually used these books to make at least 4 different cakes I can remember with pretty good results. 

50 Easy Party CakesEnchanted Cakes for Children


Warner Bros. Cartoon Cakes


and when I just popped into the online bookstore to get these pics - I saw a new book on the way pictured below Gorgeous and Gruesome cakes for children. Wahoo! looks fabulous.


Gorgeous and Gruesome Cakes for Children


Anyhoo back to the workshops, there are 4 different workshops with a different cake to be made each day, I wish I could attend them all but I had to contain myself and just pick one.

If your thinking of attending  you will need to bring some of your own equipment a rolling pin, cake smoothers- a turntable and a small knife.

At the end of the day you get to take home your very own made with your own hands and love creation.

Bookings are via debra.brown@btinternet.com

Here is a link to her website Debbie Brown

Wednesday, June 9, 2010

Mocha Macaron Melodramatics


So Borders had a 40% off cook book sale and I went a little crazy. I can't tell you how many books I bought or you will never be able to think of me as a sensible person again, but one of my purchases was a book devoted to Macarons.

It is gorgeous to look at and I was swept away by the exciting sounding flavour combinations and beautiful photography.

Then after I got the book home I noticed the basic recipe for each macaron is quite different from the one I use and does not require a sugar syrup to be made.

Well I thought to myself, I can give this a try, it seems much simpler than the recipe I normally use.

I kept reading..... whoa 2 to 6 hours of resting before cooking. I live in a house with 3 kids 5 years old and under including a very able and active climbing toddler. Oh well, I thought to myself I'll just have to stand guard in the kitchen for as long as it takes (only just over 2 hours luckily and most of that time the toddler was asleep, yay for me)

and so it began, I followed the recipe and made macarons, they were ok, they rose and gained the little frill/ feet, I was able to remove them from the paper. If I had never made macarons before I might have been jumping for joy, but instead I was a bit cranky I had wasted all that almond meal on mediocre macarons. Melodramatic much???

The recipe I usually use is a little more complicated - it requires more equipment. But for me I think the extra effort is worthwhile and results in a better macaron.

For some the recipe below might be perfect as it requires little more than a bowl, spoon, spatula, sifter and hand held electric mixer and way less mixing time (although more resting time). Also everyone has a different taste preference and I admit to being a little harsh. My trustee tasters who received the macarons thought they were lovely and some preferred the bitter coffee to the sweet rose. So I will share the recipe with you, but I do recommend clicking here to see my other macaron recipe which for me would win hands down in a macaron bake off every time.


This recipe is adapted from Macaron by Alison Thompson, it is a beautiful book and I would buy it again (and at 40% off like I got it in a heatbeat). As I said before it has many gorgeous pictures and wonderful flavour combinations and as a bonus many of the fillings use up the egg yolks. I actually used a different filling than recommended.

So what lessons did I learn today. Don't judge a book by it's cover. Easy is not always better. Stick with what you know.

Well none of the above, I'll still be buying cookbooks for the beautiful photography and life would be too boring if I never tried anything new. But I did learn to love my other macaron recipe just a little bit more.

Macaron Shell
(US conversion in brackets)
225g (8oz) pure icing sugar (powdered)
140g (5oz) almond meal (ground almond or almond flour)
100g (3 1/2 oz) egg whites

Line 2 baking trays with parchment paper.

Optional step - Combine icing sugar and almond meal in a food processor and pulse a few times.

Sift icing sugar/almond mixture and discard anything remaining in the sieve. If you are discarding a lot of almond, try to replace it with a little more sifted almond.

Whisk egg white with an electric mixer until stiff peaks form. Fold in sifted almond and sugar. Fold until the mixture is glossy and moves slowly when the bowl is lifted.


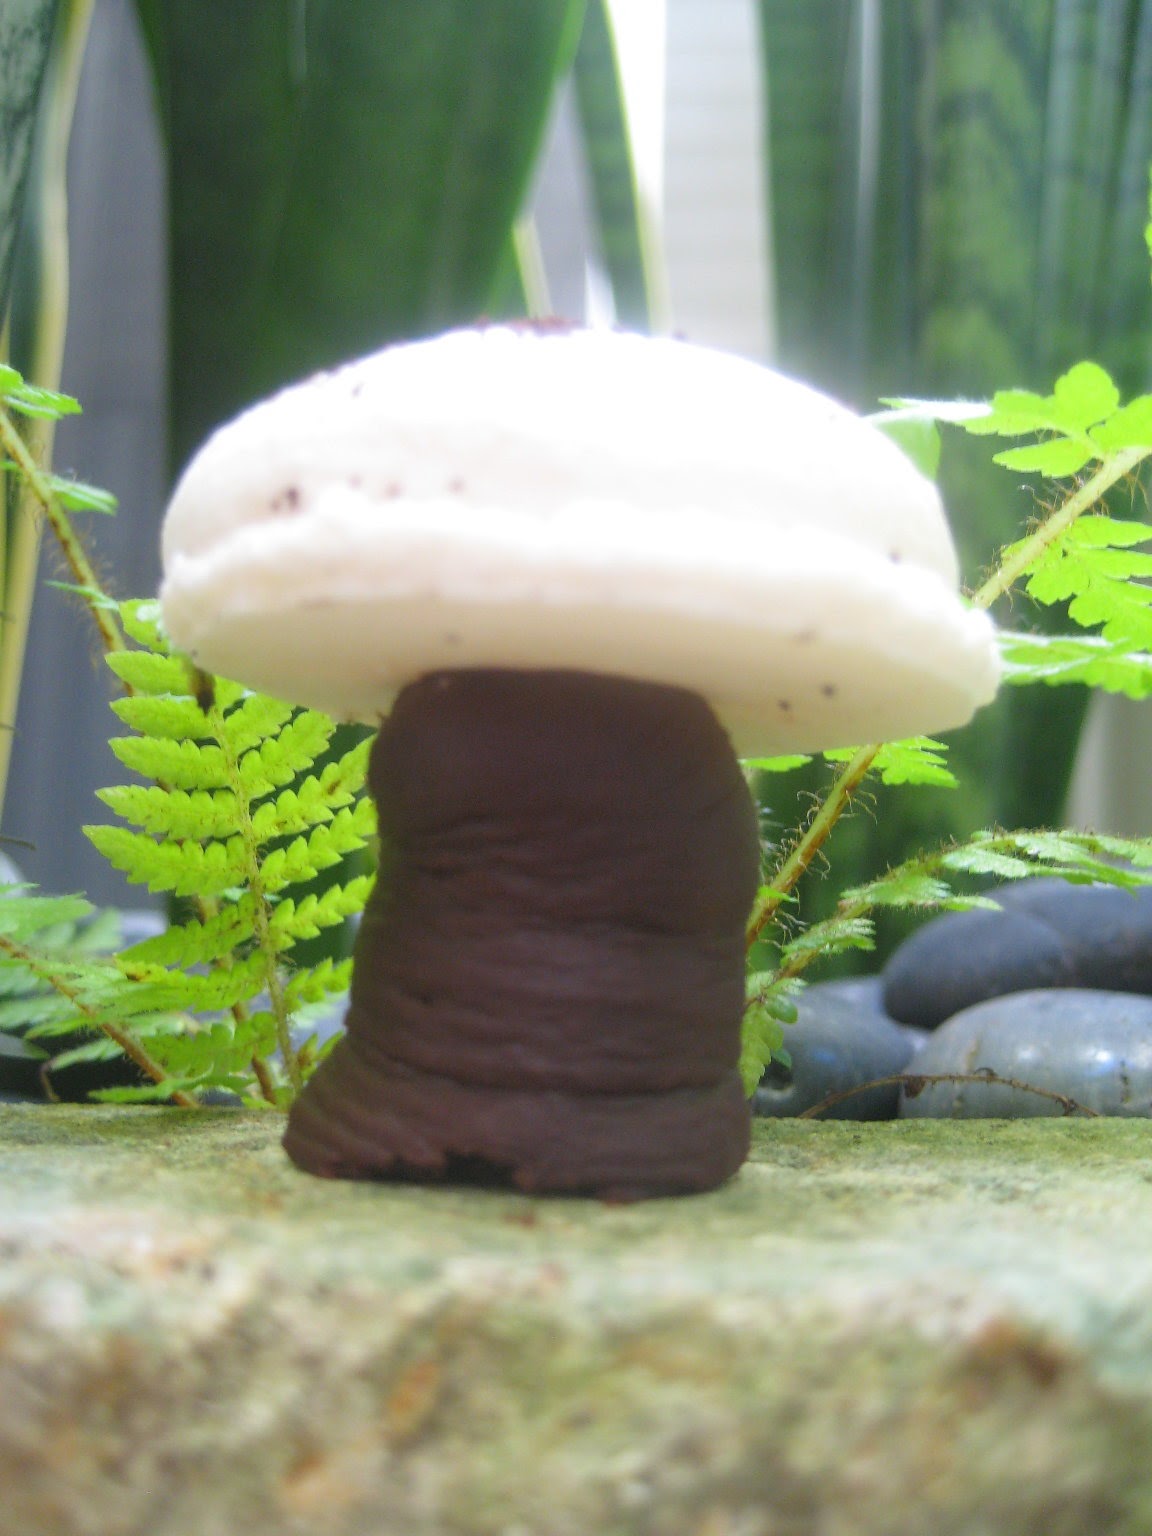
Spoon mixture into piping bag and pipe 3cm rounds onto the trays, spacing them approx 3 cms apart. Tap the trays firmly to remove any air bubbles (eek at this stage the macarons had a couple of largish air bubbles which disturbed me so I burst them with a toothpick and smoothed the macaron over - not sure what the macaron fanatics would say about this behaviour).

I sprinkled some finely ground coffee onto the tops at this stage, but it is optional.

Rest at room temperature until a crust forms, that is until you can lightly touch the uncooked macaron without it sticking to your finger. This will take between 2 to 6 hours depending on humidity in your area.


Ok, I am officially not in love with this recipe at this stage

Preheat oven to 150 C (300F). Once heated place macarons into the oven and reduce temperature to 130C (265 F). Bake for 10 -12 mins until firm to touch but not coloured. Remove from oven and cool on the baking tray. When macarons have cooled carefully remove from parchment paper.

Match macarons in like sizes and sandwich together with filling.

Filling
50ml cream
100 gm (3 1/2 ounces) 70% dark chocolate
1/2 tsp instant coffee


Bring cream to boil, dissolve coffee in cream. Pour over finely chopped chocolate and stand 5 mins. Stir until all chocolate has melted. Allow to set a little and use as required.

Sunday, June 6, 2010

Cinnabon like cinnamon scrolls with coffee cream cheese frosting

Warm cinnamon scrolls with coffee cream cheese frosting - Mmmm melty deliciousness

When I traveled in the US I loved the smell coming from the Cinnabon stores baking warm delicious cinnamon scrolls and a while ago a came across a knock off version on My Tartelette. They were pretty delicious.

Then I came up with the idea to add coffee to the icing, and now they are not just delicious they are super dooper delicious.

I made these ones this morning with no special equipment in 2 hours (most of that time is resting time) and they were a perfect breakfast, just imagine them on a chilly morning with a cup of hot coffee.

Sadly my coffee machine broke a few months ago and I have yet to buy a new one so I have used instant coffee in this recipe and had to eat the scrolls on their lonesome. I am hoping my luck is about to change however, Not Quite Nigella has a competition at the moment to win a Nespresso coffee machine at her blog and I have my fingers crossed.

The recipe make 12 scrolls, in the past I have reheated the scrolls a day later in the microwave and they are still good. This recipe adapted from My Tartelette. It does use a lot of bowls so be prepared for a bit of cleaning up.

Cinnabon™  like cinnamon scrolls with coffee cream cheese frosting
as usual the recipe is suitable for Australian measurements any US conversion is in brackets

Rolls:
1 pkg active dry yeast approx 7 - 8 g (US 1/4 oz. size or 2 1/4 tsp)
1 cup warm milk
1/2 cup granulated sugar
76g   (2 5/8 oz or 1/3 c) melted butter
1/2 tsp salt
2 large eggs room temp
4 cups plain (all-purpose) flour

Filling:
1 cup packed brown sugar
2 1/2 TBS cinnamon
76g   (2 5/8 oz or 1/3 c) melted butter

Coffee Cream Cheese Frosting:
57 g  (2 oz 1/2 stick) butter, softened
57 g  (2 oz.) cream cheese, softened
1 1/2 c icing (powdered) sugar
3 tsp (1 TBS) whole milk
1/4 tsp vanilla
1 tsp instant coffee


Dissolve the yeast in the warm milk in a large bowl, let rest for 5 mins while you sift flour and measure out other ingredients.

Mix together the yeast mixture, sugar, butter, salt &  eggs. Add flour and mix well.
Knead the dough into a large ball, using your hands lightly dusted with flour.

My 5 year old daughter kneading the dough

If you have kids let them at it, my 5 year old daughter helps out with kneading all the time. I break the dough in half and we each knead for a while and then I swap the halves over so they get kneaded evenly.


Put in a bowl, cover, and let rise in a warm place about an hour or until the dough has doubled in size. It's winter here at the moment so I popped mine into the oven at the lowest setting with the door ajar.

Preheat oven to  200º C (400º F).
Once doubled in size roll the dough out on a lightly floured surface flat until it is approximately 54 cm (21 inches) long and 40 cm (16 inches)  wide. It should be about 1/2 cm (¼) inch thick.


Clockwise from top - 1. spread the softened butter all over the rolled out dough, 2. sprinkle the cinnamon sugar mixture and 3. the rolled up dough ready for cutting

For the filling, combine the brown sugar and cinnamon in a bowl. Spread the softened butter evenly over the surface of the dough, and then sprinkle the cinnamon-sugar evenly over the surface.
Working carefully from the top (the long side ), roll the dough down to the bottom edge.

Cut the rolled dough into 4 cm (1 1/2 inch) slices and place 6 at a time, evenly spaced, in a lightly greased baking pan. Let the rolls rise again until doubled in size (about 30 min.). Bake for 10  to 12 minutes, or until golden on top.

While the rolls bake, make the frosting by mixing the butter and cream cheese in a large bowl with an electric mixer on high speed. Add the powdered sugar and mix on low speed until the sugar is incorporated. Dissolve the coffee into the milk and add to the cream cheese mixture with the vanilla. Mix on high speed again until the icing is smooth and fluffy.


When the rolls come out of the oven, let them cool for about 10 minutes, then coat generously with the icing.