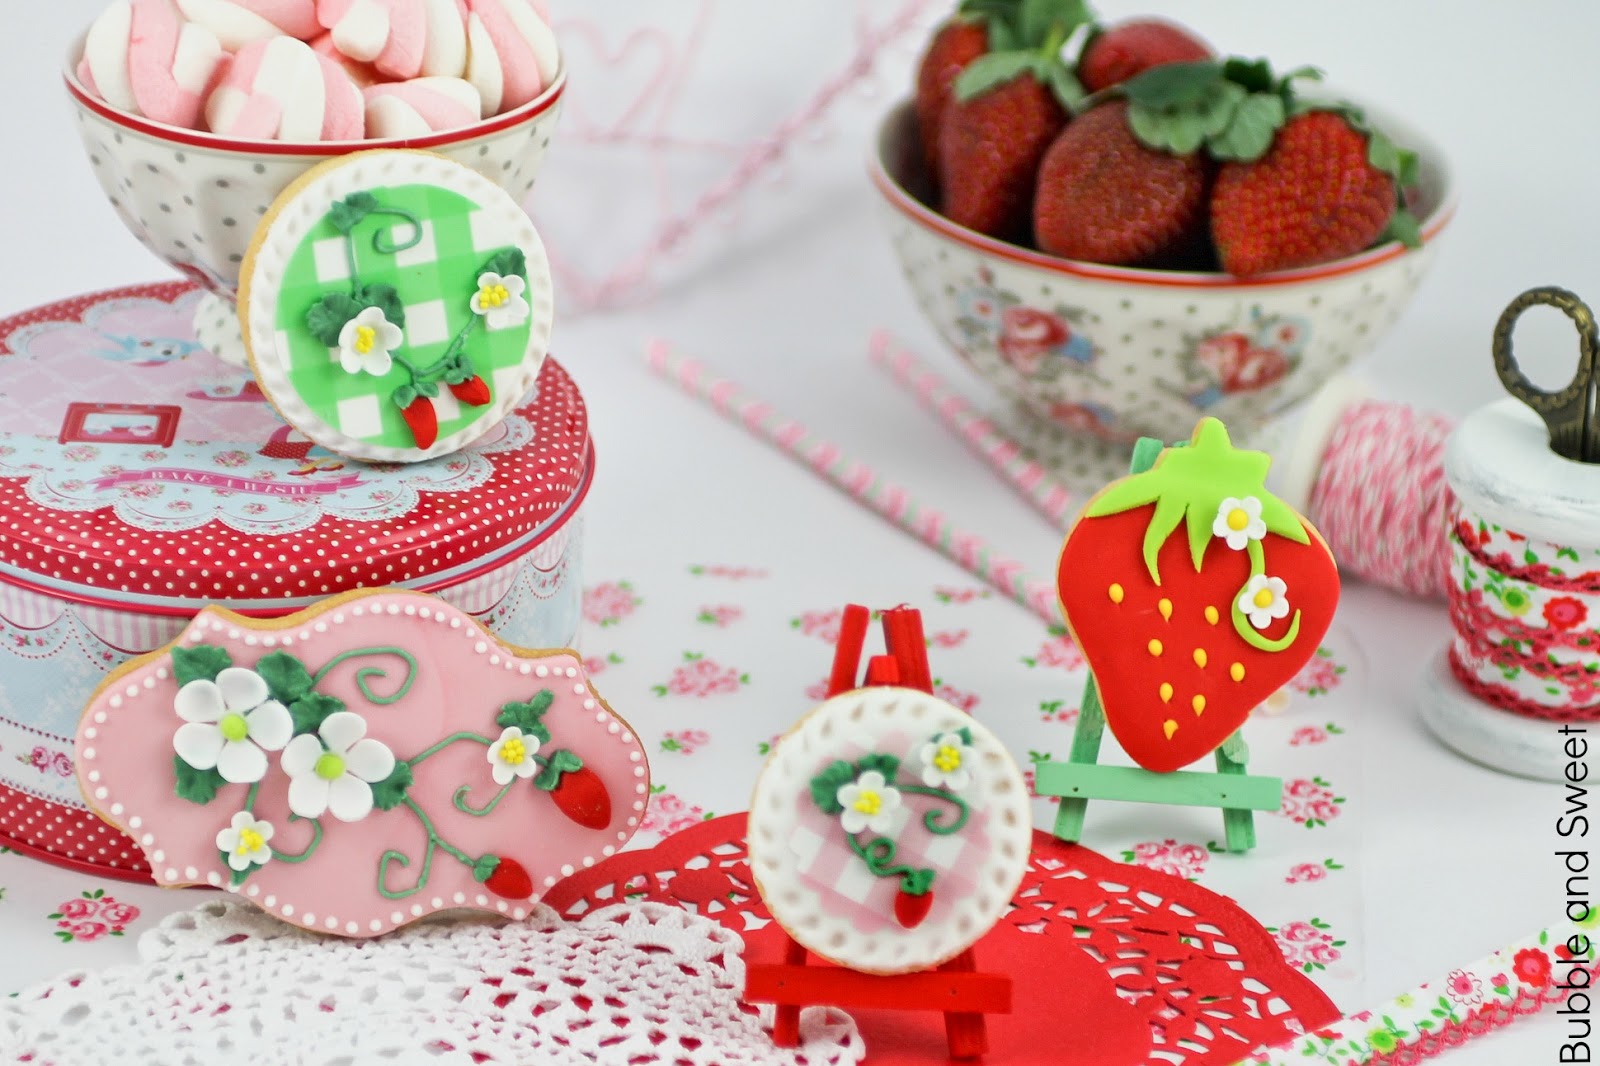
My niece had an adorable Strawberry themed birthday party on the weekend and I made up some cookies to go onto the party table.
Strawberries are so yummy and cute, I don't even know why I haven't had my own Strawberry party yet. Did I mention it was adorable? A-dor-able!
Plus there are so many cute things you can pick up for a bargain to match a strawberry theme. Hello red polka dots or pink and lime gingham. Plus ready made strawberry piñata's for decoration, oh my goodness it's a strawberry theme party decorators dream at the discount stores.
Anyway, like I said I was making the cookies plus some macarons, so about 10 days before the party I rang up my Sister in law (SIL) and said 'Hey I think I'll make the cookies this weekend because they keep really well and then I can just make the macarons the Friday before'.
Y'all know because macarons are best when they have sat in the fridge for at least a day so I was thinking I had it all planned.
So I heard a moments silence, and then my SIL let me know the party was actually in 3 days time, and that my own daughter's birthday party was the one in 10 days time (yup forgot my own daughter's party date...... more on that revelation in another post).
Eeeek! Anyhoo people that know me are probably not very surprised with this story.
So I started making cookies as soon as I hung up the phone and came up with this cute set to match the rest of the party.
Luckily I was able to quickly get some edible frosting sheets from
Caketopia in pink and lime gingham which pretty much made decorating so much faster, and easier, and did I say faster 'cause that was really important.
Seriously people edible frosting sheets - try it, the ones I got from
Caketopia were so easy to use.
The bigger plaque cookies were not exactly what I wanted, I was hoping to do pink and white royal icing stripes, but seeings as I was working on a new super short timeframe I was pretty happy with how they ended up.
Scroll down below for the step by step instructions on how to make your own strawberry cookies.
Plus if you like my strawberry cookies you might like these from some of the blogs I follow:
3D Strawberry Sugar Cookies - by Munchkin Munchies
Pretty summer Strawberry Cookies (on a square cookie) by Sugarbelle
How to make simple Strawberry Shortcake cookies by Sugarbelle (includes cookie cutter hack)
Shortbread Strawberries (with Kawaii faces) by Butter Hearts Sugar
Simple Strawberry Cookies by Bake at 350
I've also popped up a free video tutorial of me making the strawberries cookies here:
Sweet Strawberry Decorated Cookie
The cookie dough recipe made up at batch of over 30 cookies. If you like you can add raspberry flavour to your red fondant to improve the taste - I did.
Strawberry shaped cookie (
CLICK HERE for my favourite vanilla cut out cookie dough)
Strawberry shaped cookie cutter
Fondant (Red, green, white and yellow) either buy already coloured or buy white and colour with gel food colours^
cornflour (cornstarch)
clean brushes and water
sharp knife
small plastic rolling pin
small blossom cutter - mine is an ejector cutter
small fondant ball tool
dresden tool
non stick foam
^fondant dries out quickly, when not in use store in an airtight container or ziplock bag. To use fondant knead until pliable and smooth and roll out on a workbench dusted with cornflour (cornstarch).
Knead the red fondant until smooth and pliable. Dust workbench with cornflour (corn starch) and using the small plastic rolling pin roll out fondant until quite thin then using the strawberry cutter cut out a fondant shape.
Use the sharp knife to cut off the top section which resembles the leaves/stalk.
Brush a small amount of water onto the cookie and adhere the red fondant shape to the cookie, use the rolling pin to roll/push the fondant into shape if it is a little smaller than your cookie.
Knead the green fondant, dust the workbench and roll out the fondant. Cut out another strawberry shape, you only need the top third of the shape so you only need to cut that much out.
Using the sharp knife cut the stalk and leaves of the strawberry as shown in the picture.
Brush a little water onto the top of the cookie and a very small amount onto the very top of the red fondant and adhere the green stalk and leaves to the cookie.
Using your fingers roll out a long thin strip of green fondant to make a vine, I like mine to taper at the end, place it onto the cookie twisting it until it resembles a curly vine and press into place, if the fondant has not dried it should stay in place, if the fondant is a little dry use a tiny amount of water in one or two spots to stick the fondant in place. Remember when you press the blossoms in at the next step they will also help secure the vine. Cut any excess off where the vine meets the leaves at the top with the sharp knife.

Make the small 'strawberry' blossoms. Dust the workbench and roll out the white fondant, use the ejector cutter to cut out 2 small blossoms. Place the blossoms onto the non stick foam pad and press the ball tool onto each of the petals to make the petals thinner and cupped in shape. Pop the 'strawberry' blossoms onto the cookie on the fondant vine as shown in the picture, one at the top and one half way along and press into place. *Roll a small amount of yellow fondant into a ball and press into the center of the blossom.
(I actually have a whole tutorial on making simple sugar flowers
CLICK HERE)
Using the knife or a fondant tool, press indents into the red fondant where you would like to place strawberry seeds. *Roll tiny pieces of yellow fondant into seeds and press into place with a fondant tool.
*Note the blossom centers and seeds can also be made by piping yellow royal icing.
Decorated cookies can be made a week in advance and stored in airtight containers.
Linda Vandermeer is a blogger, baker, maker and author of the cookbook '
Sweets on a Stick': More than 150 kid friendly recipes for cakes,
candies, cookies and pies on the go!. Published in the US the book is
available at most online book stores.
Original Ideas, photography and recipes by Linda Vandermeer unless otherwise stated do not reuse without permission.