Sunday, August 5, 2012

Pink Shabby Chic Princess Party for Lilli's 8th Birthday


Lilli just had her 8th birthday party and she decided on a sweet princess party with a color scheme of pink, gold and white.

Sweet, Bubble and Charlie.....Photo by Alyce Holzberger

EDIT UPDATE: Here is a link to the princess dress Bubble is wearing and a couple of others they have:


I am pretty sure our recent trip to Disneyland and the number of people telling her she looked like Cinderella had no part whatsoever to play in her decision :)

Candy jars from 2 Garnish

Regardless of the reasoning I was more than happy to oblige. I've mentioned before that my tastes run towards pastel and pretty and Princess is totally a theme within my comfort zone.

The party had a bit of a shabby chic feel and a touch of glittery glitz to reflect Lilli's sweet, fun and vibrant personalty.

photograph by Alyce Holzberger

I was lucky enough to be able to borrow the ruffled tablecloth from my SIL. It is linen with a white ruffle layer in the middle and was a great background for the pink white and gold food.

photograph by Alyce Holzberger

I modified it with some pink muslin fabric and a scattering of handmade shabby chic fabric flowers.


We used the same flowers in pink frames behind the table to add a bit of texture and interest on the plain white walls. The same effect could be achieved with paper poms.


I hung a handful of paper pom poms in light pink, tan and white from Ah-Tissue to continue the ruffle theme.

photograph by Alyce Holzberger

Of course we did have to have a princess themed cake and I decided to make a ruffle cake (which we still love at the moment in this household). The tiara is totally edible made from fondant, edible jelly jewels and painted with gold lustre dust. More photo's of the cake and what I used to make the tiara can be found in my previous blog post CLICK HERE.

Royal sugar cookies with edible jelly jewels, gold luster dust and ruffles

Royal cookies were an assortment of cookies in gold, pink and white that were a little bit more mature than the cookies we generally make for the kids parties. My little girl is growing up and the treats while still fun are more reflective of her tastes. They are fondant covered sugar cookies (recipe from Sweets on a Stick) decorated with rolled fondant, royal icing (recipe from Sweets on a Stick) and edible jelly jewels. The white cookies with the jewel and gold royal icing piping were her favorite. Mine were the ruffled cookies.


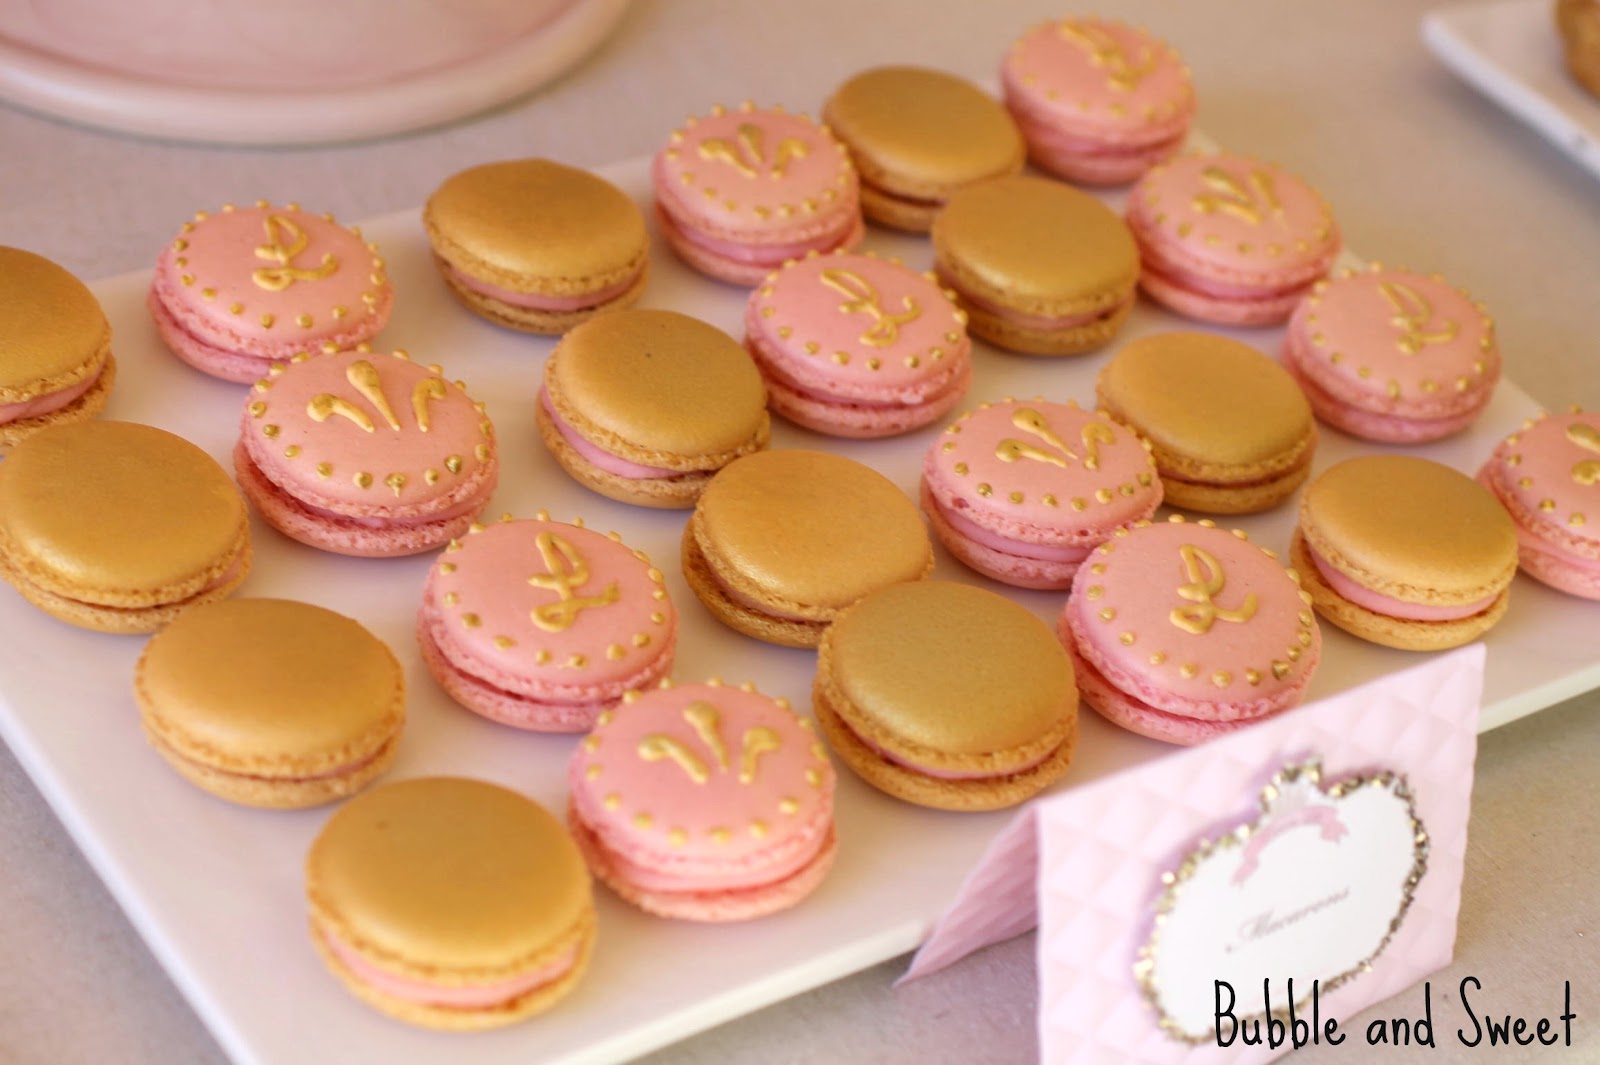
To keep in with the pink and gold royal theme I made the macarons in pink and gold with hand piped and painted decorations on the pink batch.


Princess delights were round choux pastry puffs with raspberry pastry cream, fondant and raspberries.


To dress up a packet of simple marshmallows I popped them on a stick, dipped them in pink chocolate/ candy coating, added a jelly jewel, piped a 'royal' decoration which was painted with gold edible paint.


Candy consisted of 4 different flavors of bon bons and twisted rope marshmallow cut into shorter pieces.


I picked up the princess printables from Polkadot Prints (who are one of my favorite designers with a fun blog as well) and did a bit of glittering.

photograph by Alyce Holzberger

Cardboard cake boxes are from Robert Gorden, I picked them up at 2 garnish, they come flat pack with double sided tape already in place. Seriously I was so behind in my preparations the Friday before the party I took them along to the kids swimming classes and put them together in the viewing areas. I was folding and sticking those boxes in between waving at the kids and giving them thumbs up signs through the glass barrier.


We like to have the parties at our house and this year the timing was not great as we are having some minor renovations. The painters packed up at about 2pm on the Friday ready to return bright and early Monday morning which did not leave a lot of time for me to bake and decorate for the event.

photograph by Alyce Holzberger

Knowing this in advance, I arranged for an entertainer to come and manage the kids which took some of the pressure off as I had no need to think up party games, or buy prizes and I could focus on what I love which is the food.

Tiara by Terri Vandermeer photograph by Alyce Holzberger

I booked in Super Steph - and she truly was super.


The kids adored her magic show, they were totally enthralled, and as a result the mums and dads adored not having to worry about looking after the kids at all.


We also had a princess pit stop with dress ups, tiaras, and jewels, which was actually just the kids Ikea  storage unit repurposed with a bit of 'satin' from the craft store.

Fabric tiara by Terri Vandermeer

I made up the ruffled party bags myself CLICK HERE for a tutorial on how to DIY.

photo by Alyce Holzeberger

It was all worth it.....after the party Lilli gave me a big hug and said 'Thank you for my Party I loved it".

photo by Alyce Holzeberger

Cakes, macarons, cookies, marshmallows, choux puffs by  Bubble and Sweet
Photography Alyce Holzberg Photography
Entertainer (magic, balloons, party games) Super Steph
Printables PolkaDot Prints
Paper Pom Poms Ah Tissue
Pink Ceramic Cake Stand Clara French
Cake boxes and candy jars from 2 Garnish
Edible Jelly Jewels from Culpitt purchased at Party Animal
Fabric Shabby Chic Flowers  Karen McCubbin

photo by Alyce Holzeberger

Special thanks to Terri Vandermeer for her styling assistance and help Xx


Here are some pictures of the kids enjoying themselves at the party. Thanks everyone for sharing Lilli's special day.


Headwear by Karen McCubbin


EDIT UPDATE I found some similar kids dress up racks here over at Amazon as quite a few people have asked about them:


Above photo's by Alyce Holzeberger


Linda Vandermeer is a blogger, baker, maker and author of the cookbook ' Sweets on a Stick': More than 150 kid friendly recipes for cakes, candies, cookies and pies on the go!. Published in the US the book is available at most online book stores:


Or here at fishpond (Aus/NZ)

Sweets on a Stick: More Than 150 Kid-Friendly Recipes for Cakes, Candies, Cookies, and Pies on the Go!


Friday, August 3, 2012

How to eat a Tiara - Pink Ruffle Princess Cake with Edible Gold Tiara

Photograph by Alyce Holzberger
Recipe for Strawberry Layer Cake CLICK HERE

This is the cake from Lilli's 8th birthday party. Y'all will have to wait till Sunday for the rest of the party photo's but I couldn't help but share this with you today.

OK can y'all guess the party theme.

Photo by Terri Vandermeer

Lilli helped to design the cake which was great fun. The top cake is 4 layers of white graduating to dark pink/ burgundy and is raspberry flavored.

Yes please I will have some cake - Photo Alyce Holzberger

The rasberry flavored cake is modified from the strawberry cake recipe in my book Sweets on a Stick.

The tiara is edible fondant with edible jelly jewels held in place with a little royal icing.


Photo by Terri Vandermeer

Yup that's right the jewels are not those hard diamonds that cloud over as soon as you touch and break your teeth.them but flexible edible jelly that you can pop on cookies and for cake decoration......y'know for example tiaras.

Photo by Alyce Holzberger

I used patchwork cutters for the tiara template hand cut it out then applied 2 layers of gold americolor airbrush and 2 layers of gold home made paint which was a mixture of the americolor sheen, gold luster dust and rose spirits.

you can find them on Amazon here (US):


Available to Australia via Fishpond

Crowns Patchwork Cutters


For a tutorial on  how to make a ruffle cake see my Rainbow ruffle cake HERE for a tutorial on applying ruffles.

Oh and how cute are the cake boxes I picked up at and decorated with party dots from Polkadot Prints.

Cake boxes Robort Gordon Party Dot Polkadot Prints
Photography by Alyce Holzberger

Cake Photo and prop credits

Cake made and designed by Bubble and Sweet

Edible Jelly Jewels by Culpitt purchased from Ebay seller Party Animal
Tutorial on how to make a ruffled cake here
Photography by Alyce Holzberger Photography and Collette - Alyce did this
Party Dot Printables Polkadot Prints
Cake Boxes Robert Gordon from 
Cake Stand Clara French
Cake Recipe Sweets on a Stick

Available online here at Amazon


Or here at fishpond (Aus/NZ)

Sweets on a Stick: More Than 150 Kid-Friendly Recipes for Cakes, Candies, Cookies, and Pies on the Go!


Special Thanks to Caketopia for lending me your airbrush machine and Terri Vandermeer for styling assistance and photographs not tagged otherwise.

Photo by Alyce Holzberger

Tuesday, July 31, 2012

Ruffled party bags made with crepe streamers DIY


Lilli has just had her 8th birthday party a bit over a week ago and I can't wait to share all the pictures and sweet treats. In the meantime while I am waiting to get the photo's back I though I would share with you the ruffled party bags we made for the party favors.

I guess it's not a secret I love all types of ruffles whether they are on cakes, cookies or paper pom poms, so when I saw an idea on pintrest for paper crepe streamers on a box I thought the idea would translate perfectly to a party favor bag. The original idea was super nifty and they sewed the crepe paper, but I am totally craftless so I made mine up with double sided tape.

They were pretty simple to make and everything was picked up from a local craft store and pretty inexpensive.

Oh and obviously you don't need to stop at one strip. I was thinking you could leave off the lace, use lots of different colors and make fun and inexpensive ruffled rainbow bags quite easily with this technique.

We filled our party bags with a book containing a special hand written message from the birthday girl, a candy bracelet, push pop candy, fairy floss and a pink balloon (the birthday girl insisted the balloon was a deal breaker MUST).


Printable thank you tags from Polkadot Prints

Easy to make Ruffled Party Bags

Paper bags
Crepe Streamers in 2 different colors
Lace
scissors 
double sided tape
hot glue gun

Step  1 Adhere the Lace

Lay the bag down flat and adhere a length of double sided tape horizontally across the paper bag, approximately halfway between the top and bottom of the bag.


Remove the protective backing from the tape and press a length of lace along the tape pressing down to secure it. Cut excess lace away.


Step 2 Adhere the first ruffle layer

Adhere another length of double sided tape horizontally across the top edge of the lace.


Remove the protective backing from the tape and attach the crepe streamer on one end securing it to the tape in the center. In the picture I have attached the streamer to the left edge working my way toward the right side. Cut excess streamer away.


Around 1.5 cm's (1/2 ") from the edge fold the streamer back to make a pleated ruffle and then press it back down and continue towards the right edge folding the streamer back at regular intervals as shown in the pictures to give a ruffled appearance.


Step 3 Adhere the final ruffle layer

Adhere another length of double sided tape horizontally across the middle of the ruffled streamer.


Take the second color streamer and using scissors cut down the middle of the streamer to make a thinner half sized streamer.

Remove the protective backing from the double sided tape and attach the half sized streamer and folding back to make a ruffled appearance using the same technique described in step 2.


Step 4 optional - secure further

You may like to use the hot glue gun to secure the lace in spots to the bag to minimise the risk of the lace falling off.

Tip Junkie handmade projects