Monday, October 10, 2011

Mermaid Cookie Tutorial


Phew - I just could not get myself motivated to do up this tutorial for the Mermaid Cookie Pops I made for Lilli's 7th Birthday party.

I've had a busy couple of months so this is just going to be a short and to the point post on how I made up the cookies.

I have had a stack of enquiries about where I got the mermaid cookie cutter. I picked mine up from Kitchenwear Plus at Logan Queensland Australia. It's a d-line brand cutter and I also spied it here at another shop on-line.

But if you can't find the same cutter I used, just use another mermaid cutter and apply the same technique, it should all work out in the end.

and cause I'm too tired to think up anything witty or cute I'll just pop a pic of Lilli's birthday party here. If you missed the post on the party you can find it by clicking HERE.


Mermaid Cookies

Ingredients and Equipment

Mermaid Sugar Cookies - I used the sugar cookie recipe from my soon to be released Sweets on a Stick: More Than 150 Kid-Friendly Recipes for Cakes, Candies, Cookies, and Pies on the Go!
Mermaid Cookie Cutter
Ready Roll Fondant or Marshmallow Fondant (Mine was white, light aqua, slightly darker aqua, green and skin tone) Keel fondant in an airtight container or ziplock bag as it dries out quickly. Knead well before use.
Small Rolling Pin
Sharp Knife
Cake molding tools (see picture)
small flower cutter (I used a plunger cause they are easier)
small brush and water
small dry brush and pink edible dusting powder (optional)
Cornflour (corn starch) for dusting
Black edible pen


Roll out the skin tone fondant onto a cornflour dusted workbench. Cut out a mermaid shape using the cutter. Using the sharp knife carefully cut out hand shapes where the arms end on the cookie cutter (see picture).


Roll out the light aqua fondant on the cornflour dusted workbench and cut out a mermaid shape using the same cutter.


Place the skin tone fondant shaped on top of the aqua shape and using the sharp knife cut through both layers of fondant in a V shape at the waist. Cut the 'arms' from the aqua shape so you are left with just the tail. Take the top of the skintone shape and the bottom of the aqua shape and adhere to the cookie with a little water. Use the rolling pin to push the fondant out to the edges of the cookie as required. The hand shapes should sit on top of the blue mermaid tail.

Use the cake tools to make 'scale' indents into the tail and draw lines into the ends of the tail. If you do not have these tools use what ever you have handy. You could use the edge of a piping tip to make the scales and the sharpe knife would work nicely to make the indents.


Roll out the white fondant on a cornflour dusted workbench and cut out a mermaid shape using the cutter. The white fondant will be the top, use the sharpe knife to cut out a V neckline, sleeves and a V shape at the waist (see picture for example). Adhere the white top to the mermaid cookie with a little water.


Make the mermaid hair by rolling out the dark aqua fondant and cutting thin strips. Twist the strips to make the hair appear twirly, cut into different lengths and adhere to the mermaid head working down from the top around the face area (do not just stick it all on the top of the head or it will look odd). I used about 8 pieces of different lengths and made the hair. Repeat the process of making the hair with the light aqua color and then white.


Roll out the green fondant on a cornflour dusted workbench and cut out a small flower.


Press into the hair part and add a small amount of rolled fondant for the center or press in an edible silver ball.
Allow the fondant to dry a little and then using the edible pen draw on a face. I went with simple eyes and mouth, well pretty much as I am terrible at drawing and I find the simpler the better.#

Optional - Use a small dry brush to brush on a little pink dusting powder to make rosy cheeks. Just use a small amount, you can always add more if needed but you can't remove it. Use a clean brush to remove the excess dust.


#hint - I like to cut out some fondant a couple of hours before I draw the faces and try a few different types to see what will work best and it's also a good way to test out the dusting powder, you don't want to be too heavy handed.

Thursday, October 6, 2011

Country Women's Association Classics Cookbook

 
Quick and Easy Biscuit (recipe page 527)

Wow - the CWA Classics (Country Women's Association) cookbook is one heck of a cookbook. It's huge, 400 recipes huge and filled with the kind of cooking you have come to expect from an Association which although not founded on food, has certainly made it's mark and name in that arena.

I was sent this book a couple of months ago, just as I was heading off for holidays and took it along to read during the trip despite it's hefty weight and as it turns out I'm glad I did.

I was kinda expecting a baking book, filled with scones, sponges and the types of fare you might expect to find at the CWA stall at a country fair but to my surprise this book has a great mix of savory and sweet recipes.

In fact some of the main meals were so simple and good I whipped them up while we were on holidays and to my delight the kids really enjoyed each of the meals.

The introduction gives a bit of a background on the CWA which I found very interesting as I have forgotten over time the CWA provide more than tea and scones and that they work tirelessly to support rural families in so many ways. In fact the proceeds from this book are being used to fund a postgraduate nursing scholarship for a nurse working in a rural area.

The book is a collection of recipes including starters and mains through to desserts, baked goods and preserves from CWA members.  A lovely touch is that each recipe has the name and state of the contributor which I liked and in some instances a little introduction written by the contributor which I totally loved. Some of the intro's were funny, some to the point , some told where the recipe originated..... I enjoyed reading each of the introductions as much as the recipes themselves.

So far I have tried quite a few of the recipes and not one of them has failed. Honestly would you expect any less.

Quite a few of the baking pages had been tagged to try, and when I noticed that the Quick and Easy Biscuits (page 527) only required 4 ingredients all of which I had in my pantry it quickly got pushed to first place. I helped my kids measure out the ingredients and then they pretty much sifted and mixed these babies up themselves.

Easy to find ingredients, clear instructions and yummy results. Yup that's what good classic cooking is all about.

Overall I found the recipes in this book easy to follow with ingredients that in most instances you probably already have at home as kitchen staples. Some of the recipes did not have clear instructions regarding what size pan to use but I put that down to the fact that the women of the CWA are a resourceful bunch and they make do with what they have. Something I could probably learn from if my crowded kitchen cabinets are anything to go by.

The book is distributed by Penguin and is available pretty much everywhere in Australia where you find good books.

CWA Classics

Tuesday, October 4, 2011

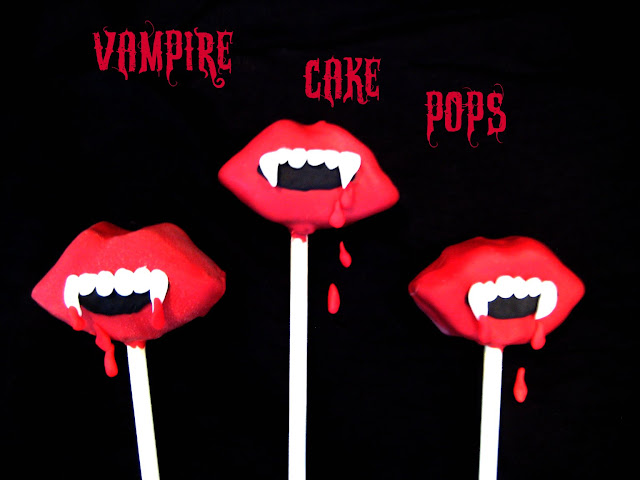
Vampire Cake Pop Redux


Remember these vampire mouth cake pops I made last year inspired by True Blood........


well it's coming up to Halloween again and although I know any time is a good time for vampire cake pops I have had lots of questions on how to make them recently so here is bit of a better explanation of what I did.

Although sorry still the same mildly blurry over exposed photo's I used the last time :)


I made these from tim tam cookie truffles, or you could use oreo truffles (recipe at the bottom). I find that the consistency of the cookie truffles makes shaped pops a little bit easier, plus it is way quicker.

Shape the cookie truffle mixture into a mouth shape, I made an oval, flattened it down and pinched out the edges with my fingertips, then made a little lip/bow at the top. Pop your mouth shaped cookie truffles onto a parchment lined tray, grab a lollipop stick and make a hole in the bottom of each mouth (see the picture for a guide as to where you will be sticking the lollipop stick), remove the lollipop stick, repeat for the remaining mouths.Stick the tray into the fridge to chill.

Now for the purposes of this post I am going to be calling the chocolate coating 'candy coating' as that is what I buy. You can get compound chocolate melts (nestle brand) from the supermarket in Australian or other types from cake and hobby stores but I use the US candy coating/melts as they are already colored and set well on the pops. In Australia you can get candy melts from Spotlight and specialty cake stores, or online from Cakes Around Town who sell Merckens red candy coating and Baking Pleasures who sell red Wilton Candy Melts.

Melt some red candy coating (melts) in the microwave on medium low heat. Do not be tempted to melt at higher temperatures as you will burn the candy coating. If you like you can add some extra red to make it a deeper color but make sure you use special oil based color or the candy will be ruined (chocolate much like witches is destroyed by water in most instances). Melt the candy coating with some paramount crystals or copha until it is smooth. I use quite a lot of the copha, up to 1 part copha to 7 parts candy coating if I'm using Wilton, different brands will require different amounts of copha or paramount crystals, add it gradually to see what works best, the candy melts should not be thick the mixture should flow easily, kinda like this picture.

Yup I know this is blue and not a mouth it's just an idea of how your candy coating should look

Take lollipop sticks and holding one end dip the other into your melted candy coating and then insert the lollipop stick into the hole you have already made in each mouth. Repeat for remaining mouths and return to the fridge to chill for another 10 minutes.

Make sure the red candy coating is still melted sufficiently, remove the cookie truffle mouths from the fridge and holding the end of the lollipop stick dip each one into the candy coating, submerging the whole truffle and then lift out, tap gently to remove excess candy coating, and allow to set upright. I use large squares of styrofoam covered in glad wrap.

Once the mouths are set you can decorate, I lay mine back down flat on the tray to do this. I used ready rolled fondant (plastic icing) which you can get from specialty cake stores, grocery stores (in Australia) or hobby stores (in the US). Color some black and leave the rest white. Use your fingers to shape the black opening to the mouth and press onto the mouth cookie truffle pops, mine stuck without anything extra but if you have trouble adhering it try using a little royal icing or edible glue.


Shape the white fondant into teeth making four smaller front teeth and then two larger vampire canine type teeth for the edge. Adhere the teeth to the black mouth using a really teensy amount of water (really just a tiny amount of the black will smudge everywhere) and press on lightly.

Allow to set and serve.

The red drops of blood in the top picture are just more ready rolled fondant colored red and shaped into blood droplets.

Oh and Not Quite Nigella made a fun version of these last year for her Halloween party based on my original post - I love the photo where she is holding them up - so fun.


Oreo Cookie Pops

Note for US conversion, for the Oreo's just add half the amount of cream cheese to what ever size packet oreo's you get. So if you have a 16oz package of Oreos add 8oz cream cheese which will make around 23 or 24 Oreo truffles.

300g Oreo Cookies
150g Cream Cheese at room temp

Crush Oreo cookies finely in a food processor add cream cheese and process until the mixture clumps together. Shape mixture into a ball for traditional pops or follow the directions above for vampire pops.

Oh and for lots more fun ideas for sweets on a stick, check out my book being released in the US in December:


Tip Junkie handmade projects