
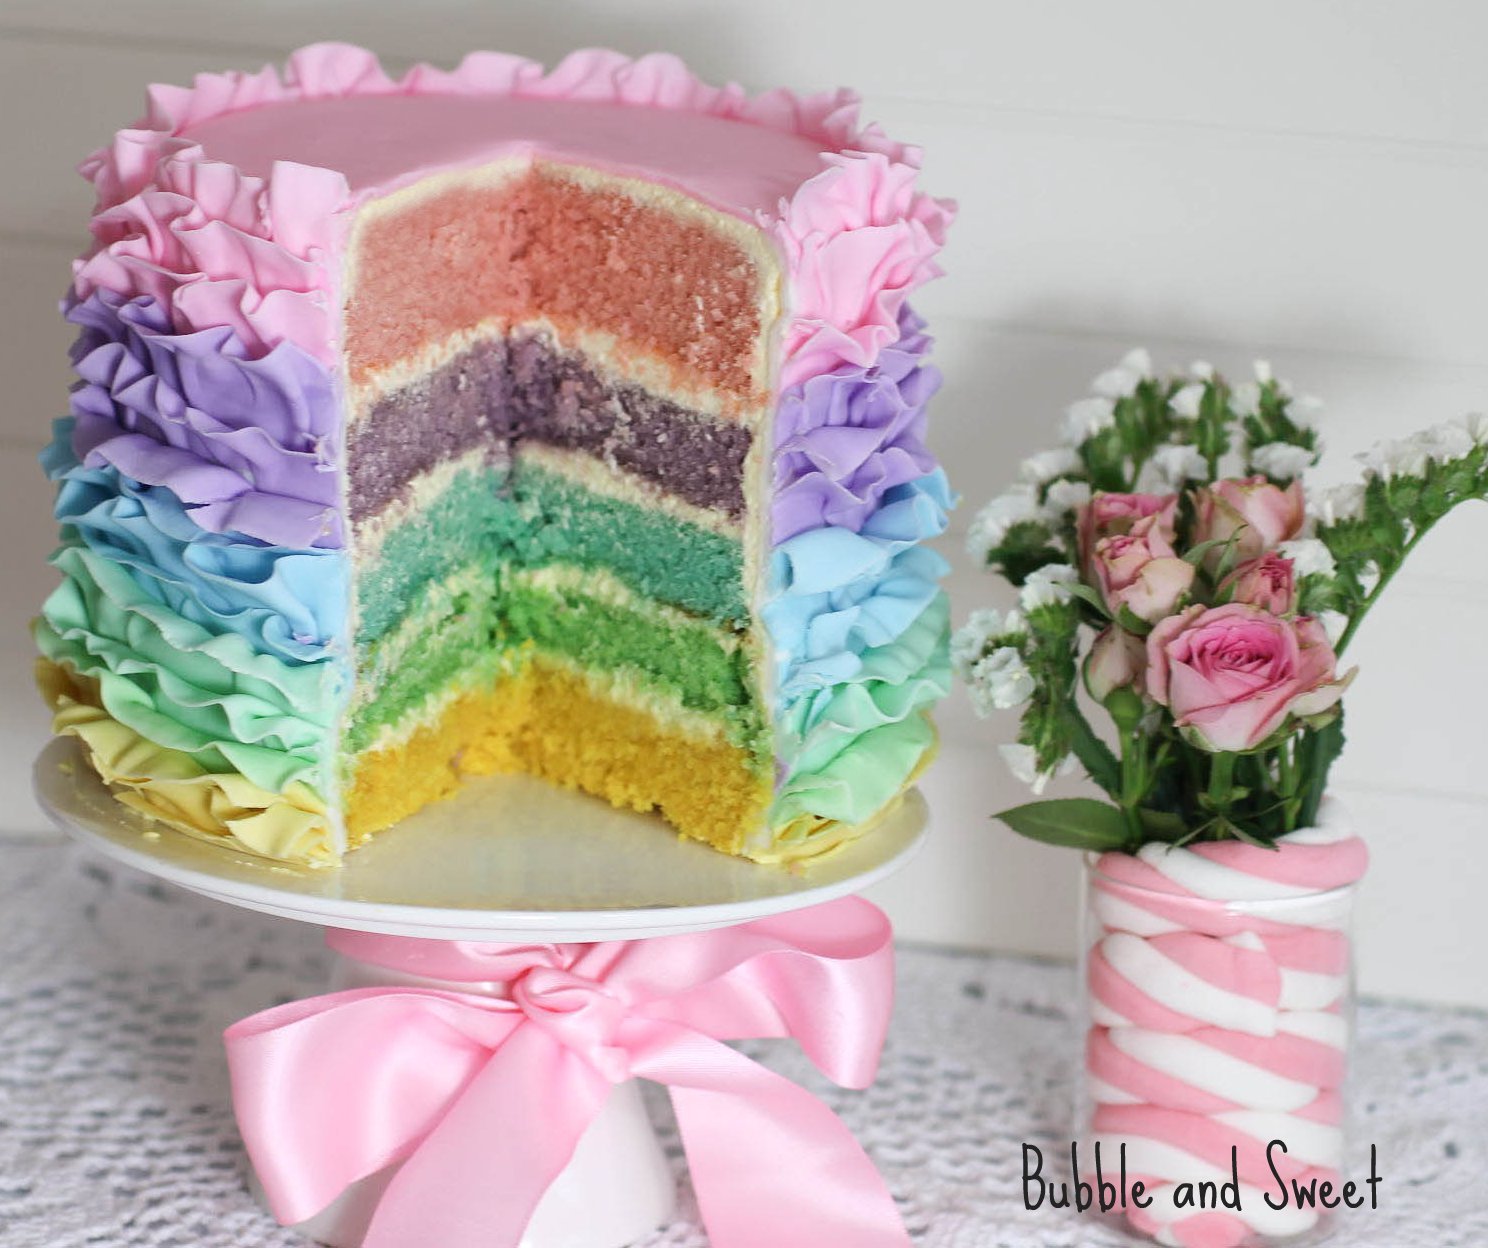
Wow, the pictures of that Pastel Rainbow Ruffle Cake that I posted last week were pretty popular. I had something else planned for today's post but I have pushed it back to show how I made the cake seeings as y'all asked so nicely.
Now some of you are going to be disappointed as although the cake was frosted and filled with delicious Buttercream frosting, the actual ruffles are fondant.

I know some of you do not like fondant at all.
Me - I don't mind a bit of it and I kinda like it on cookies, I use Bakels brand which tastes quite nice, before I started using Bakels I was with the not a fondant fan club as well, so I get where some of you are coming from. Some of the fondant brands taste really awful.
If you really hate fondant and you are not so great with piping, check out my post on this pink rainbow ombre cake for Real People HERE. You could cover your rainbow cake in this way following the instructions for the buttercream layers and using pretty pastel colors instead of all pink for a totally achievable rainbow cake. It is way easier to make and you don't need a lot of equipment.

For the rest of you the steps I followed to make the cake follow and as always ....this is just the way I did it, if you are a decorator and you have a different way of doing any of the steps that is fine, you can follow your regular steps.
Pastel Rainbow Ruffle Cake instructions
To make this cake you will need 5 cakes in rainbow colors
Buttercream (or ganache)
Fondant*
Pink, purple, blue, green and yellow gel food color (I used Wilton, although for the purple fondant I used Americolor)
Large rolling pin
cornflour (corn starch)
Small Rolling Pin
Large knife for trimming the cake
Small sharp knife
Cake smoothers X 2
Frilling tool - if you do not have a frilling tool a toothpick can be used for a similar result
Not stick flower molding mat
Small brush and water
*Fondant dries out really quickly - keep it in an airtight container or ziplock bag in between use and work really quickly.

Make the cakes.....The recipe I used to make the cakes is the Quick and Easy Vanilla Cake from page 9 of my book Sweets on a Stick
Make sure you grease, flour and line the tins to make removing the cake easier. I only had 2 tins the size I wanted so I cooked a couple of cakes wiped the baking pans clean, regreased and floured, lined and popped the new batch of cake batter in.

Pop the baked cakes onto a wire rack to cool.
I trimmed the top and bottom off each layer to make the cake flat and remove the thin brownish crust. If your not taking photo's I would only worry about trimming the top to make each layer even. I started with yellow as the base. I took a cake board and popped a little of the buttercream in the center to secure the cake and then I stacked the cakes up with Italian Meringue Butter cream in between each layer.
In between each layer I popped the cake into the fridge to chill to make sure the whole thing didn't slide off the plate.
The Italian Meringue Buttercream recipe I used was from the Whimsical Bakehouse cookbook.
Once the final layer was in place and chilled I spread buttercream around the edges and made the cake as smooth as possible. Well as smooth as possible without going overboard remember there will be lots of ruffles covering this cake. Chill the cake again until the buttercream is firm.

At this stage I got a piece of paper and marked on it where each layer ended/started.
Now you need to cover the cake with the fondant underlayer for the ruffles to stick on - I just used plain white for around the side. Measure around the cake with a piece of string to work out how long your fondant will need to be and then measure the height.
You will need to roll out a piece of fondant that you can cut into a rectangle the size that you have measured.
Roll out the fondant on a workbench dusted with a little cornflour, turn and lift the fondant often to make sure it does not stick and try and roll out in a rectangular (ish) shape.
Once the fondant is big enough trim along the top to get a straight line. Take the cake out of the fridge and lay it sideways onto the fondant so that you can wrap the fondant around the cake. Where the fondant joins at the back you can wrap one layer over the other and then using a sharp knife cut down in a straight line. Lift up the fondant and remove any excess underneath and smooth the cut line together with your finger. Don't get too uptight about it, it's all going to be covered with ruffles.
Pop the cake upright and use the sharp knife to trim off the fondant from around the bottom of the cake, and use fondant smoothers to make sure that the cake is smooth.
Color some of the fondant pink and roll out until very thin and using the cake tin that you used to bake the cakes in press down to cut out a round the approximate size of the cake. Place it on top of the cake and use the fondant smoothers to make the top as smooth as you can. I used the smoothers in a kinda T shape around the top edges to make a moderately sharpe edge.
Take that piece of paper from before where you marked the colors and using a knife make a little indent so you will know where each color ends/starts.
Now time to start making the ruffles.
Color your fondant by kneading a small amount of the gel food color into the fondant. You should not need a large amount of colored fondant for each color, about the size of your fist should do if you are making a smallish cake, obviously more if you are making a large cake.**Remember fondant dries our really quickly so keep it in an airtight container or zip lock bag while you are not using it.

To Make the fondant ruffles dust the workbench with cornflour (cornstarch), take a piece of fondant about 1 1/2 tsp and shape it into a rectangle, using the small rolling pink roll in out into a long strip. As you roll you may need to press the sides in carefully with the sides/heels of you hands to stop it from getting too wide. (or if you find that is not working you can always use a sharp knife to trim it back to size) Keep rolling until the strip is quite thin. I like to pick the strip up after each roll to ensure it is not sticking to the bench and when necessary dust underneath again.

When you have rolled out as thing as you can on the workbench, pick up the strip of fondant and place onto a nonstick foam (the type you use for making fondant flowers) and using the middle section of the frilling tool roll back and forth (like using a rolling pin) to make the strip even thinner, you will probably get it to double in length.

Then use the pointed edge of the frilling tool rolling back and forth along one edge of the strip a little more to make it a little ruffly.
Attach this strip of fondant to your cake starting at the top. Brush on a very small amount of water to the cake along the top and press the fondant strip onto the cake. I tried to gather the strip to make it appear more ruffly (see picture). When you have finished attaching one strip make another and attach it to the cake starting where the last strip finished. Go back and press the lumpy bottoms of the ruffles down as you finish attaching each strip.

Continue making pink strips of fondant and attaching them to the cake cone working your way down the cake until you reach the indent that indicated you should start with the next color and follow the instructions this time making violet ruffles. Follow this process for all the remaining colors until the cake is completely covered with ruffles.

As you work your way down, some of the ruffles may fall down and look floppy, I usually brush a tiny amount of water around the middle section and press the ruffle up so it is upright, but this look is not about perfection so some floppy areas will work just fine.
At the very bottom I rolled out a strip of yellow around 1/3 the width of the regular strips and without ruffling it adhered it around the bottom to cover any of the uneven ruffle bottoms.
Phew all done, now you can relax and have a piece of cake: )

Linda Vandermeer is a blogger, baker, maker and author of the cookbook ' Sweets on a Stick': More than 150 kid friendly recipes for cakes, candies, cookies and pies on the go! Published in the US the book is available at most online book stores:


