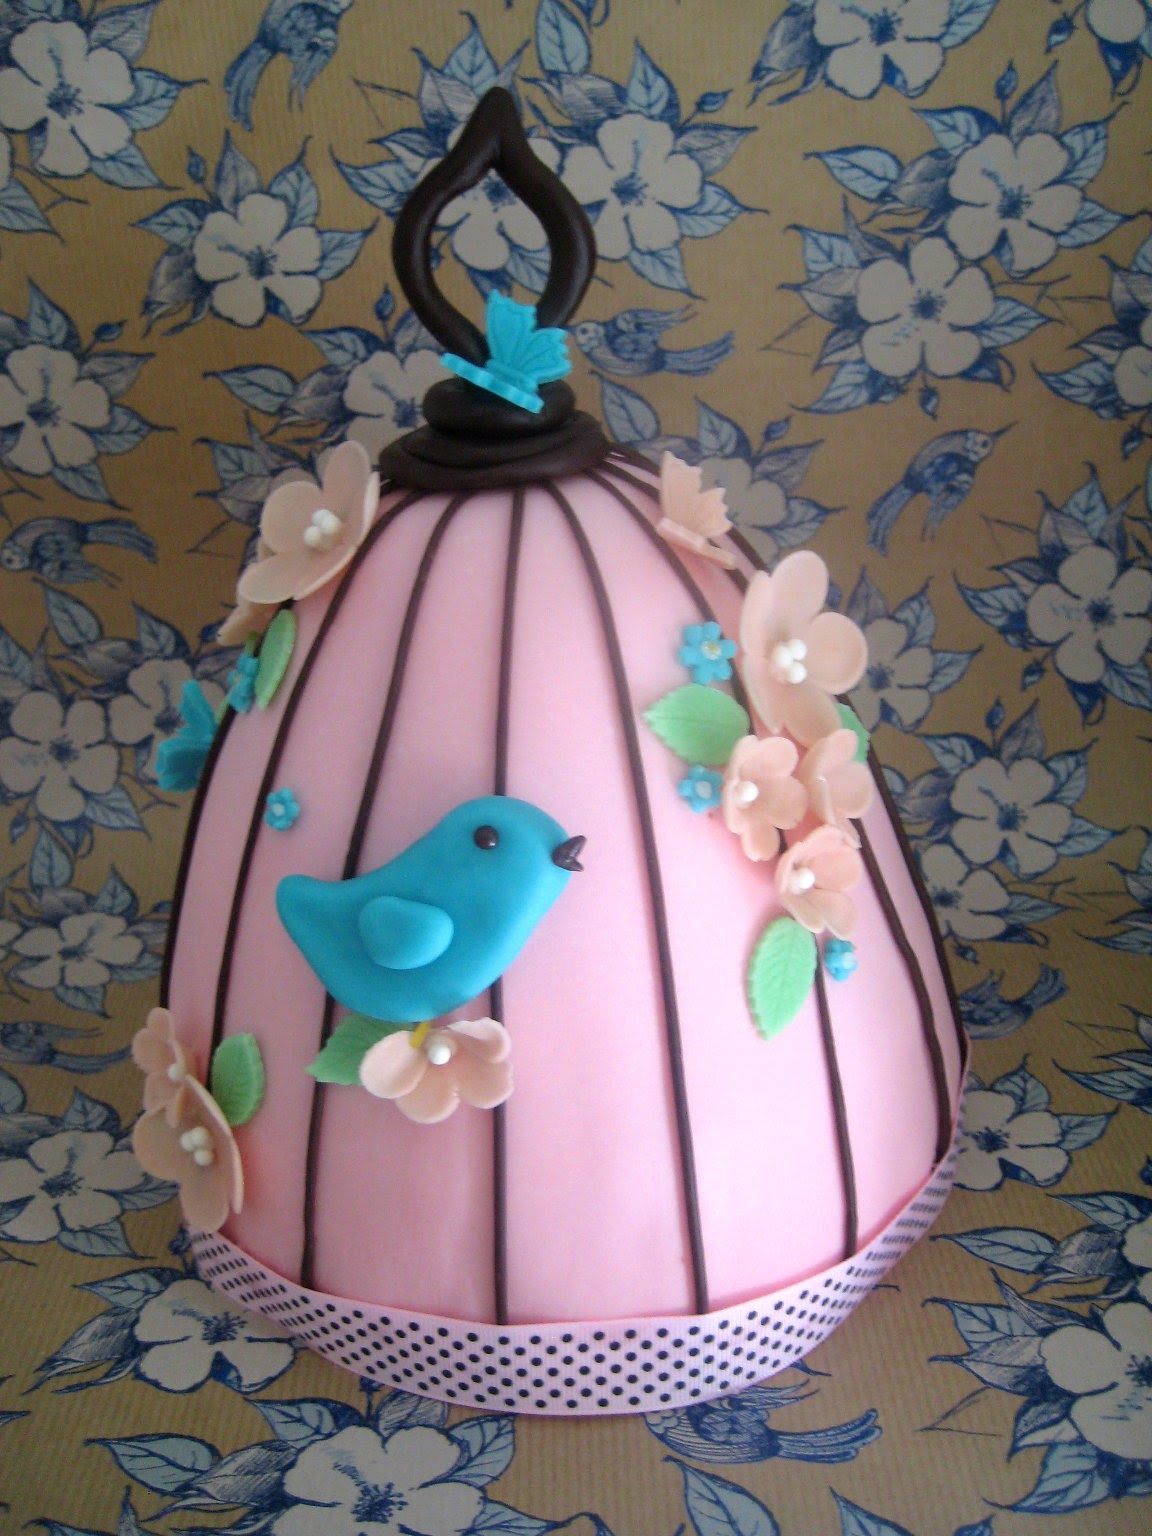
I'm adoring this cake I made for a 40th Birthday. Bluebirds, blossoms and butterflies what a sweet combination.
I have come up with a bit of a basic tutorial on how I made it which is pretty long winded and will be broken into a few days, but here it is the first installment of the Blossom and butterfly birdcage cake epic.
I received a request for a 40th birthday cake which was not specific, just that there were about 100 people coming. After some questioning, I found out that the birthday girl likes chocolate, her favourite colour is purple and that some of the family are gluten intolerant. Follow up questions determined there would be a number of desserts served and not everyone would have cake so serving 100 was optional.
Eeeek - so it was up to me. I looked through my many books for inspiration and came up with a 3 tiered design topped with a faux cupcake with layers of pink and purple. Then I considered the Planet Cake 40th Birthday Cake in their book and popped over to their community and then I saw it...........
Bellasmommy had as her avatar a birdcage cake and I had to try it. No instructions just a pic of a perfectly cute cake.
Luckily I had so much leeway that all the plans I had already made were turfed and I redrew my decorating schedule for the week.
Yes that's right, for just one cake I do up a schedule after I have drawn a design of the planned cake. This is not just for time management but to ensure that I will have the required equipment and ingredients at each step and in this case to allow time for the bird and tops of the cage to dry/set a little.
My schedule pretty much went roughly like this:
Day 1 make bird, pointy top/handle for cage, blossoms, butterflies and leaves
Day 2 make marshmallow fondant and make both cakes
Day 3 make buttercream and ganache, cut and fill cakes, crumb coat (cover with the ganache or buttercream). Cover the birdcage with fondant and add all decorations.
Day 4 place dowels into bottom tier. Assemble cakes and add any finishing touches such as ribbon.
(Day 3 and 4 could easily be combined)
Day 1 Make bird, handle, blossoms, butterflies and leaves
(where I have used chocolate modeling paste you can just use gumpaste coloured black or brown)
Bird, colour a small amount of rolled fondant blue and shape a flat oval the approx size of the bird required, manipulate the head and tail until shape resembles bird. Make a second smaller ball, flatten and shape into wing, adhere to bird body with tiny amount of water.
Make eye and beak out of small amount of chocolate modeling paste, a tiny round for eye and very tiny and thin log folded to make beak. Adhere to bird and pinch into shape if required.
Place bird on parchment paper to air dry.
Handle shape chocolate modeling paste into log and pinch into a point at middle, manipulate with fingers to make required handle shape pinching together at bottom. Cut excess off with knife.
Make another long log and twirl around in a type of snail shape to make base of handle. Place both pieces on parchment paper to air dry.
Pink Blossoms colour fondant as required and roll out with rolling pin. Cut blossom shapes, place onto non stick foam and using a ball tool with gentle and even pressure rub in small circles to thin out each of the blossom petals. Gently lift into a flower former. Pipe a small dot of royal icing in the middle and pop decorating pearls into the center. I used 3 on the large blossom and 1 in the small.
Small blue Blossoms are made using a small plunger cutter and ejector set with royal icing dots in center.
Leaves colour fondant green and roll our with rolling pin. Cut leaves with PME plunger cutter by pushing down once to cut shape and a second time to indent leaf veins. Place finished leaves on parchment paper.
Butterflies using remaining blue and pink fondant and a PME butterfly plunger cut the butterfly shape and place on cardboard folded into a M with parchment paper and allow to air dry.
Ok this is a pic of chocolate fondant butterflies but you get the idea
Variations if you do not have the equipment required -
you could purchase already formed sugar flowers and butterflies from a cake decorating store or supermarket.
blossoms and leaves could be replaced with buttercream flowers and leaves piped directly onto the birdcage.
A non edible bird could be purchased from a craft store to replace the edible fondant bird.
A clean draw handle could be sourced to used on top of cake.
Handle could be made by piping chocolate onto parchment paper (although the chocolate would be very delicate and care would be required.