Thursday, August 20, 2015

Pinkalicious Macaron Recipe


When I saw these plates online I was smitten. Look at them. Just look they are pretty much the cutest disposable plates I have ever seen.

I don't even like disposable plates, I completely avoid them where ever possible but I had to buy these ones I mean seriously they have pink polkadots and gold spots and then part of them is the sweetest pale pink and no this post is not sponsored by the company.

Anyhoo then I made some macarons to serve on them 'cause they deserved something special.


I picked mine up from Lark Australia.

In the US check out Bash Party Goods who produce the plates.


I did read on Bash Party Goods Instagram page that they had macarons in mind when they created these plates so just to help you out I'll re-share my recipe.

Your welcome


Macaron Shells makes around 40 shells or 20 filled macarons. See below macaron recipe for simple instructions for ganache filling.

190 gram (6 5/8 oz)almond meal (almond flour)
190 gram pure icing sugar (6 5/8 oz powdered sugar)
190 gram granulated sugar (6 5/8 oz)
48 grams water (1 5/8 oz)
140 gram egg whites aged split into 2 lots of 70grams each (5 oz split into 2 lots of 2 1/2oz each)*
food color of choice (I use gel type food color like Wilton)

*ageing egg whites refers to separating the yolks from whites and then leaving the whites to age for a few days. This can be done on the counter if your countries climate permits or in the fridge, wrap the bowl with plastic wrap and then pop a few holes in the top. Alternately you can pop fresh egg whites in the microwave on high for 10 seconds or so - I used the microwave method in this batch pictured.

1. Mix the ground almonds and icing sugar together and pulse a few times in food processor to make almond meal finer. Do not over process as the meal can become oily. Sieve into a large bowl. Add colour and 70g (2 1/2 ounce) of the egg whites to the sugar/almond mixture but don’t mix in.

2. Place remaining 70g (2 1/2 ounce) of egg whites in bowl of mixer fitted with the whisk.


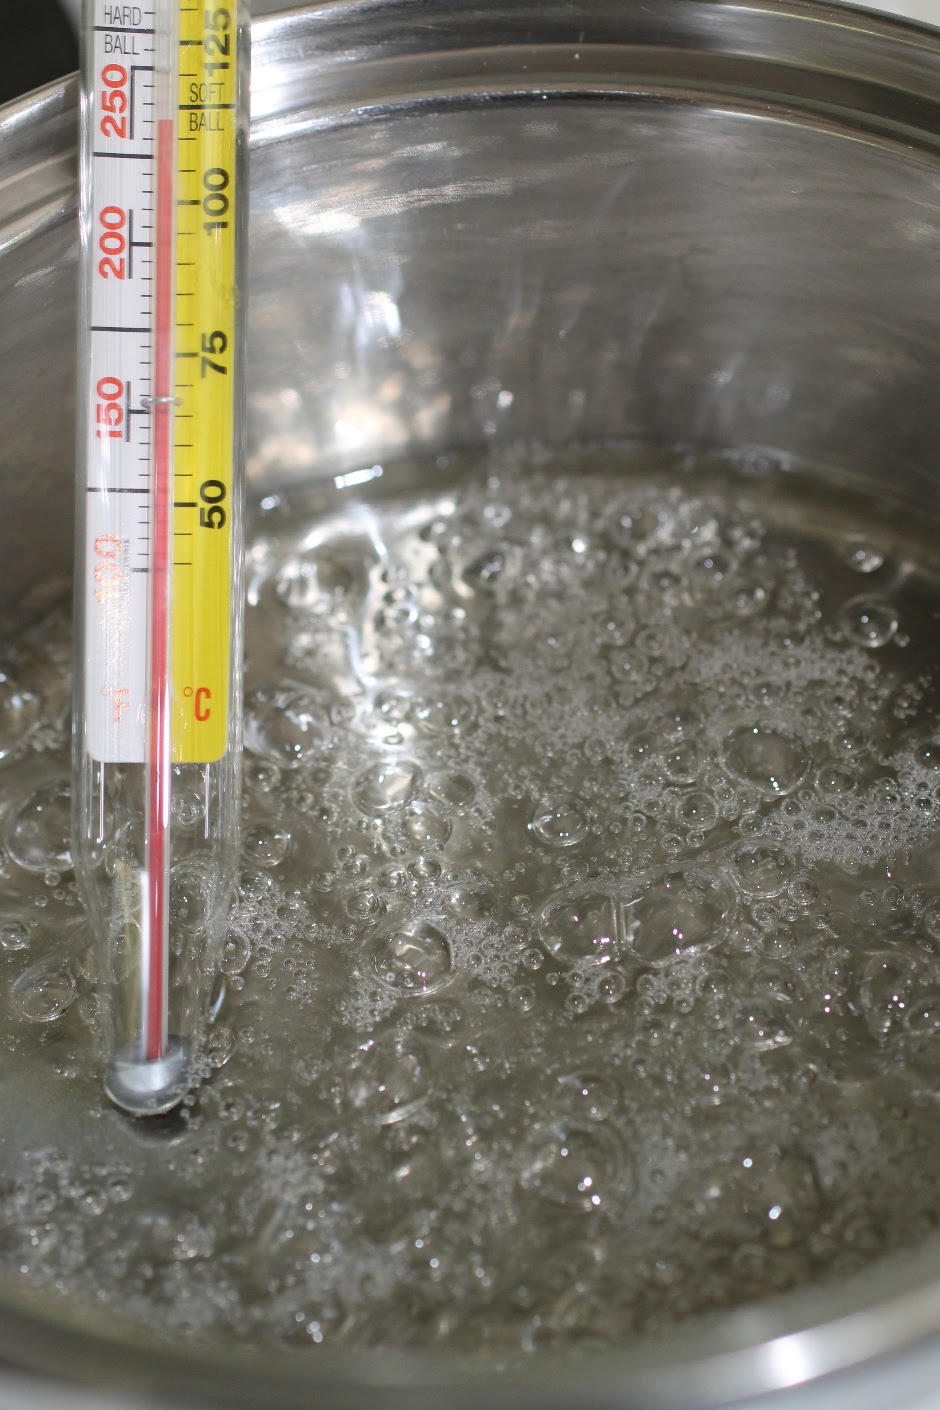
3. Pop granulated sugar and water into saucepan stir to combine and cook without stirring to 118C (245 F). Brush down the sides with a pastry brush dipped in water as required to avoid the sugar crystallizing. Once the mixture reaches 115C (240 F) start mixing the egg whites on high. Make sure you have a pouring shield on your mixer, when the sugar syrup reaches 118C (245 F)remove from heat and immediately pour in a thin stream down the side of the mixer bowl continuing to whisk on high.

4. Continue to whisk the meringue on high until the side of the bowl is only a little warm to touch, around 50C (120 F).

5. Add meringue mixture to almond mixture and using a large spatula fold the mixture together until it starts to shine and forms. If you run the spatula through the mixture it should form a ribbon that disappears back into the mixture after about 20 seconds.


6. Add the mixture to a piping bag fitted with a plain tip (or just cut the end of a disposable piping bag, that's what I do) and pipe in lines onto parchment lined baking sheets. To make the macarons as even as possible I apply a constant slow pressure to the piping bag and count a few numbers like up to 3 for each one.

Waiting to form skins after piping


7. Set aside for about 30 minutes or until the macarons have formed a skin so that the macaron mixture does not stick to your finger when gently touched. If the weather is humid this step may take longer up to 2 hours. I pop on the aircon if it's humid at my house.

8. Meanwhile preheat oven to 140C (285 F). Once ready bake the macaroons for around 13 to 16 minutes depending on size, it may take longer, all ovens are different. If they are baked and you gently push on the side the tops will not move, if the tops do move bake for another minute or 2. Also they should not be browned if they are reduce the heat for the next batch or bake for less time.

9. Once baked remove the baking trays and immediately slide off the macarons and the parchment onto the work surface and let cool completely before removing the shells.

10. Once cooled match disks into like sizes and sandwich together using the ganache.

Ganache Recipe
To make ganache melt white chocolate with cream in the microwave and mix gently until combined, use a ration of 3:1, so for example 300 grams (10 1/2 oz) white chocolate to 100 grams (3 1/2 oz) cream, sorry guys I measure as I already have the scales out and I can't be bothered messing up a liquid measuring jug :) Add some gel color and raspberry oil/flavor to taste.


Linda Vandermeer is a blogger, baker, maker and author of the Children's cookbook Sweets on a Stick: More Than 150 Kid-Friendly Recipes for Cakes, Candies, Cookies, and Pies on the Go! Published in the USA in 2011 the book is still available at Amazon and many online bookstores.

Affiliate links may earn me money and contribute to supporting this blog.

Original ideas, photography and recipes Linda Vandermeer please do not reuse without permission.

Thursday, August 13, 2015

Candylicious Macarons


I love it when I have left over macarons and get to have a play around. I had half a dozen of these pretty purple mac's sitting around plus a bit of the teal ganache and we always have sprinkles and candy sitting around so I whipped up these cute Candylicious macarons.

They might be my new favourite macaron, well to look at anyway. They look so pretty and party ready and of course they are a little bit inspired by Katherine Sabbath's beautiful cakes.


Mostly you just melt the ganache and spread it onto the top and gently push it over the edge so it dribbles down then press a few pastel pearls and sixlets onto the top. I added some mini shards of pastel chocolate as well.

You can buy your macarons or here is my recipe CLICK HERE

My macarons are coloured with Wilton Violet and the ganache is tinted using Americolor teal. The larger rounds are sixlets in shimmer white, shimmer pale pink and bright pink and I chopped some in half to give different heights. The mini pastel pearls are Queen Fine Food soft pearls in Australia you can pick them up at the supermarket. I have popped in a link to a similar US version below :)


Happy Baking


Linda Vandermeer is a blogger, baker, maker and author of the Children's cookbook Sweets on a Stick: More Than 150 Kid-Friendly Recipes for Cakes, Candies, Cookies, and Pies on the Go! Published in the USA in 2011 the book is still available at Amazon and many online bookstores.

Affiliate links may earn me money and contribute to supporting this blog.

Original ideas, photography and recipes Linda Vandermeer please do not reuse without permission.

Sunday, August 9, 2015

A touch of Whimsy water colour cookies


Do you have a favorite cutter? One that when you pull it out you know that the cookies you make will be super adorable no matter what you do.

This Deer Aimee cutter from Cakes by Bien is one of my go to cutters it's just about as cute as you get, so when my friend asked me about it for her daughter's first birthday party I was a bit excited.

I know it's not completely normal to get excited about cookies but you know I write a blog about baking so you'll just have to humor me. Deer cookies = big excitement for me :)


Anyhoo the whimsical theme was based on the birthday girls super sweet bedroom colours so I came up with a set of cookies and macarons to tie in with it.

These 'A Touch of Whimsy' water colour cookies were some of the filler cookies. You know easy to make cookies that match in with the more complicated design but still look great. But I think you can tell from the first photo they are impressive enough to have all on their own.

And the fabulous thing about the technique in this tutorial is that you can apply it to pretty much any cookie shape with any colour theme and it will look just as pretty.


I'm hoping to pop up a video tutorial of me making these cookies on my you tube channel soon, plus I will definitely have tutorials for the other A Touch of Whimsy cookies soon.

Happy Baking


If you love these deer cookies check out my previous deer cookie posts here:
- Deer Heart Linzer Cookies
- Oh Deer! These cup edge cookies are too cute
- Sweet Deer cookies with silver leaf

A Touch of Whimsy Deer Cookies
I've added edible gold leaf to the cookies but if you don't have it just leave it off and they will still be super cute.

Deer Cookie Cutter (mine from Cakes by Bien)
Small Plastic Rolling Pin
Cornflour (cornstarch)
Ready Roll Fondant^ (around 300 grams (just under 11oz)
Roll out sugar cookie dough (recipe below)
Gel food colour (I used teal and violet)
brushes
water
1 sheet Edible Gold Leaf (I used transfer sheets)

^fondant dries out quickly, when not in use store in an airtight container or ziplock bag. To use fondant knead until pliable and smooth and roll out on a workbench dusted with cornflour (cornstarch)


Using the cookie dough recipe roll make deer shaped cookies. The dough will make around 60 small cookies. Bake as per instructions until golden.

Knead the fondant until pliable. Dust the workbench with cornflour (corn starch) and using the small rolling pin roll out the fondant until quite thin. Use the deer cutter to cut out a fondant shape.


Lightly brush the cookie with water and place the fondant onto the cookie. Gently press the fondant down onto the cookie using the rolling pin to smooth into place.

Take a small amount of teal food colour with the edge of a toothpick. Place some water into a spoon or paint palate and use a paint brush to mix with the water. The colour should be a bit washed out. Dry the brush a little on a piece of paper towel and then lightly brush the side of the paint brush along the fondant covered cookie. If the colour becomes too weak mix in a little more gel food colour.

Repeat the same with the violet. If you find the violet is too dark you may like to add a little rose or pink to the mix to brighten it a little.

Allow the food colour to dry.

Brush a little extra water onto the back of the cookie and adhere a small amount of gold leaf to the fondant covered cookie.

Allow to dry and store in airtight container for up to 5 days.


Sugar Cookie Recipe (makes 24 regular cookies or 60 small)

460 grams plain flour (16 1/4 oz all purpose flour)
1/4 tsp baking powder
1/4 tsp salt
230 grams unsalted butter (8 1/8oz)room temperature
220 grams caster sugar (7 3/4 oz superfine sugar)#
1 large egg
1 tsp vanilla extract
#use regular white sugar if you do not have caster/ superfine sugar

Sift together flour, baking powder and salt.

Cream butter and sugar in a large bowl using an electric mixer until light and fluffy. Reduce the speed to medium low, add the egg and vanilla and mix until combined. Reduce mixer speed to low and mix in the sifted flour mixture until combined. Wrap the dough in plastic and chill in fridge for 30 minutes or so.

Line a few baking trays with parchment/ baking paper.

Dust workbench with plain flour and using a large rolling pin roll out the dough until around 1/2 cm (1/4") in thickness. If the dough is to hard you may need to work/knead it a bit until you can roll it out.

Cut out cookies shapes and place the cookies on the prepared trays. (Knead and reroll dough as necessary, if it becomes to soft you can pop it back in the fridge.)

Pop the cut cookie dough trays into the fridge to chill again for around 30 minutes until firm (or in the freezer for 10 minutes).

Preheat oven to 160 C (320 F) and cook the cookies until they just start to turn golden, around 15 minutes (less or more depending on cookie size).

Cool on trays for 5 minutes and then carefully lift onto a wire rack to cool completely prior to decorating.

- Cookies can be stored in an airtight container for 1 week.


Linda Vandermeer is a blogger, baker, maker and author of the Children's cookbook Sweets on a Stick: More Than 150 Kid-Friendly Recipes for Cakes, Candies, Cookies, and Pies on the Go! Published in the USA in 2011 the book is still available at Amazon and many online bookstores.

Affiliate links may earn me money and contribute to supporting this blog.

Original ideas, photography and recipes Linda Vandermeer please do not reuse without permission.


Thursday, July 23, 2015

Triple Chocolate Meringue Tart for Tickle the Imagination Magazine


Are you ready for chocolate overload. Like really seriously chocolate on chocolate on chocolate overload.

'Cause if you are the Triple Chocolate Meringue Tart I created for the latest issue of Tickle the imagination completely fits the bill.


You can find the recipe for it along with a stack of other amazing things to make and interesting stories about things Australian and handmade in the latest Home issue. Here is a free sneak peek of the magazine: http://bit.ly/1L4Mncb


But wait there's more. In the past few days the Handmade Coorperative - Australian Handmade 4 Kids have been having an online #TickleTour and it's been so fun watching them all make different items from the magazine. I'm kind of needy so I've been getting a big kick out of seeing them post pictures after they make the tart themselves. Plus some of the other crafty stuff they have been making is totally inspiring me to give it a go.


Make sure you pop up a picture on Instagram or Facebook if you get the magazine and make the tart yourself. I'd love to see it.


Linda Vandermeer is a blogger, baker, maker and author of the Children's cookbook Sweets on a Stick: More Than 150 Kid-Friendly Recipes for Cakes, Candies, Cookies, and Pies on the Go! Published in the USA in 2011 the book is still available at Amazon and many online bookstores.

Affililate links may earn me money and contribute to supporting this blog.

Original ideas, photography and recipes Linda Vandermeer please do not reuse without permission.


Monday, July 6, 2015

Rustic naked cake how to


Naked cakes and semi-naked have been pretty fashionable at weddings, anniversaries and birthdays the past few years. Pretty much they are just a cake without all the extra fondant and buttercream which some people actually prefer.

Plus they can be perfect if you want to make your own rustic version. In fact the one in the picture I made with a shop purchased cake then decorated with pesticide free flowers and herbs from my garden and the whole thing cost less than $10.


Although don't go rocking up to your cake decorator expecting the same, they actually put quite a bit more effort into than I did and they probably can barely turn the oven on without it costing $10 (let alone make a wage). Plus in Australia I don't think it would be legal for them to stick flowers from their own garden onto a cake.

But like I said if you want a really rustic pretty cake without all the fuss this is the perfect cake for you.

I've popped a guide as to how I made the cake down below but if you are making one yourself or even just ordering one for an event here are a few things to think about:

- How hot is it going to be? Is your event in summer? You don't want to end up with a slippery slidy mess of cream and wilted flowers. Think about what type of frosting you are going to use and make sure there is a fridge handy. Then pop the flowers, fruit and a dusting of sugar on top just before you need to display the cake.

- How long will it be out? Cake decorators often use recipes that can be out of the fridge for quite a while. I used cream cheese frosting which is highly perishable and should not be left out for hours on end. If you are concerned a whipped ganache made by boiling cream and adding to white chocolate is a safe fall back.

- Where are your flowers from? The flowers in my garden are pesticide free because I am too lazy to spray them. If you're not sure if the ones you source are edible or if they have been sprayed be careful about placing them on the cake, You might want to make a barrier of parchment paper. Also it should go without saying, but....never ever ever use poisonous flowers.


- Will my frosting hold up the weight of the cake? I used a light sponge, if you are using a heavier cake you might want to use a frosting that will hold up better (ie whipped ganache or a sturdy buttercream).

- How high do you want the cake? If you are making a tiered cake you will need internal dowels and cake boards otherwise you will have a leaning tower of cake.  It will cost you way more than $10 and you may say some curse words like shoot and fudge if you're not used to making cakes. Same goes for a single tier but very tall cake.

- What type of cake stand should I use? Once again my cake was pretty light so I used a pretty 10" mint cake stand and it was able to hold up the weight. If you cake has a number of layers and is very heavy this type of stand may not hold the weight.


- Do you want a rustic look or a semi-naked finish? The cake I have pictured is very, very rustic. If you like a neater finish you should use a spatula to run around the frosting and make it even with the edges of the cake. For a semi-naked finish you will need some cake scrappers or similar to spread a thin patchy layer of frosting around the edge of the cake.

- Hey I don't like the brown edges on the cake can I cut them off? Of course you can, it's your cake, but it will be a crumby mess to do this and will take way longer than you think it will. Plus the cake will dry out faster. On the plus side it looks pretty.

- Do you want any other decorations? I love the trend of glittery or wooden signs on top of rustic cakes at the moment, or bunting can be cute as well.


Simple guide for Naked Cake
I purchased a store made cake, however you can make your own from scratch or use a packet mix. Use edible pesticide free flowers. If you are selling your cakes make sure you follow your local food and safety standards.

2 layer white cake (I picked up a sponge cake from Drakes/IGA on sale for $1.69)
Raspberry Jam  (optional)
Frosting (recipe below)
Edible pesticide free flowers, fruit, chocolates, macarons or herbs for decorating
Icing sugar (powdered sugar)

Cut each cake into half so you end up with 4 cake layers. If any of the cakes have a domed top trim it off to make the cakes flatter.

Spread 3 layers generously with jam if you are using it and leave one free of jam. The jam free layer will be the top/final layer.

Place the first jam topped layer on your cake stand or cake board and top with a thick layer of frosting and then place the second layer of cake onto the top of the first layer and gently press into place. Make sure the second layer of cake evenly centered. Spread a layer of frosting onto the top of the second layer do not press down very hard. Pop the 3rd layer of cake onto the top of the cake and then place the cake into fridge to chill for about 10 minutes.


Remove the cake from the fridge spread on another layer of frosting and top with the final layer of cake.

Place in the fridge to allow the frosting to set a little for 10 minutes and then remove from fridge and spread on the final layer of frosting.

Decorate with fresh flowers, fruit and herbs. Use a sieve or tea strainer to dust with a little icing sugar (powder sugar).

I find removing the flowers prior to slicing the cake is best.


Peanut Butter Cream Cheese Frosting

115 g (4oz) unsalted butter at room temperature
115g (4oz) cream cheese (full fat)
1/2 cup smooth peanut butter
2 cups icing sugar mixture (powdered sugar) sifted

Mix together all ingredients until light and fluffy.


Linda Vandermeer is a blogger, baker, maker and author of the Children's cookbook Sweets on a Stick: More Than 150 Kid-Friendly Recipes for Cakes, Candies, Cookies, and Pies on the Go! Published in the USA in 2011 the book is still available at Amazon and many online bookstores.

Affililate links may earn me money and contribute to supporting this blog.

Original ideas, photography and recipes Linda Vandermeer please do not reuse without permission.


Thursday, July 2, 2015

Perfect soft boiled eggs


What is the secret to a perfect soft boiled egg? I find that most recipes are a bit out of date now that we mostly use extra large eggs to eat rather than the old standard of large.

I get the eggs out of the fridge for a few minutes and then bring the water to a gentle simmer (low boil), add the extra large eggs using a large spoon to gently drop the to the bottom of the saucepan and cook for just 5 minutes. Then remove drain away the hot water and run under cold water for a minute to stop the cooking.


Of course everything always tastes better when it's served on something pretty and at the moment we are using Greengate stoneware range for breakfast with glasses from Daiso the discount store.


We love to mix and match the egg cups, I find the Greengate range seems to work well and I can use my older Lulu Mint egg cups with the Summer White plates. My new favourite Simone White latte cup looks perfect in the mix.

If you have a better way to cook eggs be sure to let me know.


Stockists
Plates and Egg Cups - Greengate from Simply Sweet Home
Glass - Only $2.80 each from Daiso discount stores


Linda Vandermeer is a blogger, baker, maker and author of the Children's cookbook Sweets on a Stick: More Than 150 Kid-Friendly Recipes for Cakes, Candies, Cookies, and Pies on the Go! Published in the USA in 2011 the book is still available at Amazon and many online bookstores.

Affililate links may earn me money and contribute to supporting this blog.

The owner of Simply Sweet Home is my SIL.

Original ideas, photography and recipes Linda Vandermeer please do not reuse without permission.

Monday, June 29, 2015

Golden Things Cupcakes with Nutella Dream Frosting


This Nutella frosting is so dreamy I might have eaten a spoonful or two while decorating the cupcakes.

Also I was kinda happy when there were a few of the bark shards leftover and I had no other option but to eat all of them. Everyone knows unevenly decorated cupcakes are just a fight waiting to happen.

I made them with Lindt milk chocolate and they were so good you could serve them as they are.

Which is what makes these cupcakes so good, every element by itself is delicious so putting it together comes up with a super delicious treat.

I've had these in mind since I made my Chocolate Peanut Layer Extravaganza Cake and when I was at the supermarket I saw Ferrero Rocher chocolates were on sale. It was totally a sign.


And because Ferrero Rocher's are wrapped in golden paper I wanted to make the cupcakes gold. I used Robert Gordon gold cupcake cases and edible gold which always add a bit of fabulousness to any cupcake.

Also just so you know, it seems I can not be trusted with edible gold as once I get it out I put it on everything. It's just sooooo pretty I can't help myself.

I made a few without the golden cases and Ferrero Rocher chocolates and they were delicious as well pretty much because....yup Nutella dream frosting :)


I've included the full recipe below exactly as I made it, but like I always say do what makes you happy. If you want to use a packet mix for the cupcakes to save time and then just make up the Nutella Dream Frosting go ahead. If Ferrero Rocher chocolates are not on sale, skip them and if you prefer a different brand of chocolate, who am I to tell you different.

Happy Baking


Some Stockists (many online stores and baking specialty shops stock these items)

United States of America


Australia - Baking Pleasures stocks edible gold leaf and Ateco piping tips
Robert Gordon baking cases are available at many kitchen and homeware stores or online
23k Edible Gold (25 sheets/Transfer Type) 23k Edible Gold (25 sheets/Transfer Type)


Golden Things Cupcakes with Nutella Dream Frosting (makes 18 cupcakes)
I've used edible gold which is available from specialty stores see end of post for some places you can buy it. It is completely optional.

18 Chocolate Cupcakes (recipe below)
1 batch Nutella Dream Frosting (recipe below)
Almond Bark (recipe below)
18 Ferrero Rocher Chocolates unwrapped (optional decorated with a little edible gold leaf)

Place a large star tip onto a piping bag (I uses Wilton # ) and fill half full with the Nutella Dream Frosting. Start piping on the left outside of the cupcake and pipe a circle around the outside edge, when you reach the start move the piping inwards to pipe a smaller circle. You should apply consistent pressure to the piping bag and when you reach the top gently release the pressure as you pull up.

Press in 2 shards of almond bark into the frosting with the widest edge along the bottom in the back half of the cupcake frosting.

Press a Ferrero Rocher chocolate into the front of the cupcake.

Can be stored in an airtight container for up to 3 days in the fridge. Remove container from fridge and allow to come to room temperature for 30 minutes prior to serving.


Almond Bark Shards with Edible Gold
It is very important to always make sure your bowl and spoon are completely dry when working with chocolate. I have used Lindt milk chocolate as it is what I have, but you can use any chocolate you would be happy to eat including dark or bittersweet.

200 g (7 oz) Lindt milk chocolate cut into small pieces
80 g (2 3/4 oz) slivered almond (blanched almonds cut into strips)
Edible gold leaf (optional)

Line a tray with baking/ parchment paper.

Melt the chocolate in the microwave at medium low heat for 2 minutes. Allow to stand for a minute stir until all lumps have melted. If required return to the microwave for 30 seconds at medium low stand for 1 minute and then stir (repeat this step as required).

Pour the almond into the bowl and mix until it is completely coated with chocolate.

Spread the chocolate almond mixture onto the paper lined tray and allow to set to room temperature. Remove the paper and chocolate from tray onto a cutting board and cut the chocolate into irregular shards.

Optional - press gold leaf transfer sheet onto the chocolate with edible gold side down touching the chocolate. The heat from your finger should be enough to melt it a bit so it adheres, if not you can brush a tiny amount of water onto the chocolate so the gold adheres.

Store in an airtight container until required, up to 2 weeks.

The edible gold pictured is on a transfer sheet. Some edible gold comes loose. 
That's ok for this type of use.

Chocolate Cupcakes
1 1/2 cups plain flour (all purpose)
1 tsp bicarbonate soda (baking soda)
1/4 tsp baking powder
pinch salt
1/2 cup cocoa powder
1/2 cup hot water
1/2 cup cool water
115 g (4oz) unsalted butter at room temperature cut into small cubes
1 1/4 cup caster sugar (superfine sugar) use regular white sugar if caster not available
2 eggs
1 tsp vanilla extract

Preheat oven to 160 C (325 F) fan forced and place 18 cupcake cases into muffin tins,

Mix the hot water and cocoa together to make a paste then add the cool water and mix until well combined, set aside until required.

Sift together flour, bicarb soda (baking soda), baking powder and salt and set aside until required.

In the bowl of a stand mixer cream together butter and sugar at high speed until light and fluffy (about 2 -3 minutes).

Reduce speed to low and mix in eggs and vanilla, mix until well combined.

Add 1/3 of the flour mixture and mix at low speed until just combined. Add 1/2 the cocoa paste mixture and mix again until combined scrapping down sides of bowl as required. Add another 1/3rd of the flour mixture, mix, add the remainder of the cocoa mix continue to mix and then add the final batch of flour. Scrape down sides and mix at low speed until just combined.

Scoop mixture into cupcake cases until 2/3 full and bake for 18-20 minutes or until a skewer inserted into the cupcake comes out clean.

Remove from oven, take cupcakes out of tray and cool on a wire rack.

Nutella Dream Frosting

200 g (7 oz) unsalted butter at room temperature
2 cups icing sugar
2 Tbsp (US 2 Tbsp plus 2 tsp) cocoa powder
1 tsp vanilla extract
200 g (7 oz) Nutella

Place butter and icing sugar into a large bowl and mix at high speed until light and fluffy. Add vanilla and continue to mix at low speed until combined, then add the cocoa and mix. Add the Nutella at low speed until combined then increase to high speed and mix for 3 minutes until the mixture is light and creamy.


Linda Vandermeer is a blogger, baker, maker and author of the children's cookbook Sweets on a Stick: More Than 150 Kid-Friendly Recipes for Cakes, Candies, Cookies, and Pies on the Go! Published in the US the book is still available at Amazon and some online bookstores.

Affiliate links may earn me money and contribute to supporting this blog.

Original ideas, photography and recipes by Linda Vandermeer please do not reuse without permission.