Sunday, November 13, 2011

Snowman nesting doll Christmas cookies


One of my favorite cookies ever is the babushka doll (nesting doll) which I first posted on this blog about a year ago here and then an even prettier version earlier this year HERE. After I posted tutorial instructions one of my lovely readers Jody emailed me a picture of a set of Santa nesting dolls suggesting they would make a great set of cookies to which I totally agreed and ever since I have had it in the back of my mind to do just that.

So when I was thinking of ideas for the Christmas Cookie swap I was part of,  Santa nesting doll cookies was one of the first things I thought of. But I needed to make a set and so this snowman was the second thing that popped into my head.

Snowman cookies are nothing new, but this version with the nesting doll cookies is cool as you can easily make a family, and once I post the instructions for a couple of the other cookies in the set you can make quite a few Christmas themed cookies using the one basic shape.

Plus anything that uses nesting doll cookie cutters is just really neat!

If you don't have a set of nesting doll cookie cutters, you could follow these instructions and use a regular ole' snowman cookie cutter and they would look just as cute. Well almost.


Over here in Australian I got my nesting doll cookie cutters from Bisk-art HERE

In the US I have noticed them at Fancy Flours and Ecrandal have a super pretty copper 5 set.

Snowman nesting doll cookies
These instructions use the medium nesting cookie cutter, follow the exact same instructions for small or large nesting doll cutter.

Sugar cookies made using medium nesting doll cookie cutter
white rolled fondant shop bought or home made marshmallow fondant
colored rolled fondant any colors (or home made marshmallow fondant)
small amount of orange rolled fondant (or home made marshmallow fondant)
black edible writing pen
small rolling pin
nesting doll cookie cutters
small sharp knife

clean brush and water

Roll out the white fondant onto a clean benchtop dusted with cornflour/ cornstarch. until a couple of mm (1/8") in thickness. I like to lift my fondant frequently and turn it like pie dough to ensure it does now stick to the bench while rolling it out.


Use the nesting doll cookie cutter to cut out a shape. Lightly brush a cookie with water and place the fondant over the cookie, using the rolling pin lightly press down to adhere the fondant to the cookie.


Repeat with remaining cookies.

Roll out a small amount of the colored fondant on a cornflour/ cornstach dusted workbench until a couple of mm (1/8") in thickness and using the nesting doll cutter cut out the head, then using the side of the nesting doll cutter where it curves at the shoulder section press down about .5cm from the top of the head to make a little beanie/ hat. You can make the hat bigger or larger as you like. Adhere the hat to the snowman cookie as shown in the picture using a very small amount of water and pressing down lightly with the rolling pin as needed.


Still using the curved side of the rolling pin, press in down lightly about 1mm from the bottom curved edge of the hat to make a small decorative indent. If you like you can use the square corner edge of the cookie cutter to make more decorative indents in the hat to look like knitting. If you like you can roll a small ball of white fondant and adhere it to the top of the hat to look like a little pom pom.


Repeat for remaining cookies.

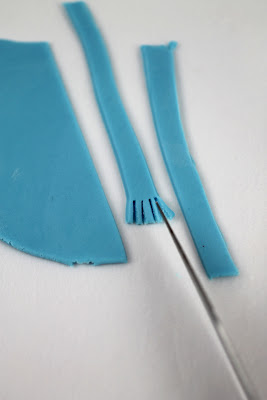
Make the scarf by rolling out some more of the fondant and using the sharp knife cut out 2 strips around .5cm wide and 3-4cm long. At one end using the sharp knife to cut a fringe around .5cm long with about 4 to 5 pieces as per the picture.

Using a small amount of water adhere the scarf pieces around the neck of the snowman.and cut any overhang at the neck off using the sharp knife.


Shape a small nose using the orange fondant and adhere to the middle of the face with a very small amount of water.


Allow the fondant on the snowman to dry a couple of hours and then using the edible pen draw on 2 eyes and 5 dots for the mouth. I find starting with the center dot and working my way out makes for a more even smile.
 
Now for some great news (well for me anyway) it seems some of the online book shop warehouses have started receiving my book and have emailed people on the waiting lists to say the book is on its way soon. I had a few copies delivered during the week and I'm so happy with how it turned out. Remember it's a US release book and the weights and measurements are written accordingly although there is a conversion chart in the back of the book. It's available lots of places, here is a link to Amazon:

Thursday, November 10, 2011

A Christmas Cookie Swap 2011

Cookie by hello naomi 

I've never dreamed of a white Christmas, but many a time I have watched online as others have shared photo's of fabulous Christmas Cookies that they have swapped and hoped one day I might be participating in something similar.

Well this year my cookie dreams came true and I had the great pleasure of joining in a Christmas Cookie Swap with a group of talented Australian Cookie Decorators.

Cookies by hello naomi

The swap resembled a secret Santa whereby each decorator was provided with a name of one other person and it was their task to decorate a small batch of cookies and send them off. The guidelines were pretty simple, mostly that the cookies were all to be posted off on the same agreed date, that the cookies should be some type of Christmas theme of around 4 to 6 cookies and that no one should reveal the name of their swappee or any pictures until everyone had received their cookies.

Jordan from Polkadot Prints helped us out with some of the administration and drew out the swappee names and emailed out the addresses. Super Big Thanks to Jordan - she is such a good sport.

and my secret cookie sender turned out to be none other than the awesomely talented and sweet Naomi from hello naomi. I have been a fan of Naomi's clean simple style for many years and it was a treat to receive her package which consisted of a forest of elegant white Christmas trees and a super sweet and pretty garland of mini cookies in muted pink and green.

and I secretly sent my cookies to Kate, from Kiss me Kate. I made a set of 5 Christmas themed cookies using my babushka (nesting doll) cookie cutters.

How did I come up with such an awesome idea you might ask....well last year after I did up my babushka cookie tutorial a lovely lady called Jody emailed me with a picture of a set of Santa nesting dolls suggesting it would make a good cookie and ever since it has been in the back of my mind. I just came up with the rest to match.

I'll be doing up a tutorial for at least a couple of these cookies here on the blog soon.

Thank you to everyone who participated in this cookie swap, you were all such good sports. Here is the list of lovely decorators who joined in:

I don't have photo's of everyone's cookies yet but here are some that I managed to grab, photo and cookie credits under each photo:

Cookies and Photo by Jacki at Blissfully Sweet (cookies sent to Kylie at Three Honeybees)

Photo by Jacki at Blissfully Sweet, cookies by Noo at Dessert Menu Please

photo by hello naomi, cookie by Kiss me Kate

if you pop over HERE to flickr you will be able to see some of Kylie from Three Honey Bees pretty Christmas cookies as well.

and you'll be happy to know that the cookies I received from Naomi tasted even better than they looked. Thanks to everyone for joining in the preChristmas fun.

Cookie by Naomi at hello naomi - YUMmmmmm

Sunday, November 6, 2011

Happy Rainbow cloud cake pops


OK - I'm just gonna say it - these are pretty much the cutest pops I have made.

Rainbows + clouds with smiley faces = too cute for words....well I think so anyway.

Actually come to think of it they also look super cute without any faces as well - so I guess maybe edible+cloud+rainbows X on a stick = cute.
.

And you know what would be even cuter, it's ok I've stopped with the weird maths.

But there would be even more cuteness if they were rainbow inside. I didn't think of it for these trial ones, they are just white tim tam truffle cookie pops. But after I remembered I have a receipe in my book for a type of fun-fetti multi colored sprinkle cake pop which would look totally and completely rainbowlicious awesome.

 This cloud pop is not so happy, in fact he looks downright sad. 
This must be how rain happens :(


Oh and best news ever, my publisher just told me that they have received copies of the book, that it looks great and next week in will be in the warehouse and a few will be sent to me. Then they will be sending them out from the warehouse to the distributors and then I kinda lost track of what happens in the excitement........ but it should be out in the stores in the US and online in around a month..


I know YAY!

These particular pops are not in the book. But I use this technique in the instruction of stacks of other cute shaped pops.

OK I have to interrupt now before the instructions (and not to let everyone know that the above statement may or may not be true in regards to how rain occurs). Have you ever noticed how most of the pops in the blog pictures are Tim Tam or Oreo truffle pops - no you haven't - well I feel like I have to explain cause in real life I do make other types of cake pops, I promise.

The cookie ones are just faster - when I come up with a new cake pop idea I want to make it NOW - so I have packets of biscuits and cookies sitting around ready to go at any time. You know for cake pop decorating emergencies, it happens all the time around here.


Happy Rainbow cloud cake pops
You will need to make the fondant rainbows at least one day ahead to allow time to set. Alternatively you can leave the rainbows off and just have cloud pops.

1 batch cake or cookie pop mixture
Candy Coating (like Wilton candy melts) and copha or paramount crystals
Fondant (in rainbow colors)
Edible black pen
pink edible petal dust and brush
sharp knife
cornflour/ cornstarch
small rolling pin
water and brush
lollipop sticks
small cloud cutter (you can make a cloud cutter by taking a tin blossom (flower) cutter and squeezing the top on bottom together a little)


At least one day prior to making pops make the fondant rainbows.Dust a bench lightly with cornflour/ cornstarch roll out some purple fondant and using a sharpe knife (or cutter if you have one) cut out the shape of a rainbow half arc.

Roll out the remaining rainbow colors and cut into thin strips. Attach one strip of each color to the purple arc using a very small amount of water brushed on and then using the rolling pin gently press the colored fondant strips onto the base. Use a sharp knife to trim off any excess colored pieces to make a neat rainbow arc.

Day 2
Line a tray with parchment paper and place the cloud cutter ontop of the paper lined tray. Take a few teaspoons of the cake pop mixture and press it into the cloud cutter pressing down firmly until it is evenly packed in, turn it over to check that there are no gaps underneath. Use your fingers to gently press the mixture out of the cutter so it remains on the lined tray. Repeat with the remaining mixture.


Place in fridge to chill until firm.

Melt up a bag of white melts/ candy coating. Mix in quite a bit of copha or paramount crystals - now is not the time to be stingy you need a stack about a ratio of 1:7 for the Wilton brand to give an example (1 being the copha and 7 being the chocolate/candy melts).

I melt my chocolate in the microwave on medium low, medium is too hot and high is way too hot. If you heat your chocolate at too high a temperature it will burn and not be salvageable for dipping .Remember medium/low for short bursts of 60 to 90 seconds.

Grab a bunch of lollipop sticks. Holding one end of the stick dip the other end into the melted chocolate/candy coating and insert it into a cloud cake pop shape so the stick is sitting in the bottom side of the cloud and the stick is parallel to the tray (see picture). Repeat for remaining clouds and then pop into the fridge to chill for 10 minutes or so until the sticks are secure.


Line a fresh tray with parchment paper and place the fondant rainbows on the tray with the rainbow side facing up.

Make sure the chocolate/candy coating is still melted. Holding the end of the stick dip the whole cloud cake pop into the melted chocolate/candy coating. Lift it up and allow as much of the candy/chocolate mixture to fall off as possible. tap gently on the side of the bowl if necessary. Before the chocolate/candy coating has a chance to set place it ontop of one of the rainbows on the tray  so that the rainbow arc is sticking out the side (see picture). Repeat with remaining mixture and allow to set still laying down on the tray.


Once set use the edible pen to carefully draw on a cute face. If you have pink petal dust you can use a brush to brush tiny little pink circles for the cheeks. Use a dry brush to wipe away any excess dust.


Updates

I used Wilton White Candy Melts for these pops
The edible pens are available in Australia at Cakes around Town and Baking Pleasures online (and lots of other places) I prefer Americolor brand
Recipe for Tim Tam pop here:http://bubbleandsweet.blogspot.com/2010/11/lolli-cake-pops-tutorial-and-cake-pop.html