Showing posts with label biscuit. Show all posts

Monday, October 24, 2022

Raspberry Heart Linzer cookies


One of the things about owning a cafe was I rarely found enough time to blog or develop new recipes. Once customers found something they liked, I would be churning out the same cookies day after day. I can't call it a problem though as these Linzer cookies were always super popular and often sold out.

The cookies are lovely, buttery but still manage to be light with a hint of vanilla and cinnamon and once filled are not overly sweet and the perfect treat to have with afternoon coffee or tea. 

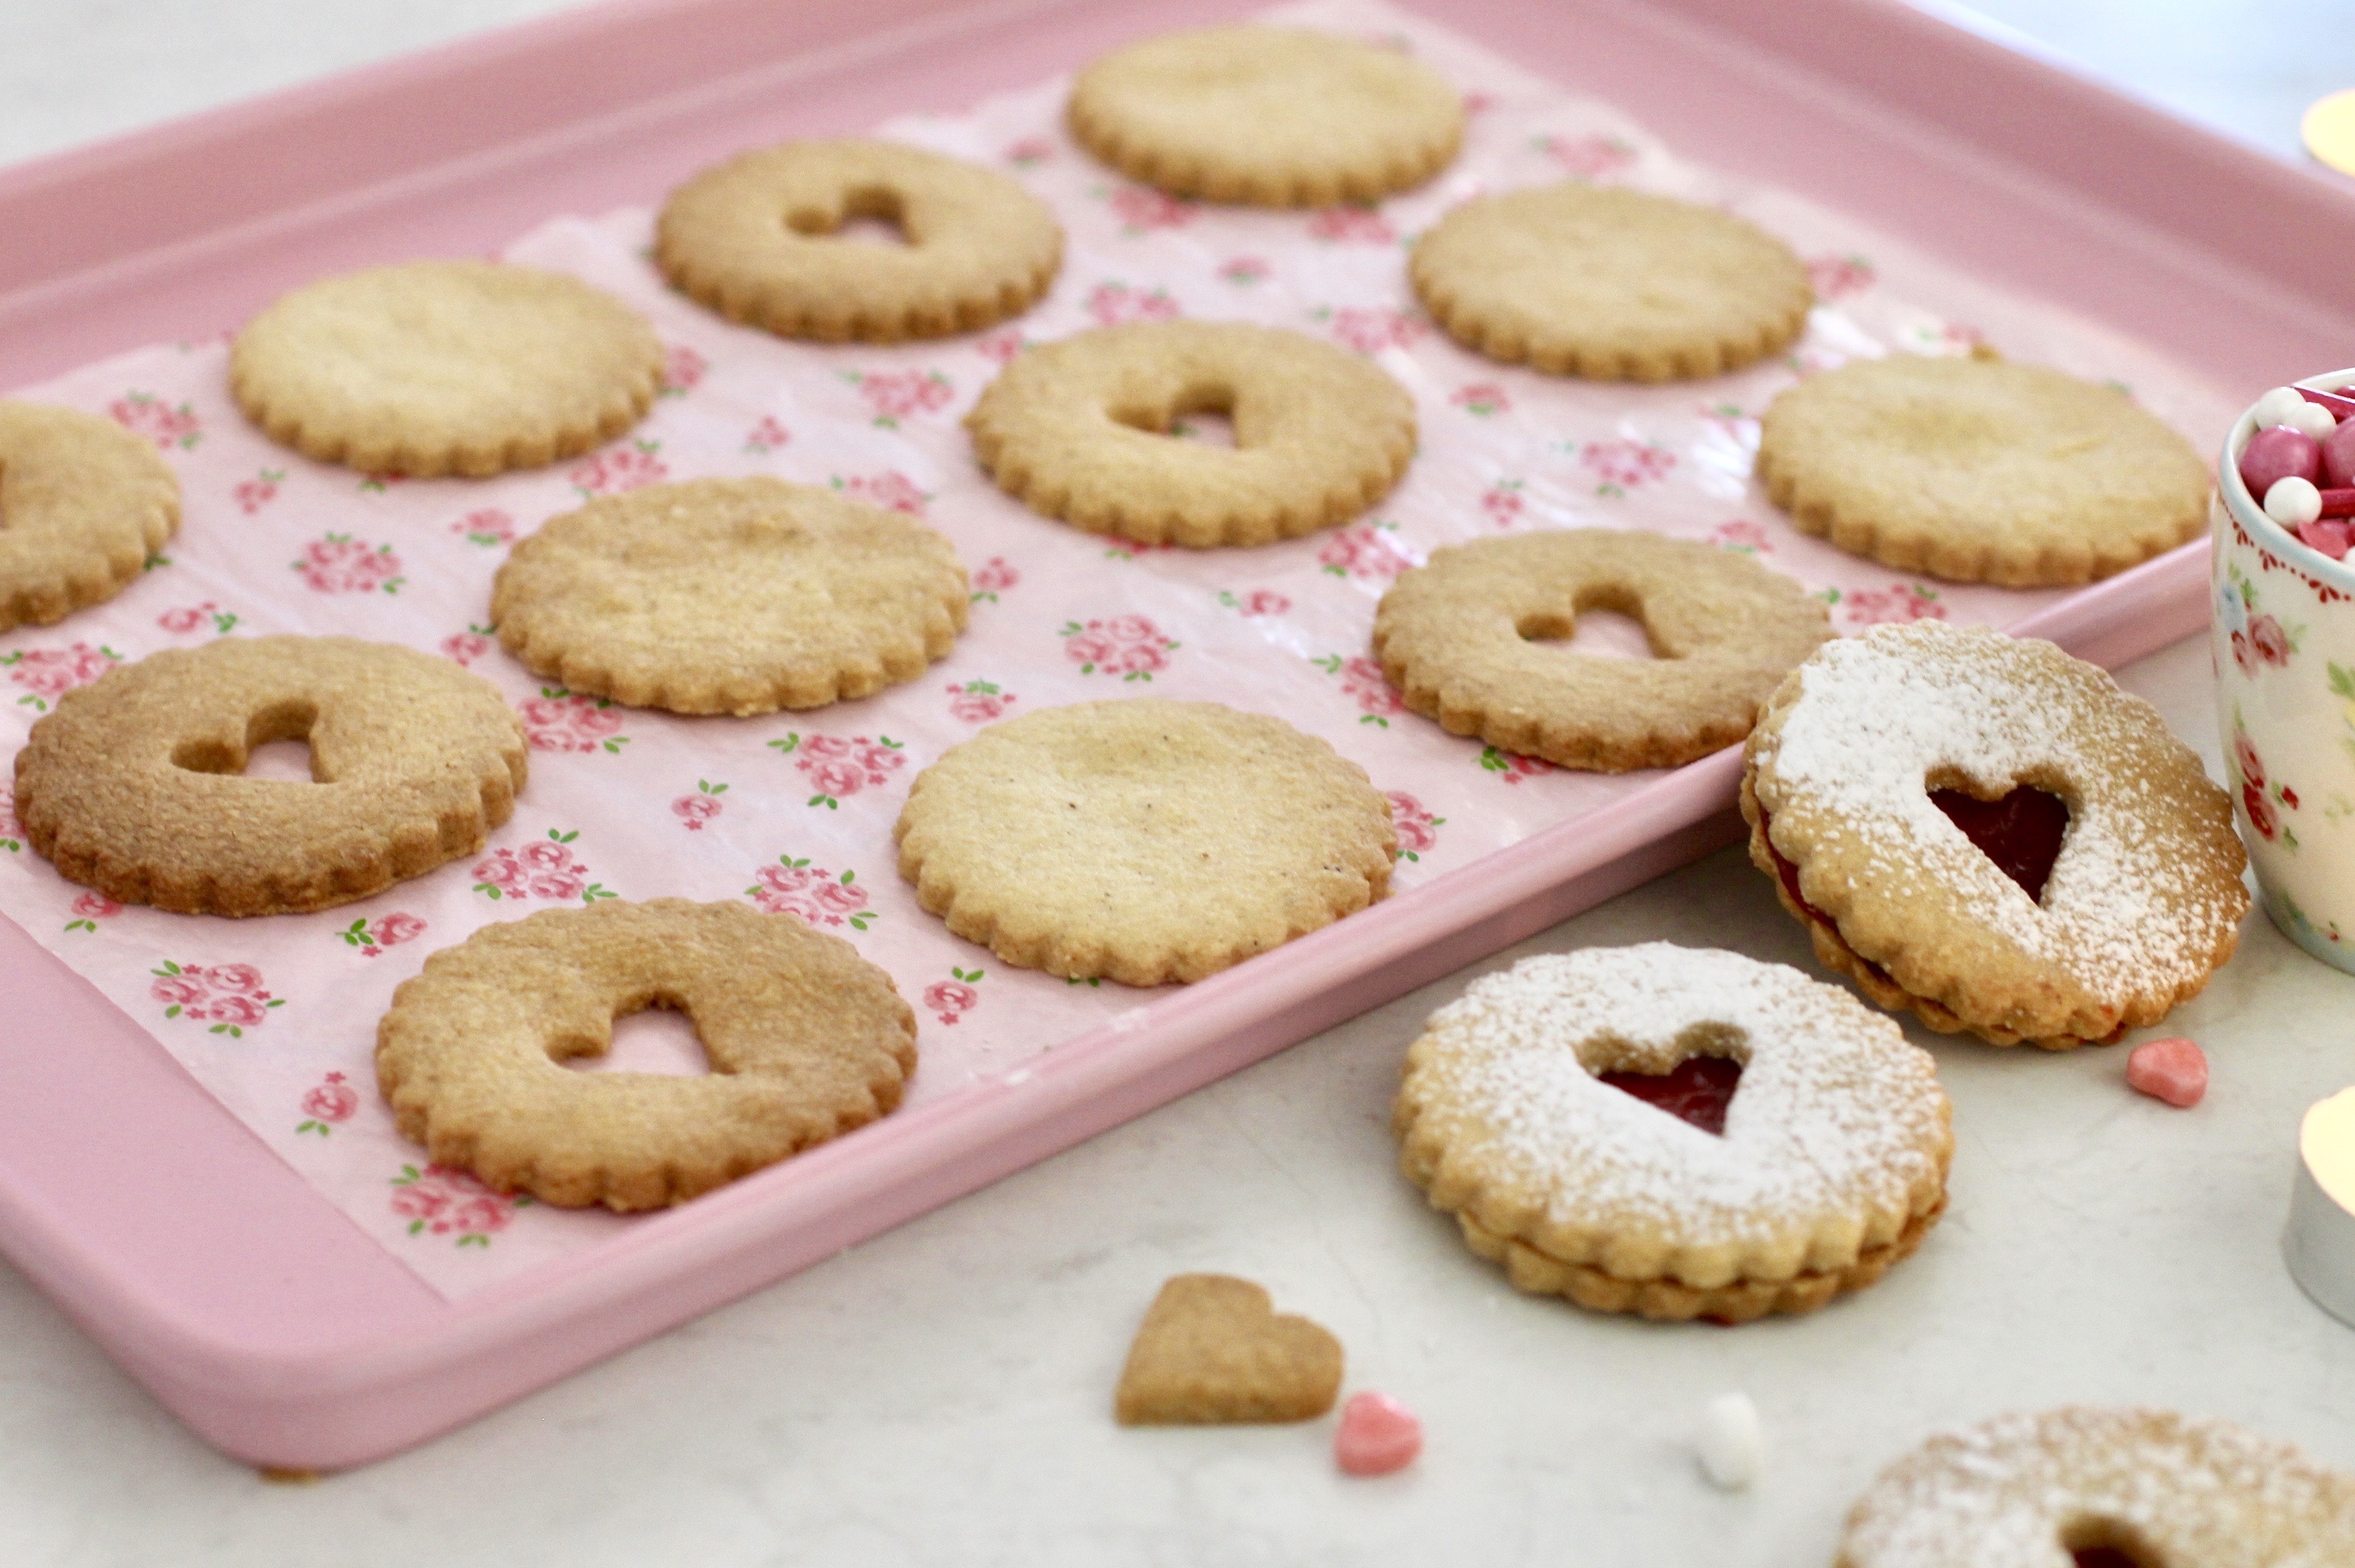
At the cafe they were filled with raspberry jam or lemon curd (raspberry was the biggest seller) and at Christmas we would change the heart cut out to a mini Christmas tree.

The cookie recipe calls for Almond Meal which is simply ground almonds. I actually often buy my almond meal from Costco and find it to be of good quality, I prefer the one with the skins removed but if you can only find ground almond still with their skin on the recipe would still work.


If you like you can freeze the dough in smaller batches before baking if you like, although I did scale my recipe back for you to make a smaller batch than I normally would.

The cookies can be stored for a few days, but I find them best if stored without the jam filling and then filled not long before you plan on eating them.

*I usually pop the unused egg whites into a ziplock bag in the freezer to use later to make meringue or macarons.

The dough is quite buttery so make sure you use the kitchen bench and rolling pin well with flour. I use an offset metal spatula to lift the cookies onto my baking tray.


I hope you enjoy these as much as my family and friends do.

xx

Linda

Linzer Cookie Recipe makes 16-18 double cookies filled with jam (7cm or 2 3/4")

170g unsalted butter (6oz) 1 1/2 sticks

100g caster sugar (3 1/2 oz)

1tsp vanilla extract

1/2 tsp ground cinnamon 

1 egg yolk

160g plain flour (5 5/8 oz)

75g ground almond meal (2 5/8 oz)

pinch salt

To finish

around 1/2 cup raspberry jam 

icing sugar (powdered sugar) for dusting 

Mix butter, sugar, vanilla and cinnamon on low until combined with an electric mixer (I use a stand mixer) then increase speed to high and cream until light and fluffy.

reduce speed of mixer to medium low and mix in egg yolk until combined. Scrap down the sides with a spatula as needed.

At low speed mix in the flour, almond meal and salt and mix until combined.

Put some plastic wrap on the counter, tip the cookie dough onto the plastic, wrap securely and pop in the refrigerator until it's firm enough to work with. 


Dust counter and rolling pin with flour, cut away 1/4 of the dough and roll out until 1/4 inch thick. Cut out circles and place on baking tray. 

Try cutters like this from Amazon (link to product)

On half of the circles cut out/remove a smaller heart shape in the centre as per the picture.

Bake at 160 C for 12-15 mins or until just turning golden. Allow to cool on trays.

Split the cooked and cooled cookies into 2 lots, the whole round cookies and the cookies with hearts cut out. Using a sieve, dust icing sugar (powdered sugar) onto the heart cut out cookies.


Place the whole circle cookies so the bottoms are facing up (the side that was on the bottom during cooking). Heat the jam in the microwave and then spoon 1/2 to 1 tsp jam on each round cookie and spread almost to the edge with a knife or spatula. Press the sugar dusted heart cookie on top of the jam.

Store in an airtight container for up to 3 days.


Sunday, March 27, 2016

Bunny Love cookies


Ooops is it Easter already and I haven't shared any of the cookies and projects I made up.

Luckily I did take some photo's of these cookies even if I didn't do the process shots because they're pretty cute.


Sweet floral pastel bunnies. I mean really how could you go wrong.

The flowers are teensy little fondant ones with royal icing centers and they each have an edible soft gold ball (from Queen) and then I decorated them with a few royal icing leaves.

I served them with some water color cookies in matching pastel hues (CLICK HERE for last week's post).


Linda Vandermeer is a blogger, baker, maker and author of the Children's cookbook Sweets on a Stick: More Than 150 Kid-Friendly Recipes for Cakes, Candies, Cookies, and Pies on the Go! Published in the USA in 2011 the book is still available at Amazon and many online bookstores.

Affiliate links may earn me money and contribute to supporting this blog.

Original ideas, photography and recipes Linda Vandermeer please do not reuse without permission except for non commercial purposes where you may use 1 image, give credit and link back to original post.


Saturday, March 19, 2016

I love bunny cookies or how to make squiggly cookies


Oh my it's nearly Easter!

How did that happen so fast. I know I've moved house and been keeping busy trying to keep the kids lives as normal as possible with all the changes but seriously......... Easter that's like quarter of the way through the year.

If you're as bewildered as I am these simple bunny cookies might make you happy.

They are modern, easy and fun.


My son, The Destroyer, loves this type of hand painted cookie, he calls them the squiggly ones.

I admit I have a soft spot for them too and have been using them as filler cookies for other sets quite a bit lately. They are even lovelier if you happen to have some edible gold on hand.

I didn't have a chance to make up instructions for the bunny cookies but I have in the past made sweet deer cookies and the process is exactly the same.

CLICK HERE for the link to my post showing how to decorate them yourself.

See below for my cookie recipe.


Happy Baking


Shop the shoot Guide


Confetti Paper Plates from Bash Party Goods (mine purchased at Lark)
Purple spot chalkboard cards part of set from Kmart
Washi tape from Kmart
Purple Marshmallow Puffs - Big Lolly Australia


Sugar Cookie Recipe (makes 24 regular cookies or 60 small)

460 grams plain flour (16 1/4 oz all purpose flour)
1/4 tsp baking powder
1/4 tsp salt
230 grams unsalted butter (8 1/8oz)room temperature
220 grams caster sugar (7 3/4 oz superfine sugar)# 
1 large egg
1 tsp vanilla extract
#use regular white sugar if you do not have caster/ superfine sugar

Sift together flour, baking powder and salt.

Cream butter and sugar in a large bowl using an electric mixer until light and fluffy. Reduce the speed to medium low, add the egg and vanilla and mix until combined. Reduce mixer speed to low and mix in the sifted flour mixture until combined. Wrap the dough in plastic and chill in fridge for 30 minutes or so.

Line a few baking trays with parchment/ baking paper.

Dust workbench with plain flour and using a large rolling pin roll out the dough until around 1/2 cm (1/4") in thickness. If the dough is to hard you may need to work/knead it a bit until you can roll it out.

Cut out cookies shapes and place the cookies on the prepared trays. (Knead and reroll dough as necessary, if it becomes to soft you can pop it back in the fridge.)

Pop the cut cookie dough trays into the fridge to chill again for around 30 minutes until firm (or in the freezer for 10 minutes).

Preheat oven to 160 C (320 F) and cook the cookies until they just start to turn golden, around 15 minutes (less or more depending on cookie size).

Cool on trays for 5 minutes and then carefully lift onto a wire rack to cool completely prior to decorating.

- Cookies can be stored in an airtight container for 1 week.


Hopefully I'll hop too it and type up some instructions for these Bunny Love cookies soon Xx


Linda Vandermeer is a blogger, baker, maker and author of the Children's cookbook Sweets on a Stick: More Than 150 Kid-Friendly Recipes for Cakes, Candies, Cookies, and Pies on the Go! Published in the USA in 2011 the book is still available at Amazon and many online bookstores.

Affiliate links may earn me money and contribute to supporting this blog.

Original ideas, photography and recipes Linda Vandermeer please do not reuse without permission except for non commercial purposes where you may use 1 image, give credit and link back to original post.

Monday, June 15, 2015

Gluten Free Chocolate Chocolate Cookies


Shhhh, don't tell anyone. They will never ever know these chocolate, chocolate chip cookies are gluten free and celiac friendly.

Ok then tell your friends that are gluten intolerant, in fact share this gluten free recipe all around because it's a keeper, the cookies are soft and filled with chocolate chips and chunks and they stay soft for a couple of days.


Eating gluten free is a necessary way of life for many people and luckily these days there are quite a few options available in the supermarket to help out.

If you do a lot of gluten free baking you will probably already know that there are some things you need to put into your flour to give it a bit of help. I find it can be expensive to have a pantry full of stuff like guar gum and tapioca starch for the occasional cookie or biscuit I make.

So I buy a gluten free flour that already has those things added. The one I use at the moment is Orgran as I have found it to be a good all purpose flour but if you make your own or have another brand you like just substitute that in my recipe.


If you are living a gluten free life I hope you enjoy these cookies, they can be frozen and kept for a few months after baking.

For more gluten free options check out my recipe for macarons (CLICK HERE) which are also gluten free and super delicious.

Happy Baking


Gluten Free Chocolate Chocolate Chip Cookies Recipe Makes around 16 cookies
Do not be tempted to over bake the cookies they will continue to bake and harden as they cool.

260g (9 1/4 oz) Orgran All Purpose Flour
30g (1 oz) cocoa powder
1 tsp baking powder (make sure it's gluten free)
115g (4oz) unsalted butter
60g (2oz) cream cheese
115g (4oz) brown sugar
60g (20oz) white sugar
1 tsp vanilla extract
1 large egg
1 1/4 cups chocolate chips (I used dark bittersweet)
Optional 1/4 cup extra chocolate chunks to press into top

Preheat oven to 160C (320 F ) and line 2 trays with baking paper.

Sift together flour, cocoa and baking powder and set aside until required.

Place butter, cream cheese, brown sugar and white sugar in a large bowl and mix at low speed until combined. Increase speed to high and mix for 2 to 3 minutes until the mixture is well creamed and lightened in color.

Reduce mixer speed to low, add vanilla and egg and mix until combined.

Add the flour mixture and mix until just combined then add the chocolate chips mixing until the chips are distributed evenly.

Place approx 2 Tbsp mounds of cookie dough onto the prepared baking trays leaving. Flatten the cookie dough slightly. If you would like to add extra chocolate chunks to the cookie press a few into the top of each cookie at this stage.

Bake in preheated oven for 12 minutes, the cookies should still be soft to touch, but don't worry they should be fine.

Remove from oven and allow to cool on tray.

Keep in an airtight container for up to 2 days. Cookies can be frozen wrapped separately in plastic wrap and placed in an airtight container in the freezer for up to 2 months.


Linda Vandermeer is a blogger, baker, maker and author of the children's cookbook Sweets on a Stick: More Than 150 Kid-Friendly Recipes for Cakes, Candies, Cookies, and Pies on the Go! Published in the US the book is still available at Amazon and some online bookstores.

Affiliate links may earn me money and contribute to supporting this blog.

Original ideas, photography and recipes by Linda Vandermeer please do not reuse without permission.